智云ERP

智云ERP是由OSCG面向广大小微型企业所研发的云端ERP系统,它是目前全球增长速度最快的企业系统odoo (OpenERP) 衍生出的最新产品。智云ERP提供了最便捷安全的系统环境以及配套服务。只需要三分钟,您的企业就能够享用最先进的企业管理软件。

智云ERP包含了所有Odoo的最新模块,如销售管理,采购管理,库存管理,项目管理,财务管理,人力资源管理以及不断更新的OSCG本地化和行业化模块。

  • 享用真正的云端ERP-无需安装,不限用户
    • 快速启用
      • 只需三分钟,就可以享用属于自己的智云ERP
    • 收费合理
      • 打破传统ERP价格昂贵的现状,适合小微型企业
    • 安全可靠
      • 多层加密及备份措施,确保系统数据安全
    • 随时随地使用
      • 只需要浏览器,就可以使用智云ERP
  • 体验专业的ERP服务-多年经验,快速上手
    • 专业的顾问团队
      • 经验丰富的讲师,资源丰富的支持团队
    • 易懂的用户手册
      • 通过实际案例设计的用户手册,用户更易理解和掌握
    • 完整的技术文档
      • 即使普通用户,也能使用ERP高端功能
    • 二次开发服务
      • 提供专业的ERP开发团队,让智云ERP随公司发展而变化

SAP S/4HANA

工業 4.0解決方案及物聯網(IoT)是製造業的業務驅動因素。根據 IDC 的報告顯示,全球的物聯網市場將於 2020 年達到 3.04 兆美元,當中有 30 億台連網裝置。現在經過多年的創新及不斷的發展,物聯網相關的科技更趨成熟,使工業 4.0 的目標更容易實現。

另一方面,「中國製造2025」是一個更廣泛的倡議,力求推動中國製造業的全面升級。而香港製造商可以帶領智能製造,綠色製造的行業發展。香港製造業可以透過應用資訊科技,抓住數碼轉型的機遇。

為了把企業收益增長達到最高,您需要一個能夠降低成本,加速生產週期,減少浪費和再加工,以及加快獲利的解決方案。選用 SAP S/4HANA 於IBM Power Systems,你會體驗到如何透過使用合適平台,在內存數據庫運用實時分析的裨益。

SQLite database management tool

SQLite is the primary database of python. SQLite is a simple and easy to use database. We can also easy to manage SQLite database by using SQLite Studio, which is a freeware and you can download from https://sqlitestudio.pl/index.rvt?act=download.

SQLiteStudio is a SQLite database manager with the following features:

  • Portable – no need to install or uninstall. Just download, unpack and run.
  • Intuitive interface,
  • Powerful, yet light and fast,
  • All SQLite3 and SQLite2 features wrapped within simple GUI,
  • Cross-platform – runs on Windows 9x/2k/XP/2003/Vista/7, Linux, MacOS X and should work on other Unixes (not tested yet).
  • Exporting to various formats (SQL statements, CSV, HTML, XML, PDF, JSON),
  • Importing data from various formats (CSV, custom text files [regular expressions]),
  • Numerous small additions, like formatting code, history of queries executed in editor windows, on-the-fly syntax checking, and more,
  • Unicode support,
  • Skinnable (interface can look native for Windows 9x/XP, KDE, GTK, Mac OS X, or draw widgets to fit for other environments, WindowMaker, etc),
  • Configurable colors, fonts and shortcuts.
  • Open source and free – Released under GPLv3 license.

Difference for moving AP/AR transaction to history mode in Great Plain/Dynamic system

In Receivables module, a AR transaction document is moved to ‘history’ status when the said document is fully applied and then the Paid Transaction Removal (PTR) routine is processed (i.e. run “Paid Transaction Removal” Option under “Routines”). It is different from AP, whereas In Payables module, a document is auto moved to ‘history’ status when the said document is fully applied.

Raspberry Pi Wireless Connection Control

Introduction

recently, I found a software to manage wireless connection under Raspberry Pi (i.e Lunix), it called wicd-curese. It is easy to install it by running the following command:

sudo apt-get install wicd-curses

However, it request to install quite a few other packages but those daemon run in the background.

After installed, you can run it with command:

sudo wicd-curses

Then, the following screen will display for your setup control:

wireless-control

  • Right Key “->” to Configure
  • R to refresh the list.
  • D to Disconnect
  • C to Connect
  • F10 to save

You must be capital such as [SHIFT] C to connect. If you get a message saying no networks detected press P  and type in wlan0 in the wireless interface field and press F10 to save.

It is also manages the connection so it will reconnect to any configured wireless access points if it drops out for whatever reason but it will also try to connect to any available networks.

You might have to press C to connect to the access point. If you were wired that will most likely kill the LAN interface and bring up wireless, so, be careful for network connection.


Installation of an Open Source Prometeo-ERP System

Introduction

Although Prometeo-ERP System was a phase-out project for any further development, its follow-up project was Django-ERP. However, Django-ERP is still under development, Its function is not ready, and most features are not ready for public use at this moment. Then, I step back to continue to test Prometeo-ERP System. Prometeo-ERP has already provide many useful features, its public release free version had the following features:

  • Authentication & row-level permission system
  • Notification system
  • Custom widgets & dashboards
  • Taxonomy system
  • File browsing
  • Event calendar
  • User tasks & timesheets
  • CRM (Customer Relationship Management)
  • Products management
  • Stock management
  • Human resources management
  • Sales management
  • Project management
  • Knowledge management
  • DMS (Document Management System)

I installed the Prometeo-ERP system to my Raspberry Pi machine, i.e. free OS, free program tools, free application tools, … Great. It is still worth to study it, and I will show the installation installation in the following

Installation Steps:

1. Checkout sources from the GIT repository:

https://code.google.com/archive/p/prometeo-erp/

2. Follow the instructions in the README file as reference.

2.1 PREREQUISITES

Make sure you have the following prerequisites installed:

* python >= 2.6 (or 2.7 the public one)

$ pip install python==2.7

* pytz >= 2011h (required)
$ pip install pytz==2011h

* python-markdown >= 2.0 (required)
$ pip install markdown

* xhtml2pdf >= 0.0.3 (required)
$ pip install xhtml2pdf==0.0.3

* icalendar >= 2.2 (required)
$ pip install icalendar==2.2

* django >= 1.3.1 (required)
$ pip install django==1.3.1

* south >= 0.7.3 (optional)
$ pip install south

2.2 INSTALLATION
1. Rename the download folder to “prometeo” (It is necessary).

2. cp settings/base.py.tmpl settings/base.py, and edit several statement as below:

$ vi settings/base.py
….

ADMINS = (
# (‘Goldman’, ‘goldman.au168@gmail.com’),
)

MANAGERS = ADMINS

DATABASES = {
default’: {
‘ENGINE’: ‘django.db.backends.sqlite3’, # Add ‘postgresql_psycopg2’, ‘postgresql’, ‘mysql’, ‘sqlite3’ or ‘oracle’.
‘NAME’: ‘erp.db’, # Or path to database file if using sqlite3.
‘USER’: ”, # Not used with sqlite3.
‘PASSWORD’: ”, # Not used with sqlite3.
‘HOST’: ”, # Set to empty string for localhost. Not used with sqlite3.
‘PORT’: ”, # Set to empty string for default. Not used with sqlite3.
}

}

LANGUAGE_CODE = ‘en-us’

# List of installed applications.
INSTALLED_APPS = (
‘django.contrib.auth’,
‘django.contrib.contenttypes’,
‘django.contrib.sessions’,
‘django.contrib.sites’,
‘django.contrib.messages’,
‘django.contrib.admin’,
‘django.contrib.admindocs’,
‘django.contrib.comments’,
‘django.contrib.markup’,
‘django.contrib.redirects’,
‘django.contrib.staticfiles’,

#’south’,

‘prometeo.core’,
‘prometeo.core.filebrowser’,
‘prometeo.core.widgets’,
‘prometeo.core.menus’,
‘prometeo.core.taxonomy’,
‘prometeo.core.auth’,
‘prometeo.core.registration’,
‘prometeo.core.notifications’,
‘prometeo.core.calendar’,

‘prometeo.todo’,
‘prometeo.addressing’,
‘prometeo.partners’,
‘prometeo.documents’,
‘prometeo.products’,
‘prometeo.stock’,
‘prometeo.hr’,
‘prometeo.sales’,
‘prometeo.projects’,
‘prometeo.knowledge’,
)

3. It’s time to create the DB schema

$ python manage.py syncdb

4. Start the server:

$ python manage.py runserver

5. Test the application via link http://localhost:8000 as screen dump below:

prometeo-system


Setup Raspberry pi Car camera with Android phone WiFi

Introduction

Raspberry Pi can be widely used for Car computer with many features, such as plays DVDs, GPS, displays TV, Bluetooth (phone calls + music), MP3/MPEG4 player, CD/radio, car camera, reversing camera (comes on automatically when I put the car in reverse gear), etc. This week, I test raspberry pi to connect to android phone’s wireless hotpot, and setup camera and display feature as below. It is interesting.

Connect Raspberry Pi to an Android phone’s camera

Step 1. Install Pi Camera Application in Android Phone, which you can find many from Google Play Store as below screen:

ipcam-app

Step 2. Turn on the Android Phone’s Camera Application and active its web server feature, then it will display an ip address for your external browse connection.

Step 3. Turn on the Android Phone’s wireless sharing hotpot feature, then the ip address will be refresh to its own phone address for your external connection as below:

Step 4. Connect the Raspberry Pi to Android Phone Open the browser in your Raspberry Pi, and type in the ip address, then it will display the camera as below:

ipcam-display

Screen Dump of Another Scene of Camera and Display as below two pictures:

cam-phone-display

cam-pi-diaplay


Display Raspberry Pi Camera to Android phone

Step 1. Install Raspberry Pi Camera and vlc software as describe in my previous post “Installation of Raspberry Pi Camera

Step 2. Start the video streaming function with command:

$ raspivid -w 640 -h 480 -o – -t 9999999 |cvlc -vvv stream:///dev/stdin –sout ‘#standard{access=http,mux=ts,dst=:8554}’ :demux=h264

Step 3. We can connect via browser with link http://ip-address:8554/.

Bonus:

We can also use VNC to connect Raspberry Pi from Android Phone, provided that you start the VNC server function (as described in my previous post “Installation Raspberry Pi” Step 6, and then install VNC app from Google Play Store, and start VNC connection in Andriod Phone as below:

VNC-1                   VNC-2


Setup Django WorkFlow Application

Introduction

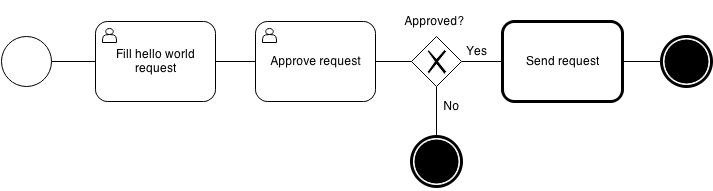
Recently, I studied how to setup a work flow program using python django. Believe me, Python Diango can provide you a high quality work flow web application. Let’s say I would like a simple workflow application as below diagram. I will show you how to setup the application as below instruction, and I will also show you the screen dump examples of running the application.

django-workflow0

Step 1. Prerequisition

This Work Flow Program requires Python 3.3 or greater, and django 1.6 or 1.7. I recommend you to setup under virtual environment. Setup the following python plug-in by running the following command:

$ pip3 install Django==1.7.1
$ pip3 install WebOb==1.4
$ pip3 install WebTest==2.0.16
$ pip3 install amqp==1.4.6
$ pip3 install anyjson==0.3.3
$ pip3 install beautifulsoup4==4.3.2
$ pip3 install billiard==3.3.0.18
$ pip3 install celery==3.1.16
$ pip3 install django-fsm==2.2.0
$ pip3 install django-viewflow==0.7.0
$ pip3 install django-webtest==1.7.7
$ pip3 install kombu==3.0.23
$ pip3 install mock==1.0.1
$ pip3 install pytz==2014.9
$ pip3 install singledispatch==3.4.0.3
$ pip3 install six==1.8.0
$ pip3 install waitress==0.8.9

Step 2. Create a standard django project and application

Run the following command:

$ django-admin.py startproject demo .

$ ./manage.py startapp helloworld

$ mv helloworld/ demo/

Step 3. Edit or Create the following files

3.1 edit demo/settings.py

INSTALLED_APPS = (
    ‘django.contrib.admin’,
    ‘django.contrib.auth’,
    ‘django.contrib.contenttypes’,
    ‘django.contrib.sessions’,
    ‘django.contrib.messages’,
    ‘django.contrib.staticfiles’,
    ‘viewflow’,
    ‘demo.helloworld’
)

TEMPLATE_CONTEXT_PROCESSORS = (
    ‘django.contrib.auth.context_processors.auth’,
    ‘django.core.context_processors.request’,
)

3.2 edit demo/urls.py

from django.conf.urls import patterns, include, url
from django.contrib import admin
from viewflow import views as viewflow
from .helloworld.flows import HelloWorldFlow

urlpatterns = patterns(
    ”,
    url(r’^helloworld/’,
        include([
            HelloWorldFlow.instance.urls,
            url(‘^$’, viewflow.ProcessListView.as_view(), name=’index’),
            url(‘^tasks/$’, viewflow.TaskListView.as_view(), name=’tasks’),
            url(‘^queue/$’, viewflow.QueueListView.as_view(), name=’queue’),
            url(‘^details/(?P<process_pk>d+)/$’,
                viewflow.ProcessDetailView.as_view(), name=’details’)],
                namespace=HelloWorldFlow.instance.namespace),
            {‘flow_cls’: HelloWorldFlow}),
    #url(r’^flows/’, include(viewflow.urls)),
    url(r’^admin/’, include(admin.site.urls)),
    url(r’^accounts/login/$’, ‘django.contrib.auth.views.login’, name=’login’),
    url(r’^accounts/logout/$’, ‘django.contrib.auth.views.logout’, name=’logout’),
)

3.3 create demo/celery.py

import os
from celery import Celery

from django.conf import settings

os.environ.setdefault(‘DJANGO_SETTINGS_MODULE’, ‘demo.settings’)

app = Celery(‘tests’)

app.config_from_object(‘django.conf:settings’)
app.autodiscover_tasks(lambda: settings.INSTALLED_APPS)

3.4 create demo/helloworld/flows.py

from viewflow import flow
from viewflow.base import Flow, this
from viewflow.contrib import celery

from . import models, views, tasks

class HelloWorldFlow(Flow):
    process_cls = models.HelloWorldProcess

    start = flow.Start(views.CreateRequestView)
        .Next(this.approve)

    approve = flow.View(views.ApproveRequestView)
        .Next(this.is_approved)

    is_approved = flow.If(lambda p: p.approved)
        .OnTrue(this.send)
        .OnFalse(this.end)

    send = celery.Job(tasks.send)
        .Next(this.end)

    end = flow.End()

3.5 edit demo/helloworld/models.py

from django.db import models
from viewflow.models import Process

class HelloWorldProcess(Process):
    text = models.CharField(max_length=250)
    approved = models.BooleanField(default=False)

3.6 edit demo/helloworld/tasks.py

from demo.celery import app as celery_app
from viewflow.flow import flow_job

@celery_app.task()
@flow_job()
def send(activation):
    print(activation.process.text)

3.7 edit demo/helloworld/views.py

from django.views import generic
from viewflow import views as flow_views

class CreateRequestView(flow_views.StartViewMixin,
                        generic.UpdateView):
    fields = [“text”]

    def get_object(self):
        return self.activation.process

class ApproveRequestView(flow_views.TaskViewMixin,
                         generic.UpdateView):
    fields = [“approved”]

    def get_object(self):
        return self.activation.process

Step 4. Start the Application Server

Run the following Command:

./manage.py createsuperuser –username=admin –email=admin@admin.com
( setup admin password )

./manage.py makemigrations

./manage.py migrate

Start the following celery in another virtual env

celery -A demo worker -l info

Start the application server:

./manage.py runserver

Step 4. Run the Application from browser

Admin Logon

http://127.0.0.1:8000/admin/

WorkFlow Application Logon

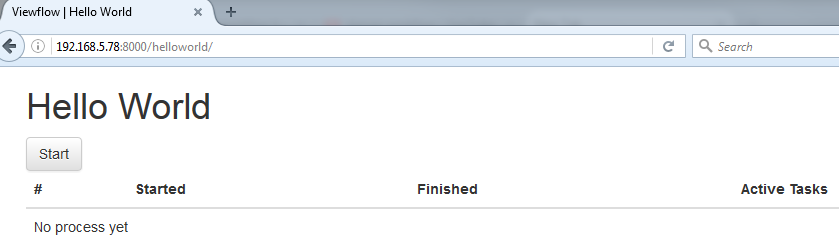
http://127.0.0.1:8000/helloworld/

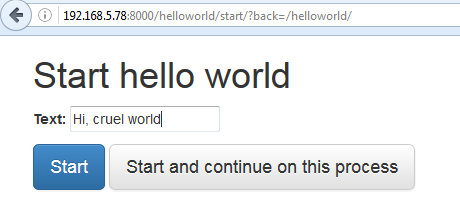
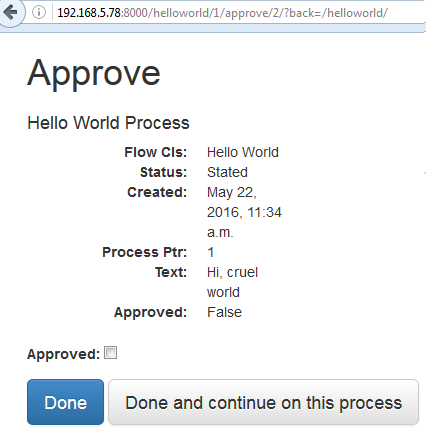
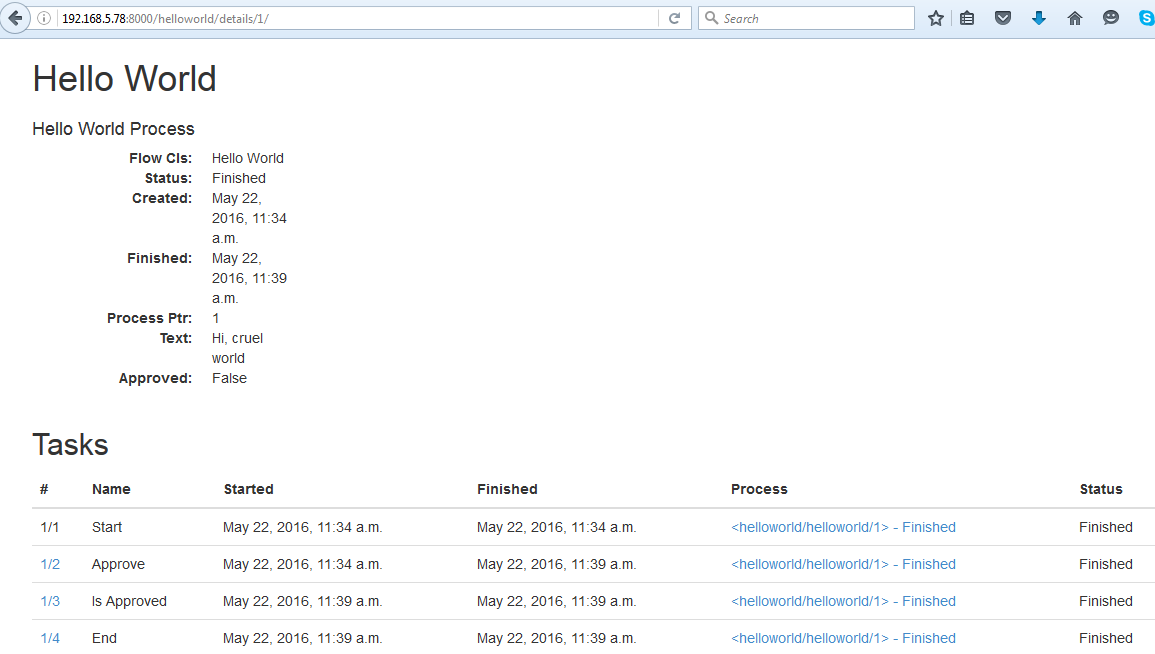
Step 5. Screen Dump Example of running the WorkFlow Application

django-workflow1

django-workflow2

django-workflow3
django-workflow4
django-workflow5

Reference Document Link:

http://viewflow.io/

http://docs.viewflow.io/material_admin.html

https://pypi.python.org/pypi/django-viewflow

Prometeo-ERP System (An Open Source ERP System)

Introduction

Recently, I found a open source ERP application project which was developed by python and django framework. Prometeo is absolutely an open-source and free of charge. It is very user friendly and user-oriented, too.

Installation

1. Checkout sources from the GIT repository:

git clone https://emanuele.bertoldi@code.google.com/p/prometeo-erp/ prometeo

http://code.google.com/p/prometeo-erp

https://code.google.com/archive/p/prometeo-erp/

https://code.google.com/archive/p/prometeo-erp/source/default/source

2. Follow the instructions in the README file from the download.

3. Test the installation at http://localhost:8000 running the development server:

python manage.py runserver

Further Development

This Prometeo-ERP project is no longer maintained nor supported! However, it is succeeded by another project called django ERP, which is still under developing. Its link is –> https://github.com/djangoERPTeam/django-erp