Android App Sample Program

Recently, I picked-up and studied Java and Android Studio programming again. I developed two Android App using Android Studio as below, and put in Google Play Store. If you have time to support me, please download to install and test it. Thanks.

1 st App Name: Egg Timer

Function: Timer of count down from range of 10 min and play a horn sound as time up.

Link: https://play.google.com/store/apps/details?id=com.infotechmanagefactory.eggtimerapplication_v2

2 nd App Name: LocateFriendMap

Function:
1) show your current location in map;
2) calculate distance between your friends and yourself;
3) select your friend’s location and show in map;
4) display google map navigation to lead you to meet friend.

Operation Manual: 
1)Setup your own username and password in the first time, then use it to logon next time; if you forget your password, simply setup another one.
2)There is a switch button to allow you to select "MyLocation" or "FindFriend" to show your location on map or show the distance between you and your friends.
3)As you select "MyLocation", it will show your map and you can press "Show Me To Friend" or "Cancel to Show Me" button.
4)As you select "FindFriend", it will show a list of your friends; as you select a friend, it will show a map between you and your friend, and you can also use "Navigation" button to call the google map navigation function.
5)To remind to use back arrow button "<" to go back to previous screen.
6)If you get trouble on map location display, you should check whether your phone GPS location function is active (maybe display your last location, but not current location), or go to out-door to get good GPS signal. 

Link:
https://play.google.com/store/apps/details?id=com.infotechmanagefactory.locatefriendmap

eCommerce Web Site

Recently, I developed a eCommerce web site for selling Health supplement and providing healthy improvement service. It has the following features:

  1. Shopping Web Site with Product categories, product maintenance, shopping cart, checkout payment, email notification, member login;
  2. Submit application form to apply healthy card;
  3. Submit application form to inquiry service;
  4. Maintain posts for news update;
  5. Multi-language feature;
  6. VISA payment gateway.

I used the following service provider because of cost effective as below:

  1. godaddy.com for domain main;
  2. AWS for hosting;
  3. WordPress for CMS;
  4. WooCommerce for shopping cart;
  5. Contact Form 7 for application form builder;
  6. Polylang for multi-language setup;
  7. Stripe for payment gateway.

You are welcome to browse the link –> https://www.skywaycare.com , and provide any comment. If you want to setup a similar website, I can help you, and feel free to contact me.

Sample Page of creating appointment booking function

This page is made by using wordpress’s “Booking Calendar” plugin which is the 1st booking system for WordPress, anddownloaded over 1,300,000 times since 20099.

Booking Calendar plugin enable awesome booking system for your site. Simply show availability and receive bookings for your property or service in easy to use booking system with clean and smooth interface.

Your website visitors can check availability of property (like apartment, house, hotel room, etc.) or any service you offer and make a booking in a minute for a full day(s) or specific timeslot (in Booking Calendar Free version). Different versions of WP Booking Calendar provide hundreds of features to complete almost any booking functionality for your business.

Your Customers will be able to:

  1. Select day(s) in calendar (which is possible to customize for fitting to your site design)
  2. Optional. Select available time-slot to book in your booking form.
  3. Fill booking form fields (which is possible to configure – change fields labels, activate/deactivate or set as required)
  4. Submit a booking

Administrator (and also your visitors) will receive notification email(s) about the new booking, and be able to Approve or Decline this reservation in Easy to Understand, sleek Admin Booking Panel (with possibility to see all bookings in day/week/month view of Calendar Overview mode – Timeline or just in Booking Listing Table).

KEY BENEFITS:

  • Extremely easy to use.
  • Very flexible functionality. Fit to very wide range of business.
  • All bookings and settings are stored in your DB. You don’t need third party account(s).
  • Sleek and customizable design of calendars, for fitting to your site design.
  • Responsive front end and back end design.
  • An easy to use Booking Admin Panel that displays bookings in Calendar Overview or Listing Table and lets you manages bookings.
  • Easy to install and integrate into your site. For example, using booking button in edit toolbar for configuration and inserting booking shortcode into post or page.
  • Booking Calendar Blocks for new Gutenberg Editor to add booking forms into pages.

The sample page is as below or link ->
http://ehealthy.infotechmanagefactory.com/ehealthy%e9%86%ab%e5%81%a5%e4%bf%9d-%e7%94%b3%e8%ab%8b%e8%a1%a8%e6%a0%bc/

Calendar is loading...
Powered by Booking Calendar
captcha

MySQL operation script for beginner

Create a new user within the MySQL shell:
mysql> CREATE USER ‘newuser’@’localhost’ IDENTIFIED BY ‘password’;
Create Permissions:
mysql> GRANT ALL PRIVILEGES ON *.* TO ‘newuser’@’localhost’;
Reload all the privileges.
mysql> FLUSH PRIVILEGES;
Your changes will now be in effect.
Revoke a permission:
mysql> REVOKE [type of permission] ON [database name].[table name] FROM ‘[username]’@‘localhost’;
Delete databases with DROP, you can use DROP to delete a user altogether:
mysql> DROP USER ‘demo’@‘localhost’;
To get a list of MySQL users:
mysql> select user,host from mysql.user;
To find the privilege(s) granted to a particular MySQL account:
mysql> show grants for ‘root’@’%’;
After test out your new user, log out by typing
mysql> quit

drop database goldman_wrdp8

CREATE Database goldman_wrdp8

use goldman_wrdp8;

source import_file.sql;
update wp_options SET option_value=’http://goldman168.no-ip.org/goldmanau’ where option_name=’siteurl’;

update wp_options SET option_value=’http://goldman168.no-ip.org/goldmanau’ where option_name=’home’;

extract a gz file?

Use guzip command as follows:
$ gunzip file.gz
OR
$ gzip -d file.gz

Change user password;

MySQL 5.7.6 and later:

ALTER USER 'root'@'localhost' IDENTIFIED BY 'MyNewPass';

MySQL 5.7.5 and earlier:

SET PASSWORD FOR 'root'@'localhost' = PASSWORD('MyNewPass');

OR

UPDATE mysql.user SET authentication_string = PASSWORD(‘MyNewPass’), password_expired = ‘N’ WHERE User = ‘root’ AND Host = ‘localhost’; FLUSH PRIVILEGES;

How to migrate WordPress from CPanel to AWS EC2

Introduction

If you use WHM/CPanel to manage your server or hosting, then you know how difficult is to upgrade or configure a service, and how annoying is that WHM/CPanel annulled any customization that you need. I know this could be a nuisance and how it complicates the server administration, that’s why I propose you a better hosting option for your WordPress, Amazon Web Services (AWS). Here you’ll find the benefits of this cloud and, in general terms, how to migrate WordPress from CPanel to AWS EC2.

Concepts approach

Let’s get concepts approach to specifically know what are we talking about… CPanel is a control panel with the purpose of managing your hosting and server. It takes total control of the server and installs everything that is commonly needed, like MySQL, FTP, Cron Jobs, etc. CPanel has a moderately intuitive design, but since WHM/CPanel has the server control, it is difficult to customize.
Screenshot_1
An AWS EC2 Instance is a virtual server with the following features:
  • High Availability level.
  • High stability level.
  • Scalable in memory space and server size.
  • The hard disk space is independent of the instance’s size , it can be set according to your needs and increase if you desires.
  • It offers “double” security since, in addition to the default firewall, AWS Security Groups are available, these restrict the ports you prefer.

How to migrate WordPress?

To migrate WordPress, from CPanel to AWS, you will require:
  • CPanel account
  • WordPress application
  • AWS account

1. The first step is to get the compressed directory and the database. The compressed directory, where you’re going to find WordPress, must be as a .tar.gz file; and the database would be in .sql format. To obtain the compressed directory of WordPress (document root) and the database, you can go to “Backup” section in CPanel and select the files you want to export.
After you have the database and the compressed document root on your computer, it is time to start with the creation of the EC2 instance and RDS (database server) on AWS.

2. Once you had logged in your AWS account, you must create the EC2 instance:
Services > EC2 > Instances > “Launch Instance”

Screenshot_2
Screenshot_3

After this step, you will be able to configure its size, volume size, network (VPC), etc.

3. You can create and configure RDS to your database in:
Services > RDS > Instances > “Launch DB instance” or “Get started Now”

Screenshot_4
Screenshot_5

4. Now you will be able to configure it, I recommend you to use MySQL like database manager because it is the most commonly used and a WordPress doesn’t need services or specialized features.

5. The next step is to test RDSconnection, create user and database with the wp-config.php file information of the original WordPress and import the database.

6. Afterwards, you’ll transfer the compressed document root to EC2 instance and uncompress it in /var/www/ directory preferably. Next, you need to edit the new wp-config.php file with the correct credentials and DB host (RDS endpoint, you can see it in:
Services > RDS > Instances > Select your RDS > in the displayed information you can see the ENDPOINT

Screenshot_6

7. Thereafter, will be necessary:

7.1 Update the packages.

sudo apt update

7.2 Install Nginx, PHP and PHP-FPM.

sudo apt install nginx php7.0 php7.0-common php7.0-curl php7.0-mysql php7.0-mcrypt php7.0-fpm

7.3 Configure the vhost.

server {
        listen 443;
        server_name dominio.com www.dominio.com;

        root /var/www/dominio.com;
        index index.php index.html;

        access_log /var/log/nginx/dominio-access.log;
        error_log /var/log/nginx/dominio-error.log;

        location / {
                try_files $uri $uri/ /index.php?$args;
                index index.php index.html;
        }

        location ~* .(jpg|jpeg|gif|css|png|js|ico|html)$ {
                access_log off;
                expires max;
        }

        location ~ .php$ {
                fastcgi_split_path_info ^(.+.php)(/.+)$;
                fastcgi_pass unix:/var/run/php7.0-fpm.sock;
                fastcgi_index index.php;
                include fastcgi_params;
                fastcgi_param SCRIPT_FILENAME $document_root$fastcgi_script_name;
        }
}

7.4 Add the following line on /etc/hosts file in your computer/laptop (change 123.123.123.123 to public IP of your instance).

123.123.123.123	dominio.com

7.5 Test the site (example).

Screenshot_7

Why is important to migrate CPanel to AWS?

  • AWS is so easy to use for everyone to quickly and securely host applications in the Cloud.
  • It enables you to select the operating system, programming language, web application platform, database, and other services you need.
  • It is cost-effective, you pay only for what you need.
  • Your WordPress would be reliable.
  • AWS utilizes an end-to-end approach to secure and harden the infrastructure.
  • Total control and the ability to configure the EC2 instance.
  • It allows the database optimization.

Conclusion

We’ve decided the best for you and your WordPress is to migrate from CPanel to AWS. As a result, the migrated WordPress could be configured depending on the site’s needs, but the most important thing is that having Nginx as the web server would make your site faster. The EC2 instance gives you total control of the site because it is not shared and doesn’t have any invasive control panel. The next steps are to optimize the EC2 instance in your WordPress, harden the WordPress, improve the page speed of Google and automate backups.

Information Source: https://cloudacademy.com/amazon-web-services/how-to-install-and-run-wordpress-on-aws-course/

How to setup wordpress in Amazon EC2

Method 1

from Web Source: https://aws.amazon.com/getting-started/tutorials/launch-a-wordpress-website/

Step 1: Launch an Amazon EC2 Instance


Now you are in the EC2 dashboard, click Launch Instance from the dashboard to create and configure your virtual machine.

launch-instance
(click to expand)
 

Step 2: Configure your Instance


Now you’re in the Amazon EC2 configuration wizard, we will be using an existing Amazon Machine Image (AMI) from the AWS Marketplace that has WordPress already installed. The AWS Marketplace provides access to thousands of pre-configured images for common pieces of software.


a. Click on AWS Marketplace on the left-hand side, search for WordPress, look for WordPress powered by BitNami, then click Select.

Launch a WordPress Website - AMI
(click to expand)
 

b. You will be presented a detailed pricing page. In this case, the price will be $0.00 for the software regardless of the size of the instance that you use.

Scroll to the bottom and click Continue.

Launch a WordPress Website - AMI Pricing
(click to expand)
 

c. For this tutorial, we will be using a free-tier eligible t2.micro instance. Click on t2.micro in the Type column (it should be the first one), then click Next: Configure Instance Details. It may take a few seconds to load.

On the following screens, click Next: Add Storage and then Next: Tag Instance.

Getting Started - Choose an instance - WordPress
(click to expand)
 

d. We will set a name for your instance in this step. Enter Name in the Key box and WordPress in the Value box. Click Review and Launch to continue.

Launch a WordPress Website - Tag
(click to expand)
 

e. You can review your instance configurations, then click Launch when you’re ready to start your Amazon EC2 instance running WordPress.

Launch a WordPress Website - Launch Instance
(click to expand)
 

f. The next screen deals with key-pairs. Key-pairs are how you can connect to your EC2 instances via a terminal program using Secure Shell (SSH). Select Proceed without a key pair, and check the box acknowledging that you know you need this key to access your EC2 instance.

Click Launch Instances to launch your instance. Be aware that starting the instance up may take a few minutes.

Note: To connect to your instance directly, you will need to create a new key pair. For instructions on creating a key pair and connecting to an instance, see steps 2 d.-2 f. and 3 of the tutorial: Launch a Linux Virtual Machine.

Launch a WordPress Website - Keypair
(click to expand)
 

g. Click View Instances on the bottom right of the page (you may need to scroll down to see it). Then select the WordPress instance, make sure the Instance State says running. If Instance State says launching then AWS is still preparing your WordPress instance.

Launch a WordPress Website - Instance Running
(click to expand)
 

h. Once your instance is running, you can now test your WordPress website. Find the Public IP for your instance at the bottom of this page.

Launch a WordPress Website - Public IP
(click to expand)
 

i. Copy the Public IP into a new tab in your web browser, and you should see a Hello World blog page appear.

Launch a WordPress Website - Hello World
(click to expand)
 

Step 3: Make Changes to Your Website


Now that you have your WordPress site up and running, it’s time to log into its administration page so you can customize your site. To find your password, please follow the steps below:

a. Switch back to your EC2 management console in your web browser. Select WordPress instance, and click the Actions button. In the drop down menu, select Instance Setting, and choose Get System Log.

Launch a WordPress Website - System Log
(click to expand)
 

b. In the system log window, scroll through to the bottom to find the password that’s surrounded by hash marks.

Launch a WordPress Website - Password
(click to expand)
 

c. Now that you have your password, switch back to the tab that you used to access the WordPress Hello Worldpage. Add /admin to the end of the URL so it looks something like 54.192.32.144/admin. Hit enter.

Enter the Username user and the Password that you read from the log file.

Launch a WordPress Website - Login
(click to expand)
 

Congratulations! You now have your WordPress site up and running. You can now manage, customize, and configure it as you like.


Next Steps

Now that you have your WordPress site up and running. You need to make it easy for people to get to. In the next tutorial we’ll register a domain name for your website so people can find it easily, and we’ll connect that domain name to your currently running instance.

Associate a Domain Name with Your Website Using Amazon Route 53 »

Method 2

from web Source: http://docs.aws.amazon.com/AWSEC2/latest/UserGuide/hosting-wordpress.html

Tutorial: Hosting a WordPress Blog with Amazon Linux

The following procedures will help you install, configure, and secure a WordPress blog on your Amazon Linux instance. This tutorial is a good introduction to using Amazon EC2 in that you have full control over a web server that hosts your WordPress blog, which is not typical with a traditional hosting service.

You are responsible for updating the software packages and maintaining security patches for your server. For a more automated WordPress installation that does not require direct interaction with the web server configuration, the AWS CloudFormation service provides a WordPress template that can also get you started quickly. For more information, see Getting Started in the AWS CloudFormation User Guide. If you’d prefer to host your WordPress blog on a Windows instance, see Deploying a WordPress Blog on Your Amazon EC2 Windows Instance in the Amazon EC2 User Guide for Windows Instances. If you need a high-availability solution with a decoupled database, see Deploying a High-Availability WordPress Website in the AWS Elastic Beanstalk Developer Guide.

Important

These procedures are intended for use with Amazon Linux. For more information about other distributions, see their specific documentation. Many steps in this tutorial do not work on Ubuntu instances. For help installing WordPress on an Ubuntu instance, see WordPress in the Ubuntu documentation.

Prerequisites

This tutorial assumes that you have launched an Amazon Linux instance with a functional web server with PHP and database (either MySQL or MariaDB) support by following all of the steps in Tutorial: Install a LAMP Web Server with the Amazon Linux AMI for Amazon Linux AMI or Tutorial: Install a LAMP Web Server on Amazon Linux 2 for Amazon Linux 2. This tutorial also has steps for configuring a security group to allow HTTP and HTTPS traffic, as well as several steps to ensure that file permissions are set properly for your web server. For information about adding rules to your security group, see Adding Rules to a Security Group.

We strongly recommend that you associate an Elastic IP address (EIP) to the instance you are using to host a WordPress blog. This prevents the public DNS address for your instance from changing and breaking your installation. If you own a domain name and you want to use it for your blog, you can update the DNS record for the domain name to point to your EIP address (for help with this, contact your domain name registrar). You can have one EIP address associated with a running instance at no charge. For more information, see Elastic IP Addresses.

If you don’t already have a domain name for your blog, you can register a domain name with Route 53 and associate your instance’s EIP address with your domain name. For more information, see Registering Domain Names Using Amazon Route 53 in the Amazon Route 53 Developer Guide.

Install WordPress

Connect to your instance, and download the WordPress installation package.

To download and unzip the WordPress installation package

  1. Download the latest WordPress installation package with the wget command. The following command should always download the latest release.
    [ec2-user ~]$ wget https://wordpress.org/latest.tar.gz
  2. Unzip and unarchive the installation package. The installation folder is unzipped to a folder called wordpress.
    [ec2-user ~]$ tar -xzf latest.tar.gz

To create a database user and database for your WordPress installation

Your WordPress installation needs to store information, such as blog post entries and user comments, in a database. This procedure helps you create a database for your blog and a user that is authorized to read and save information to that database.

  1. Start the database server.
    • Amazon Linux AMIsudo service mysqld start
    • Amazon Linux 2sudo systemctl start mariadb
  2. Log in to the database server as the root user. Enter your database root password when prompted; this may be different than your root system password, or it may even be empty if you have not secured your database server.

    Important

    If you have not secured your database server yet, it is very important that you do so. For more information, see To secure the database server.

    [ec2-user ~]$ mysql -u root -p
  3. Create a user and password for your MySQL database. Your WordPress installation uses these values to communicate with your MySQL database. Enter the following command, substituting a unique user name and password.
    CREATE USER 'wordpress-user'@'localhost' IDENTIFIED BY 'your_strong_password';

    Make sure that you create a strong password for your user. Do not use the single quote character ( ‘ ) in your password, because this will break the preceding command. For more information about creating a secure password, go to http://www.pctools.com/guides/password/. Do not reuse an existing password, and make sure to store this password in a safe place.

  4. Create your database. Give your database a descriptive, meaningful name, such as wordpress-db.

    Note

    The punctuation marks surrounding the database name in the command below are called backticks. The backtick (`) key is usually located above the Tab key on a standard keyboard. Backticks are not always required, but they allow you to use otherwise illegal characters, such as hyphens, in database names.

    CREATE DATABASE `wordpress-db`;
  5. Grant full privileges for your database to the WordPress user that you created earlier.
    GRANT ALL PRIVILEGES ON `wordpress-db`.* TO "wordpress-user"@"localhost";
  6. Flush the database privileges to pick up all of your changes.
    FLUSH PRIVILEGES;
  7. Exit the mysql client.
    exit

To create and edit the wp-config.php file

The WordPress installation folder contains a sample configuration file called wp-config-sample.php. In this procedure, you copy this file and edit it to fit your specific configuration.

  1. Copy the wp-config-sample.php file to a file called wp-config.php. This creates a new configuration file and keeps the original sample file intact as a backup.
    [ec2-user wordpress]$ cp wordpress/wp-config-sample.php wordpress/wp-config.php
  2. Edit the wp-config.php file with your favorite text editor (such as nano or vim) and enter values for your installation. If you do not have a favorite text editor, nano is much easier for beginners to use.
    [ec2-user wordpress]$ nano wordpress/wp-config.php
    1. Find the line that defines DB_NAME and change database_name_here to the database name that you created in Step 4 of To create a database user and database for your WordPress installation.
      define('DB_NAME', 'wordpress-db');
    2. Find the line that defines DB_USER and change username_here to the database user that you created in Step 3 of To create a database user and database for your WordPress installation.
      define('DB_USER', 'wordpress-user');
    3. Find the line that defines DB_PASSWORD and change password_here to the strong password that you created in Step 3 of To create a database user and database for your WordPress installation.
      define('DB_PASSWORD', 'your_strong_password');
    4. Find the section called Authentication Unique Keys and Salts. These KEY and SALT values provide a layer of encryption to the browser cookies that WordPress users store on their local machines. Basically, adding long, random values here makes your site more secure. Visit https://api.wordpress.org/secret-key/1.1/salt/ to randomly generate a set of key values that you can copy and paste into your wp-config.php file. To paste text into a PuTTY terminal, place the cursor where you want to paste the text and right-click your mouse inside the PuTTY terminal.For more information about security keys, go to http://codex.wordpress.org/Editing_wp-config.php#Security_Keys.

      Note

      The values below are for example purposes only; do not use these values for your installation.

      define('AUTH_KEY',         ' #U$$+[RXN8:b^-L 0(WU_+ c+WFkI~c]o]-bHw+)/Aj[wTwSiZ<Qb[mghEXcRh-');
      define('SECURE_AUTH_KEY',  'Zsz._P=l/|y.Lq)XjlkwS1y5NJ76E6EJ.AV0pCKZZB,*~*r ?6OP$eJT@;+(ndLg');
      define('LOGGED_IN_KEY',    'ju}qwre3V*+8f_zOWf?{LlGsQ]Ye@2Jh^,8x>)Y |;(^[Iw]Pi+LG#A4R?7N`YB3');
      define('NONCE_KEY',        'P(g62HeZxEes|LnI^i=H,[XwK9I&[2s|:?0N}VJM%?;v2v]v+;+^9eXUahg@::Cj');
      define('AUTH_SALT',        'C$DpB4Hj[JK:?{ql`sRVa:{:7yShy(9A@5wg+`JJVb1fk%_-Bx*M4(qc[Qg%JT!h');
      define('SECURE_AUTH_SALT', 'd!uRu#}+q#{f$Z?Z9uFPG.${+S{n~1M&%@~gL>U>NV<zpD-@2-Es7Q1O-bp28EKv');
      define('LOGGED_IN_SALT',   ';j{00P*owZf)kVD+FVLn-~ >.|Y%Ug4#I^*LVd9QeZ^&XmK|e(76miC+&W&+^0P/');
      define('NONCE_SALT',       '-97r*V/cgxLmp?Zy4zUU4r99QQ_rGs2LTd%P;|_e1tS)8_B/,.6[=UK<J_y9?JWG');
    5. Save the file and exit your text editor.

To install your WordPress files under the Apache document root

  1. Now that you’ve unzipped the installation folder, created a MySQL database and user, and customized the WordPress configuration file, you are ready to copy your installation files to your web server document root so you can run the installation script that completes your installation. The location of these files depends on whether you want your WordPress blog to be available at the actual root of your web server (for example,my.public.dns.amazonaws.com) or in a subdirectory or folder under the root (for example,my.public.dns.amazonaws.com/blog).
  2. If you want WordPress to run at your document root, copy the contents of the wordpress installation directory (but not the directory itself) as follows:
    [ec2-user ~]$ cp -r wordpress/* /var/www/html/
  3. If you want WordPress to run in an alternative directory under the document root, first create that directory, and then copy the files to it. In this example, WordPress will run from the directory blog:
    [ec2-user ~]$ mkdir /var/www/html/blog
    [ec2-user ~]$ cp -r wordpress/* /var/www/html/blog/

Important

For security purposes, if you are not moving on to the next procedure immediately, stop the Apache web server (httpd) now. After you move your installation under the Apache document root, the WordPress installation script is unprotected and an attacker could gain access to your blog if the Apache web server were running. To stop the Apache web server, enter the command sudo service httpd stop. If you are moving on to the next procedure, you do not need to stop the Apache web server.

To allow WordPress to use permalinks

WordPress permalinks need to use Apache .htaccess files to work properly, but this is not enabled by default on Amazon Linux. Use this procedure to allow all overrides in the Apache document root.

  1. Open the httpd.conf file with your favorite text editor (such as nano or vim). If you do not have a favorite text editor, nano is much easier for beginners to use.
    [ec2-user wordpress]$ sudo vim /etc/httpd/conf/httpd.conf
  2. Find the section that starts with <Directory "/var/www/html">.
    <Directory "/var/www/html">
        #
        # Possible values for the Options directive are "None", "All",
        # or any combination of:
        #   Indexes Includes FollowSymLinks SymLinksifOwnerMatch ExecCGI MultiViews
        #
        # Note that "MultiViews" must be named *explicitly* --- "Options All"
        # doesn't give it to you.
        #
        # The Options directive is both complicated and important.  Please see
        # http://httpd.apache.org/docs/2.4/mod/core.html#options
        # for more information.
        #
        Options Indexes FollowSymLinks
    
        #
        # AllowOverride controls what directives may be placed in .htaccess files.
        # It can be "All", "None", or any combination of the keywords:
        #   Options FileInfo AuthConfig Limit
        #
        AllowOverride None
    
        #
        # Controls who can get stuff from this server.
        #
        Require all granted
    </Directory>
  3. Change the AllowOverride None line in the above section to read AllowOverride All.

    Note

    There are multiple AllowOverride lines in this file; be sure you change the line in the <Directory "/var/www/html"> section.

    AllowOverride All
  4. Save the file and exit your text editor.

To fix file permissions for the Apache web server

Some of the available features in WordPress require write access to the Apache document root (such as uploading media though the Administration screens). If you have not already done so, apply the following group memberships and permissions (as described in greater detail in the LAMP web server tutorial).

  1. Change the file ownership of /var/www and its contents to the apache user.
    [ec2-user wordpress]$ sudo chown -R apache /var/www
  2. Change the group ownership of /var/www and its contents to the apache group.
    [ec2-user wordpress]$ sudo chgrp -R apache /var/www
  3. Change the directory permissions of /var/www and its subdirectories to add group write permissions and to set the group ID on future subdirectories.
    [ec2-user wordpress]$ sudo chmod 2775 /var/www
  4. Recursively change the file permissions of /var/www and its subdirectories to add group write permissions.
    [ec2-user wordpress]$ find /var/www -type d -exec sudo chmod 2775 {} ;
  5. Restart the Apache web server to pick up the new group and permissions.
    • Amazon Linux AMIsudo service httpd restart
    • Amazon Linux 2sudo systemctl restart httpd

To run the WordPress installation script

  1. Use the chkconfig command to ensure that the httpd and database services start at every system boot.
    • Amazon Linux AMIsudo chkconfig enable httpd && sudo chkconfig enable mysql
    • Amazon Linux 2sudo systemctl enable httpd && sudo systemctl enable mariadb
  2. Verify that the database server is running.
    • Amazon Linux AMIsudo service mysqld status
    • Amazon Linux 2sudo systemctl status mariadb

    If the database service is not running, start it.

    • Amazon Linux AMIsudo service mysqld start
    • Amazon Linux 2sudo systemctl start mariadb
  3. Verify that your Apache web server (httpd) is running.
    • Amazon Linux AMIsudo service httpd status
    • Amazon Linux 2sudo systemctl status httpd

    If the httpd service is not running, start it.

    • Amazon Linux AMIsudo service httpd start
    • Amazon Linux 2sudo systemctl start httpd
  4. In a web browser, enter the URL of your WordPress blog (either the public DNS address for your instance, or that address followed by the blog folder). You should see the WordPress installation screen.
    http://my.public.dns.amazonaws.com
    <br />
                        WordPress installation screen<br />
  5. Enter the remaining installation information into the WordPress installation wizard.
    Field Value
    Site Title Enter a name for your WordPress site.
    Username Enter a name for your WordPress administrator. For security purposes, you should choose a unique name for this user, because it will be more difficult to exploit than the default user name,admin.
    Password Enter a strong password, and then enter it again to confirm. Do not reuse an existing password, and make sure to store this password in a safe place.
    Your E-mail Enter the email address you want to use for notifications.
  6. Click Install WordPress to complete the installation.

Congratulations, you should now be able to log into your WordPress blog and start posting entries.

Next Steps

After you have tested your initial WordPress blog, consider updating its configuration.

Use a Custom Domain Name

If you have a domain name associated with your EC2 instance’s EIP address, you can configure your blog to use that name instead of the EC2 public DNS address. For more information, see http://codex.wordpress.org/Changing_The_Site_URL.

Configure Your Blog

You can configure your blog to use different themes and plugins to offer a more personalized experience for your readers. However, sometimes the installation process can backfire, causing you to lose your entire blog. We strongly recommend that you create a backup Amazon Machine Image (AMI) of your instance before attempting to install any themes or plugins so you can restore your blog if anything goes wrong during installation. For more information, see Creating Your Own AMI.

Increase Capacity

If your WordPress blog becomes popular and you need more compute power or storage, consider the following steps:

Learn More about WordPress

For information about WordPress, see the WordPress Codex help documentation at http://codex.wordpress.org/. For more information about troubleshooting your installation, go to http://codex.wordpress.org/Installing_WordPress#Common_Installation_Problems. For information about making your WordPress blog more secure, go to http://codex.wordpress.org/Hardening_WordPress. For information about keeping your WordPress blog up-to-date, go to http://codex.wordpress.org/Updating_WordPress.

Help! My Public DNS Name Changed and now my Blog is Broken

Your WordPress installation is automatically configured using the public DNS address for your EC2 instance. If you stop and restart the instance, the public DNS address changes (unless it is associated with an Elastic IP address) and your blog will not work anymore because it references resources at an address that no longer exists (or is assigned to another EC2 instance). A more detailed description of the problem and several possible solutions are outlined in http://codex.wordpress.org/Changing_The_Site_URL.

If this has happened to your WordPress installation, you may be able to recover your blog with the procedure below, which uses the wp-cli command line interface for WordPress.

To change your WordPress site URL with the wp-cli

  1. Connect to your EC2 instance with SSH.
  2. Note the old site URL and the new site URL for your instance. The old site URL is likely the public DNS name for your EC2 instance when you installed WordPress. The new site URL is the current public DNS name for your EC2 instance. If you are not sure of your old site URL, you can use curl to find it with the following command.
    [ec2-user ~]$ curl localhost | grep wp-content

    You should see references to your old public DNS name in the output, which will look like this (old site URL in red):

    <script type='text/javascript' src='http://ec2-52-8-139-223.us-west-1.compute.amazonaws.com/wp-content/themes/twentyfifteen/js/functions.js?ver=20150330'></script>
  3. Download the wp-cli with the following command.
    [ec2-user ~]$ curl -O https://raw.githubusercontent.com/wp-cli/builds/gh-pages/phar/wp-cli.phar
  4. Search and replace the old site URL in your WordPress installation with the following command. Substitute the old and new site URLs for your EC2 instance and the path to your WordPress installation (usually/var/www/html or /var/www/html/blog).
    [ec2-user ~]$ php wp-cli.phar search-replace 'old_site_url' 'new_site_url' --path=/path/to/wordpress/installation --skip-columns=guid
  5. In a web browser, enter the new site URL of your WordPress blog to verify that the site is working properly again. If it is not, see http://codex.wordpress.org/Changing_The_Site_URL and http://codex.wordpress.org/Installing_WordPress#Common_Installation_Problems for more information.

Odoo 11 Overview

Good news that I got a new version of odoo ver 11. A lot of good stuff there.

For this version, focused most of our efforts on improving the API so it will run faster and be easier for developers to work with. This isn’t to say there’s nothing for the end user, though. it made small changes to many apps to make them more intuitive and more useful. Odoo V11 introduced global keyboard shortcuts and a global search feature to make navigating Odoo quicker and easier than ever.

Odoo Community:

  • Usability
  • Speed
  • New Design (from current Odoo Enterprise)
  • Mobile

Odoo Enterprise:

  • Accounting
  • Localizations
  • Services Companies
  • Odoo Studio (make it even better)
  • Reporting & Dashboard (a more BI-like tool)

Functional Changes(features)

  • Timesheet app:
  1. New view for Timesheet recording
  2. validation policy: decide to invoice on recorded timesheets or on approved one
  3. New report has been added to analyze the differences between attendances and timesheets
  4. New timesheet flow: Create timesheet entries using the mobile app, tasks, and/or the timesheet menu. Then, a manager approves them and launches the invoicing through the approvals menu.
  • New Product Catalog app: install the Product app to access the catalog from your apps dashboard
  • Accounting app:
  1. New module to import CAMT.053 XML files to populate bank statements
  2. Analytic accounting analysis
  • Subscription app: new dashboard, cohort analysis, analysis by company and all companies

Discuss app:

  1. Counter near starred items
  2.  Users can now type some shortcuts directly in the text box. For example: /leave to leave the channel, /who to list who is in the channel and /help to see a list of commands
  • New payment acquirer: Payumoney and payment Stripe
  • Usability
  1. Odoo WMS: picking form improvements, changes in delivery slips, variants menu entry
  2.  Odoo Subscription: onboarding, adding tags on self subscriptions
  3.  Odoo Accounting: Revenue recognition usability improvements
  • New global search in the home page (start typing something to see relevant menus)
  • Keyboard shortcuts: details on the top right menu on the home page
  • New website dashboard

Purchase: manage purchase agreement, blanket.

http://technaureus.com/features-of-odoo-11/

The following is a youtube video to give you a quick overview.

Build a LAMP Web Server with WordPress under Raspberry Pi

Information Source: https://www.raspberrypi.org/learning/lamp-web-server-with-wordpress/worksheet/

Learn to set up a LAMP (Linux, Apache, MySQL, PHP) stack on your Raspberry Pi and configure it to work as a web server. You’ll download and install WordPress and set up a basic website which you can access on any device on the same network as your Pi.

Set up Apache Web Server

Apache is a popular web server application you can install on the Raspberry Pi to allow it to serve web pages.

On its own, Apache can serve HTML files over HTTP, and with additional modules can serve dynamic web pages using scripting languages such as PHP.

Install Apache

First install the apache2 package by typing the following command into the terminal:

sudo apt-get install apache2 -y

Test the web server

By default, Apache puts a test HTML file in the web folder. This default web page is served when you browse to http://localhost/ on the Pi itself, or http://192.168.1.10 (whatever the Pi’s IP address is) from another computer on the network. To find out the Pi’s IP address, type hostname -I at the command line (or read more about finding your IP address) in our documentation.

Browse to the default web page, either on the Pi or from another computer on the network, and you should see the following:

Apache it works

This means you have Apache working!

Changing the default web page

This default web page is just a HTML file on the filesystem. It is located at /var/www/html/index.html.

Note: The directory was /var/www in Raspbian Wheezy but is now /var/www/html in Raspbian Jessie

Navigate to this directory in the Terminal and have a look at what’s inside:

cd /var/www/html
ls -al

This will show you:

total 12
drwxr-xr-x  2 root root 4096 Jan  8 01:29 .
drwxr-xr-x  3 root root 4096 Jan  8 01:28 ..
-rw-r--r--  1 root root  177 Jan  8 01:29 index.html

This shows that there is one file in /var/www/html/ called index.html. The . refers to the directory itself /var/www/html and the .. refers to the parent directory /www/.

What the columns mean

  1. The permissions of the file or directory
  2. The number of files in the directory (or 1 if it’s a file).
  3. The user which owns the file or directory
  4. The group which owns the file or directory
  5. The file size
  6. The last modification date & time

As you can see, by default the html directory and index.html file are both owned by the rootuser, so you’ll need to use sudo to edit them.

Try editing this file and refreshing the browser to see the web page change. Press Ctrl + X and hit Enter to save and exit.

Install PHP

PHP is a preprocessor; it’s code that runs when the server receives a request for a web page. It runs, works out what needs to be shown on the page, then sends that page to the browser. Unlike static HTML, PHP can show different content under different circumstances. Other languages are capable of this, but since WordPress is written in PHP, that’s what we need to use this time. PHP is a very popular language on the web; large projects like Facebook and Wikipedia are written in PHP.

Install the PHP and Apache packages with the following command:

sudo apt-get install php5 libapache2-mod-php5 -y

Test PHP

Create the file index.php:

sudo leafpad index.php

(or use nano)

Put some PHP content in it:

<?php echo "hello world"; ?>

Now save the file. Next delete index.html because it takes precendence over index.php:

sudo rm index.html

Refresh your browser. You should see “hello world”. This is not dynamic but it is still served by PHP. If you see the raw PHP above instead of “hello world”, reload and restart Apache like so:

sudo service apache2 restart

Otherwise try something dynamic, for example:

<?php echo date('Y-m-d H:i:s'); ?>

Or show your PHP info:

<?php phpinfo(); ?>

Install MySQL

MySQL (pronounced My Sequel or My S-Q-L) is a popular database engine. Like PHP, its overwhelming presence on web servers enhanced its popularity. This is why projects like WordPress use it, and why those projects are so popular.

Install the MySQL Server and PHP-MySQL packages by entering the following command into the terminal:

sudo apt-get install mysql-server php5-mysql -y

When installing MySQL you will be asked for a root password. You’ll need to remember this to allow your website to access the database.

Now restart Apache:

sudo service apache2 restart

Download WordPress

You can download WordPress from wordpress.org using the wget command. Helpfully, a copy of the latest version of WordPress is always available at wordpress.org/latest.tar.gz and wordpress.org/latest.zip, so you can grab the latest version without having to look it up on the website. At the time of writing, this is version 4.5.

Navigate to /var/www/html/, and download WordPress to this location. You’ll need to empty the folder first (be sure to check you’re not deleting files you need before running rm); change the ownership of this folder to the pi user too.

cd /var/www/html/
sudo rm *
sudo wget http://wordpress.org/latest.tar.gz

Now extract the tarball, move the contents of the folder it extracted (wordpress) to the current directory and remove the (now empty) folder and the tarball to tidy up:

sudo tar xzf latest.tar.gz
sudo mv wordpress/* .
sudo rm -rf wordpress latest.tar.gz

Running the ls or (tree -L 1) command here will show you the contents of a WordPress project:

.
├── index.php
├── license.txt
├── readme.html
├── wp-activate.php
├── wp-admin
├── wp-blog-header.php
├── wp-comments-post.php
├── wp-config-sample.php
├── wp-content
├── wp-cron.php
├── wp-includes
├── wp-links-opml.php
├── wp-load.php
├── wp-login.php
├── wp-mail.php
├── wp-settings.php
├── wp-signup.php
├── wp-trackback.php
└── xmlrpc.php

This is the source of a default WordPress installation. The files you edit to customise your installation belong in the wp-content folder.

You should now change the ownership of these files to the Apache user:

sudo chown -R www-data: .

Set up your WordPress Database

To get your WordPress site set up, you need a database. Run the mysql command in the terminal and provide your login credentials (e.g. username root, password password):

mysql -uroot -ppassword

Here I have provided my password (the word password) on the command line; there is no space between -p and your password.

Alternatively you can simply supply an empty -p flag and wait to be asked for a password:

mysql -uroot -p

Now you will be prompted to enter the root user password you created earlier.

Once you’re connected to MySQL, you can create the database your WordPress installation will use:

mysql> create database wordpress;

Note the semi-colon ending the statement. On success you should see the following message:

Query OK, 1 row affected (0.00 sec)

Exit out of the MySQL prompt with Ctrl + D.

WordPress Configuration

You need to find out your Pi’s IP address to access it in the browser, so in a terminal type the command hostname -I.

Navigate to http://YOUR-IP-ADDRESS e.g. http://192.168.1.5 in the web browser on your Pi.

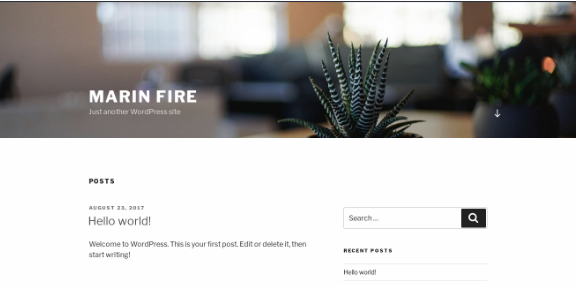
You should see a WordPress weclome page.

WordPress welcome screen

Click the Let's go! button.

Now fill out the basic site information as follows:

Database Name:      wordpress
User Name:          root
Password:           <YOUR PASSWORD>
Database Host:      localhost
Table Prefix:       wp_

and click Submit to proceed.

Now hit the Run the install button.

Now you’re getting close.

WordPress Welcome screen

Fill out the information: give your site a title, create a username and password and enter your email address. Hit the Install WordPress button, then log in using the account you just created.

Now you’re logged in and have your site set up, you can see the website by visiting your IP address in the browser on the Pi or another computer on the network. To log in again (or on another computer), go to http://YOUR-IP-ADDRESS/wp-admin.

Friendly permalinks

It’s recommended that you change your permalink settings to make your URLs more friendly.

To do this, log in to WordPress and go to the dashboard.

Go to Settings then Permalinks.

Select the Post name option and click Save Changes.

You’ll need to enable Apache’s rewrite mod:

sudo a2enmod rewrite

You’ll also need to tell the virtual host serving the site to allow requests to be overwritten.

Edit the Apache configuration file for your virtual host:

sudo leafpad /etc/apache2/sites-available/000-default.conf

(or use nano)

Add the following lines after line 1:

<Directory "/var/www/html">
    AllowOverride All
</Directory>

ensuring it’s within the <VirtualHost *:80> like so:

<VirtualHost *:80>
    <Directory "/var/www/html">
        AllowOverride All
    </Directory>
    ...

And then restart Apache again:

sudo service apache2 restart

Customisation

WordPress is very customisable. By clicking your site name in the WordPress banner along the top of the page (when logged in), you’ll be taken to the Dashboard. From here you can change the theme, add pages and posts, edit the menu, add plugins and lots more. This is just a taster for getting something interesting set up on the Raspberry Pi’s web server.