
- Application
This operating instruction is aimed for PMC, Store and Production of Factory to operate the Mfg/Pro ERP System work order module.
- Flow Chart

- Instructions
3.1 Prepartion
3.1.1 On every Friday morning, PMC shall run MPS reports for Factory projects (by planner code)

Input Steps:
- Site = HKG to HKG
- Planner = planner code, each planner code need a separated report
- Take the default for all remaining selection criteria
3.1.2 After reviewing the master schedule summary report, PMC planners shall amend the forecast, master schedule and determine work order to be released based on agreement time frame (currently n+1 week).

3.1.3 Based on the amended master schedule summary report, PMC shall update forecast using function 22.2.

Input steps:
- Part Number
- site = HKG
- year = 1999
- input forecast qty, press TAB or ENTER to go into next forecast week
- press F1 to go to next quarter
3.1.4 Also based on the master schedule summary report, PMC shall update the repetitive schedule accordingly.
a. When the project is new to Factory, inputting repetitive schedule using function 18.3 is not allowed. If it is the case, PMC shall update production line maintenance (funct. 18.1.1).

Input Steps:
- Production Line = SW1
- Site = HKG
- Then press F1 to item information screen
- Enter Part Number
- Start date = 01/01/98
- Press F1 to finish
b. For existing Factory project, PMC shall update the schedule using funct. 18.3. For those repetitive schedule qty that fall into production block week (n+1), PMC shall update the qty into zero.

Input Steps:
- Part Number
- Site = HKG
- Production Line = SW1, except LPH7366-1 that may have SW1 and SW2
- Start day = current week Monday
- Input the scheduled qty into Monday, then press F1 to go to next week, press F4 to finish
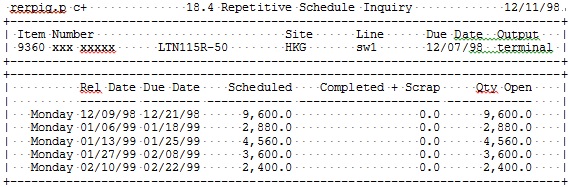
c.After input, the repetitive schedule shall be checked using funct.18.4
3.1.5 As indicated in the master schedule summary report, PMC shall create work order accordingly.

Input Steps:
- Input WO# with same format as in v6.0
- Leave the ID no. blank
- Production line = SW1. Only LPH7366-1 will have SW1 and SW2.
- Blank the work order type
- Site = HKG
- Qty Ordered = scheduled qty
- Status = F
- Sales/Job = Qty Ordered
- Yield must be 100%
- Order date = today
- Release date = Due Date – 1 week
- Due date = Monday of the schedule output week
- If default routing code is empty, inform planner to update before proceeding further
- Press two F1 to skip the 2nd and 3rd page (attributes/accounting data) of work order maintenance
3.1.6 Upon completion of work order maintenance, PMC shall release and print the Work Order using function 16.20.8 or 16.20.9 for checking picklist and routing. Confirmation after Mfg/Pro print the work order should be set to “no”

Input Steps:
- Work order ‘from’ and ‘to’ = WO number to be printed
- Blank the input fields ID, Batch, Release Date, Item Number and Buyer/Planner
- Status = ‘F’
- Press F1 to skip the rest of input field and then select printer
3.1.7 Factory PMC Planners shall check the content of WO picklist and routing, and make correction if necessary. After checking, inform PMC to proceed WO release.

3.1.8 Formal release of work order by PMC upon planner’s confirmation (funct. 18.20.8 or 18.20.9)
3.1.9 Prepare work order receiving sheet and fax to Factory
3.2 Work Order Split and Print by PMC
3.2.1 Factory PMC to Split the work order according to the work order receiving sheet

Input Steps:
- Work Order Number and WO ID
- The standard lot size to be used to split lot. Normally it should match with PQ.
- Then select ‘no’ in order not to split WO bill
- target yield % = 100%
- Check all information and confirm ‘yes’
- After calculation, the system will display the total number of lots to split and the remaining qty for the last lot
- Verify the last lot qty and change if necessar
- Lastly the system will display the range of new WO ID number after split
3.2.2 Record the new work order ID number and counter check to order generated by the system using funct. Wowoiq.p

3.2.3 Print split work order by Factory PMC

Input Steps:
- Work order ‘from’ and ‘to’ = WO number to be printed
- Blank the input fields ID, Batch, Release Date, Item Number and Buyer/Planner
- Status = ‘R’
- Select ‘yes’ for Print Picklist and Print Routing
- Select ‘no’ for Print Co/By-product and Print Bar Code
- Select ‘yes’ for Move First Operation
- Press F1 to skip the rest of input field and then select printer
3.2.4 The order qty of the mother lot will be split to zero but the picklist remains. Factory PMC shall pass the routing printout of split lots to production and issue the material according to mother lot’s picklist.
Example of routing printout of split lots

3.3 Work Order Material Issue
3.3.1 Since the WO picklist does not show substitution parts, Factory PMC can use function Ptsuiq.p to check which substitution part can be used for that project.
3.3.2 If any substitution part is issued, Factory Store shall write down the information on the picklist for data entry later on.
3.3.3 After issuing material to production, Factory Store post the transaction using WO component issue (funct. 16.10)

Input Steps:
- Work Order Number
- Mother Lot ID Number
- Operation Code = “Blank” for all, or 89999 for SMD, 90999 for COB and 92999 for assembly
- Issue Alloc = ‘No’
- Issue Picked = ‘No’
WO component issue without substitution part

Input Steps (no substitution part) :
- Component Part Number
- Leave the op code as is
- Input issue quantity (+ve), e.g. 5000
- Substitution = ‘no’
- Cancel B/O = ‘no’
- Site = ‘HKG’
- Loc = ‘1MAINS’ !!!! be careful the loc as it will always be 1MAIN !!!
- Lot/Serial = blank
- Ref = blank
- Multi Entry = ‘no’
WO component issue WITH substitution part
Input Steps (with substitution part) :
- Component Part Number
- Leave the op code as is
- Input issue quantity (+ve), e.g. 5000
- Substitution = ‘yes’
- Cancel B/O = ‘no’
- Site = ‘HKG’
- Loc = ‘1MAINS’ !!!! be careful the loc as it will always be 1MAIN !!!
- Lot/Serial = blank
- Ref = blank
- Multi Entry = ‘no’
- Use Up and Down key to select right substitution part and then press enter
- Input the same issue quantity (+ve), e.g. 5000
- Substitution = ‘no’
- Cancel B/O = ‘no’
- Site = ‘HKG’
- Loc = ‘1MAINS’ !!!! be careful the loc as it will always be 1MAIN !!!
- Lot/Serial = blank
- Ref = blank
- Multi Entry = ‘no’
Upon completion of inputting component issue
Input Steps:
- Carefully check the part number and qty
- !!! make sure all issue location is 1MAINS !!!
- Select ‘Yes’ if all information is correct
- If any problem, press F4 to return to previous WO component issue screen, then continue to press F4 if want to exit
3.3.4 If material issue is not completed at once, PMC shall create a WO material follow form (WMF) to keep those outstanding items. Material Issue using WMF is same as picklist.
3.4 Work Order Material Return
3.4.1 Production return the material to Store (1MAINS, 0MRBS or 1SCRAPS) together with WO mateial return form (WMR). Factory Store receive, count and sign on the WMR.
3.4.2 Factory Store post the material return transaction using WO Component Issue (16.10).

Input Steps:
- Work Order Number
- Mother Lot ID Number
- Operation Code = “Blank”
- Issue Alloc = ‘No’
- Issue Picked = ‘No’
In case of returning material to 1MAINS
Input Steps:
- Component Part Number
- Leave the op code as is
- Input issue qty (-ve), e.g. –2500 !!! be careful, input qty should be –ve !!!
- Substitution = ‘no’
- Cancel B/O = ‘no’
- Site = ‘HKG’
- Loc = ‘1MAINS’ !!!! be careful, the loc as it will always be 1MAIN !!!
- Lot/Serial = blank
- Ref = blank
- Multi Entry = ‘no’
In case of returning material to 0MRBS
Input Steps (no substitution part) :
- Component Part Number
- Leave the op code as is
- Input issue qty (-ve), e.g. -3000 !!! be careful, input qty should be –ve !!!
- Substitution = ‘no’
- Cancel B/O = ‘no’
- Site = ‘HKG’
- Loc = ‘0MRBS’ !!!! be careful, the loc as it will always be 1MAIN !!!
- Lot/Serial = blank
- Ref = blank
- Multi Entry = ‘no’
In case of returning material to 1SCRAPS
Input Steps:
- Component Part Number
- Leave the op code as is
- Input issue qty (-ve), e.g. -1000 !!! be careful, input qty should be –ve !!!
- Substitution = ‘no’
- Cancel B/O = ‘no’
- Site = ‘HKG’
- Loc = ‘1SCRAPS’ !!!! be careful, the loc as it will always be 1MAIN !!!
- Lot/Serial = blank
- Ref = blank
- Multi Entry = ‘no’
Upon completion of inputting component return
Input Steps:
- Carefully check the part number and qty
- !!! make sure all locations match with WMR !!!
- Select ‘Yes’ if all information is correct
- If any problem, press F4 to return to previous WO component issue screen, then continue to press F4 if want to exit
3.5 Transaction Checking
3.5.1 Factory PMC Store print transaction report on daily basis per stock location and check against the WMF and WMR.
3.5.2 Adjustment of incorrect transaction
3.6 Production Feedback
3.6.1 Upon completion of each work center, production shall feedback to Mfg/Pro using function 16.20.14
Input Steps:
- Work Order Number (compulsory)
- Work Order ID (compulsory)
- Check the operation code against what work center is currently being feedback. If the operation and work center are still under previous work center, inform supervisor of previous work center to complete previous feedback.
- Put ‘1’ as emplyee
- Press F1 to skip the rest of the fields
Next Input Steps:
- Enter accepted quantity
- Press enter in the field of Qty Reject, then the reject input screen will popup
Next Input Steps:
- Input reject qty for each eject code
- Contact supervisor/project engineer if the system does not accept the reject code
- Press F1 to complete and then go to the Rework input screen popup
3.6.2 In case of the lot has not been moved, Production performs the operation move using funct. 17.6
Example of lot not yet moved to first operation

Move to first operation using function 17.6
Input Steps:
- Work Order Number
- Work Order ID
- Operation should be equal to 2 digits work center code + ‘999’. For instance, 89999 for SMT, 92999 for assembly, 65999 for GOP, 66999 for GOF and 67999 for GOC.
- Employee = ‘1’
- Skip all fields except Qty Moved In
- Enter the work order qty into Qty Moved In, then press F1 to complete
- Check all information on screen and confirm ‘yes’ at the bottom of the screen
3.7 Work Order Receipt
3.7.1 After OQC accepted the finished goods, a daily OQC output form will be prepared by OQC and passed to Store together with the FG. Factory PMC shall then do the WO receipt (function 16.11) for receiving goods from WIP into 4MODU.

Input Steps:
- Work Order Number
- Work Order ID
- Quantity = Output Qty
- Skip UM, Conversion, Scrapped Qty, UM, Conversion
- Site = HKG
- Location = ‘MODU’ !!!! be careful, the loc as it will always be 630 !!!
- Press F1 to skip the rest of the fields
- Then enter SIR# as remarks, leave the Effective as is and Close as ‘no’
3.7.2 Upon receipt of FG from OQC and completion of WO receipt, Factory PMC shall issue the SIR for shipment to Tai Po FG Store (loc: 630). Function in v6.0 is 18.3.13 but function in v8.5 to be confirmed.
3.8 Rework Order
3.8.1 Factory PMC shall generate Receipt WO with Oustanding Report
3.8.2 With confirmation from Production on rework order, Factory PMC shall post rework quantity from WIP to 2REWORKS by using the WO receipt function 16.11.
Input Steps:
- Work Order Number
- Work Order ID
- Quantity = Rework Qty
- Skip UM, Conversion, Scrapped Qty, UM, Conversion
- Site = HKG
- Location = ‘2REWORKS’ !!!! be careful, the loc as it will always be 630 !!!
- Press F1 to skip the rest of the fields
- Then enter Rework Report Reference as remarks, leave the Effective as is and Close as ‘no’
3.8.3 Factory PMC shall then create a rework order using function 16.20.6
Input Steps:
- Input WO# with same format as in v6.0
- Leave the ID no. blank
- Production line = SW1. Only LPH7366-1 will have SW1 and SW2.
- Work order type = ‘R’ !!! Attention !!!
- Site = HKG
- Qty Ordered = scheduled qty
- Status = A !!! Attention !!!
- Sales/Job = Qty Ordered
- Yield must be 100%
- Order date = today
- Release date = Due Date – 1 week
- Due date = Monday of the schedule output week
- Routing code = blank !!! Attention !!!
- Press two F1 to skip the 2nd and 3rd page (attributes/accounting data) of work order maintenance
3.8.4 Factory PMC shall release, print and check the rework order according to steps 3.1.6
3.8.5 Since the new Mfg/Pro will not print picklist and routing, a pre-printed form should be attached to it by Factory PMC, and then pass to production for rework.
3.8.6 Factory PMC shall issue the FG in 2REWORKS into the rework order before production start the rework
Input Steps:
- Input FG Part Number
- Leave the op code as is
- Input issue quantity (+ve), e.g. 100
- Substitution = ‘no’
- Cancel B/O = ‘no’
- Site = ‘HKG’
- Loc = ‘2REWORKS’ !!!! be careful the loc as it will always be 630 !!!
- Lot/Serial = blank
- Ref = blank
- Multi Entry = ‘no’
- Press F4 upon completed input component issue
- Select ‘Yes’ to display items being issued
3.8.7 Production feedback is not required due to no work order routing
3.8.8 WO receipt are same as normal work order
3.9 Other Reports
3.9.1 Work Order Ready to Close Report
Input Steps:
- Work Order range from ‘S’ to ‘T’
- Status = ‘R’
- Select report type according to user’s requirement
3.9.2 Outstanding Work Order Material Reports
Input Steps :
- Work Order Number from ‘S’ to ‘T’
- Skip other selection fields
3.9.3 Outstanding Work Order Report
3.9.4 Operation Yield Reports