Speech with Raspberry Pi

Introduction

Raspberry Pi is an excellent automation control unit, and we can use it to build a voice recognition feature in order to make it as a voice automation control unit. Yeah, is it very interesting ! In the following, I will show you the script to build voice feature, including converting speech to text, converting text to speech, auto-reply a text question.

Script to convert Speech to Text

I take the benefit of using google speech recognition ver 2 feature and arecord feature of Raspberry Pi. To remind that you should apply your google api key for usage in this script, as below:

#!/bin/bash
echo “Recording…”
arecord -D plughw:1,0 -f cd -t wav -r 16000 –duration=4 test.wav
avconv -i test.wav -y -ar 16000 -ac 1 test.flac

echo “Processing…”
wget -q -U “Mozilla/5.0” –post-file test.flac –header “Content-Type: audio/x-flac; rate=16000” -O – “https://www.google.com/speech-api/v2/recognize?client=chromium&lang=en_US&key=AIzaSyB0RJilwaAhMpftgmgRhgEzd4lZnia1MwQ” |cut -d” -f8 >stt.txt
echo “You said: “
value=`cat stt.txt`
echo “$value”

The screen dump result to run speech2text.sh program is as below:

speech2text

Script to Auto-Reply a Query

It is a python program using Wolframalpha’s API add-on tools to process a question as below script, and you should apply a app ID from http://products.wolframalpha.com/api/:

import wolframalpha
import sys

# Get a free API key here http://products.wolframalpha.com/api/
# This is a fake ID, go and get your own, instructions on my blog.
app_id=”VWQU6P-YPRRG752XH”

client = wolframalpha.Client(app_id)

query = ‘ ‘.join(sys.argv[1:])
res = client.query(query)

if len(res.pods) > 0:
    texts = “”
    pod = res.pods[1]
    if pod.text:
        texts = pod.text
    else:
        texts = “I have no answer for that”
        # to skip ascii character in case of error
    texts = texts.encode(‘ascii’, ‘ignore’)
    print(texts)
else:
    print(“Sorry, I am not sure.”)

To run the python program as script –> python3 queryprocess.py “What is your name”, then we can get a reply result as “My name is Walfram|Alpha.”, as below screen dump.

speech-reply

Convert Text to Speech

We can use Espeak utility to convert text to speech under Raspberry Pi. Its installation is very simple as below:

$ sudo apt-get install espeak

After installation, you can run the espeak program to speech, for example,

$ espeak "Hello World"

Question and Answer Program with Speech and Voice Reply

I develop a script to combine the above three program into one, so that you can use it to speech a question and wait for a voice answer. Let’s see the script of main.sh program as below:

#!/bin/bash
echo “Recording… Press Ctrl+C to Stop.”
./speech2text.sh > /dev/null 2>&1
QUESTION=$(cat stt.txt)
echo “Me: “ $QUESTION
python3 queryprocess.py $QUESTION > ans1.txt
ANSWER=$(cut -c3- ans1.txt)
ANSWER1=$(echo “$ANSWER” | sed -e ‘s/\n/ /g’)
ANSWER2=${ANSWER1::-1}
echo “Robot: “ $ANSWER2
espeak “$ANSWER2” > /dev/null 2>&1

To run this program as script –> ./main.sh, then we can get a reply result as below screen dump, and with voice reply, too.

speech-main

Reference Document:

How to Capture Weather Forecast from web using Raspberry Pi’s Python Program

Introduction

We can use python to develop a program to capture any city’s weather forecast from openweathermap.org web site under our Raspberry Pi computer. I list our program and screen capture result in the following for your reference.

Program Source Code under Python ver 3 as below:

import urllib.request,json

city = input(“Enter City: “)

def getForecast(city) :
    #url = “http://api.openweathermap.org/data/2.5/forecast/daily?cnt=7&units=meteric&mode=json&q=”
    #url = “http://api.openweathermap.org/data/2.5/forecast/city?id=524901&APPID=42443ecbdcad3d01842205e3745895cd”
    #url = “http://api.openweathermap.org/data/2.5/forecast/daily?cnt=7&units=meteric&mode=json&q=LONDON&lang=zh_cn&APPID=42443ecbdcad3d01842205e3745895cd”
    url = “http://api.openweathermap.org/data/2.5/forecast/daily?cnt=7&units=meteric&mode=json&q=”
    url = url + city + “&lang=zh_cn&APPID=42443ecbdcad3d01842205e3745895cd”
    req = urllib.request.Request(url)
    response=urllib.request.urlopen(req)
    return json.loads(response.read().decode(“UTF-8”))

forecast = getForecast(city)

print(“Forecast for “, city, forecast[‘city’][‘country’])

day_num=1
for day in forecast[‘list’]:
    print(“Day : “, day_num)
    print(day[‘weather’][0][‘description’])
    print(“Cloud Cover : “, day[‘clouds’])
    print(“Temp Min : “, round(day[‘temp’][‘min’]-273.15, 1), “degrees C”)
    print(“Temp Max : “, round(day[‘temp’][‘max’]-273.15, 1), “degrees C”)
    print(“Humidity : “, day[‘humidity’], “%”)
    print(“Wind Speed : “, day[‘speed’], “m/s”)
    print()
    day_num = day_num+1

Screen Dump Result as below:

weather-pi

Further Development:

This function can be further developed to save weather forecast data to database, and then display in a chart format on screen. I may do it if I have time in future.

Network Communication Script for Raspberry Pi

Introduction

We can use python programs to start a server side and client side network communication service and allow them to transmit message  to each other under a Raspberry Pi. For example, we start two LXTerminal Sessions under a Raspberry Pi (or two difference Pi), and then run the following script.

In Server Side, run the following script:

import socket
comms_socket = socket.socket()
comms_socket.bind((‘localhost’, 50000))
comms_socket.listen(10)
connection, address = comms_socket.accept()
while True:
    print(connection.recv(4096).decode(“UTF-8”))
    send_data = input(“Reply: “)
    connection.send(bytes(send_data, “UTF-8”))

In Client Side, run the following script:

import socket
comms_socket = socket.socket()
comms_socket.connect((‘localhost’, 50000))
while True:
    send_data = input(“message: “)
    comms_socket.send(bytes(send_data, “UTF-8”))
    print(comms_socket.recv(4096).decode(“UTF-8”))

The testing result is shown as below screen dump for your reference:

network-communicate-pi

Most Easy Way to Start a Web Server Service Using Python

Introduction

Although it is easy to start-up IIS under Window O/S or Apache under Unix O/S, we still have another choice to start a web server service using Python programming tools. You only need to install python, and then start python and run the following script line by line:

import http.server, os
#define the server document directory with unix path;
os.chdir(“UsersadministratorDocuments”)
#if it is window env with directory as c:UsersadministratorDocuments
os.chdir(“/Users/goldmanau/Documents”)
httpd = http.server.HTTPServer((‘127.0.0.1’, 8000),
http.server.SimpleHTTPRequestHandler)
httpd.serve_forever()

This script can work under either python 2.7 or 3.x version under window or Unix environment. If you put the index.html to the server document path, then, you can start a web browser and input the link as http://127.0.0.1:8000/index.html in order to display your web page. It is the most easy, simple, fast way to start a web server service.

Setup to upload & access Dropbox on Raspberry Pi

Introduction

If you want to upload file from or to DropBox through Raspberry Pi, it is easy to do so. The following will show you a a installation program and its setup steps.

Step 1. Setup DropBox account and apps from web

First of all you need a DropBox account and apps account through the following links. Hop on over to dropbox is free.

http://www.dropbox.com

You then need to visit this link https://www.dropbox.com/developers/apps, login to DropBox and create an “app” by clicking the “create app” button.

Then choose “Dropbox API app”, “Files and Datastores”, and answer the final question “Can your app be limited to its own, private folder?” – either answer is OK, depending on your needs. The result will be as below:

raspberrypi-dropbox0

Step 2. Set Up DropBox Uploader in Raspberry Pi

Get Dropbox Uploader onto your Pi

$ cd ~    (this ensures you are in /home/pi)
$ git clone https://github.com/andreafabrizi/Dropbox-Uploader.git
$ ls

(If this fails, you may need to install git with sudo apt-get install git-core)

You should be able to see a directory called Dropbox-Uploader

$ cd Dropbox-Uploader
$ ls

You should now see three files, one of which is called dropbox_uploader.sh. This is the script we’re going to use.

$ ./dropbox_uploader.sh

Run the script with ./dropbox_uploader.sh (if it fails, try chmod +x dropbox_uploader.sh)

If access right problem still occurs, run the following command:

$ sudo ./dropbox_upload.sh

Sorting out the DropBox API keys and authorization. You need to give your app a unique name, and you will be assigned some keys to go with the name. Now you need to enter your app’s DropBox API keys and secret. Once you’ve entered your keys and answered the question “app” or “full”, your Pi will request an authorisation token and you will be given a web URL you need to visit to activate it…

The following is the whole setup screen dump from my Raspberry Pi for your reference:

pi@gopi2:~ $ git clone https://github.com/andreafabrizi/Dropbox-Uploader.git
Cloning into ‘Dropbox-Uploader’…
remote: Counting objects: 718, done.
remote: Total 718 (delta 0), reused 0 (delta 0), pack-reused 718
Receiving objects: 100% (718/718), 213.12 KiB | 190.00 KiB/s, done.
Resolving deltas: 100% (369/369), done.
Checking connectivity… done.

pi@gopi2:~ $ cd Dropbox-Uploader

pi@gopi2:~/Dropbox-Uploader $ ls
CHANGELOG.md dropbox_uploader.sh dropShell.sh LICENSE README.md

pi@gopi2:~/Dropbox-Uploader $ ./dropbox_uploader.sh
This is the first time you run this script.
1) Open the following URL in your Browser, and log in using your account: https://www.dropbox.com/developers/apps
2) Click on “Create App”, then select “Dropbox API app”
3) Now go on with the configuration, choosing the app permissions and access restrictions to your DropBox folder
4) Enter the “App Name” that you prefer (e.g. MyUploader271401743117612)
Now, click on the “Create App” button.
When your new App is successfully created, please type the
App Key, App Secret and the Permission type shown in the confirmation page:
# App key: 0pmq2laok7xxxxx
# App secret: d5fh2kgyd2xxxxx
Permission type:
App folder [a]: If you choose that the app only needs access to files it creates
Full Dropbox [f]: If you choose that the app needs access to files already on Dropbox
# Permission type [a/f]: a
App key is 0pmq2laok7tinna, App secret is d5fh2kgyd2uyftx and Access level is App Folder. Looks ok? [y/n]: y
Token request… OK
Please open the following URL in your browser, and allow Dropbox Uploader to access your DropBox folder:
https://www.dropbox.com/1/oauth/authorize?oauth_token=qH829qJuKZpxxxxx
Press enter when done…
Access Token request… OK

Finally, your DropBox account connected to your “app”

Besides Raspberry Pi operation, you also need to allow the access of Dropbox from Raspberry Pi as below two screens:

raspberrypi-dropbox1

raspberrypi-dropbox2

Step 3. Now you can test to upload from Raspberry Pi to DropBox

$ cd home/pi/Dropbox-Uploader
$ ./dropbox_uploader.sh upload /home/pi/upload_file_fr name_of_upload_file_to

This will upload the file you choose to your DropBox account.

…or use it in a Python script like this…

from subprocess import call  
photofile = “/home/pi/Dropbox-Uploader/dropbox_uploader.sh upload /home/pi/photo00001.jpg photo00001.jpg” 
call ([photofile], shell=True)

If we upload “license” & “license1” files to Dropbox, it will show the result as below:

raspberrypi-dropbox3

Finally, if you look at the DropBox Uploader documentation, there’s a lot more commands you can make use of…

  • upload
  • download
  • delete
  • move
  • list
  • share
  • mkdir


Backup of Raspberry Pi system image from SIM card

Introduction

If you want to backup your Raspberry Pi system image from SIM card, you can use the HDD Raw Copy Tool as described below.

Developer: HDDGURU.COM

License terms: Freeware

Supported OS: MS Windows XP, Vista, 7, 8, Server 2003, 2008, 2008R2

HDD Raw Copy Tool is a utility for low-level, sector-by-sector hard disk duplication and image creation.

  • Supported interfaces: S-ATA (SATA), IDE (E-IDE), SCSI, SAS, USB, FIREWIRE.
  • Big drives (LBA-48) are supported.
  • Supported HDD/SSD Manufacturers: Intel, OCZ, Samsung, Kingston, Maxtor, Hitachi, Seagate, Samsung, Toshiba, Fujitsu, IBM, Quantum, Western Digital, and almost any other not listed here.
  • The program also supports low-level duplication of FLASH cards (SD/MMC, MemoryStick, CompactFlash, SmartMedia, XD) using a card-reader.

HDD Raw Copy tool makes an exact duplicate of a SATA, IDE, SAS, SCSI or SSD hard disk drive. Will also work with any USB and FIREWIRE external drive enclosures as well as SD, MMC, MemoryStick and CompactFlash media.

The tool creates a sector-by-sector copy of all areas of the hard drive (MBR, boot records, all partitions as well as space in between). HDD Raw Copy does not care about the operating system on the drive – it could be Windows, Linux, Mac, or any other OS with any number of partitions (including hidden ones). Bad sectors are skipped by the tool.

If your media has a supported interface then it can be copied with HDD Raw Copy!

In addition, HDD Raw Copy can create an exact raw (dd) or compressed image of the entire media (including service data such as MBR, Boot records, etc). Again, all filesystems (even hidden) are supported.

Examples of possible uses

  • Data recovery: make a copy of the damaged drive to attempt recovery on the copy
  • Data recovery: copy a damaged hard drive and skip bad sectors
  • Migration: completely migrate from one hard drive to another
  • Ultimate backup: Make an exact copy of the hard drive for future use
  • Backup: create an image of a USB flash stick and copy/restore at any moment
  • Software QA engineers: restore your OS hard drives at any moment from a compressed image
  • Duplicate/Clone/Save full image of any type of media!

Sound Control on Raspberry Pi

Introduction

Raspberry Pi has a build-in sound card, HDMI and phone jack output to play sound. If you connect to HDMI display or plug-in a headphone to it, you can play sound. The setup of sound feature is easy as described below.

raspberrypi-phone

Step 1. Install PiAUISuite sound software

$ sudo apt-get install git-core

$ git clone git://github.com/StevenHickson/PiAUISuite.git

$ ./InstallAUISite.sh

(be aware to answer pop-up question to continue installation)

Step 2. Setup Sound Device

$ modprobe snd_bcm2835

$ amixer controls
numid=3,iface=MIXER,name=’PCM Playback Route’
numid=2,iface=MIXER,name=’PCM Playback Switch’
numid=1,iface=MIXER,name=’PCM Playback Volume’

$ amixer cset numid=3 1

where 0 for auto-select, 1 for headphone, 2 for HDMI.

$ sudo amixer cset numid=1 60%

to set the volume between 0 – 100%, 0 for mute.

$ sudo amixer set PCM – 60%

Step 3. To Play Sound

$ sudo omxplayer voice.mp3

If omxplayer’s auto-detection of the correct audio output device fails, you can force output over hdmi with:

$ sudo omxplayer-o hdmivoice.mp3

or you can force output over the headphone jack with:

$ sudo omxplayer-o localvoice.mp3

Note: you should be able to play sound on VLC connection, too.

Reference Link:

Bonus:

You can install alsa to control sound. Make sure alsa-utils is installed and run alsamixer as below:

$ sudo apt-get install -y alsa-utils

$ alsamixer

Then use the F1-F6 keys and UI to push up the volume.

sound-control

Use the arrow keys to jack up the volume and quit.

To save what you changed in alsamixer as defaults, do:

sudo alsactl store 0

Pls consider to buy Headphone from Amazon as below link:

Build a Raspberry Pi Webcam Server for Motion Detection

Introduction

Raspberry Pi can be connected to a camera to capture picture and video in order to use it as a CCTV motion detection device, which I have described in my previous post. To further enhance the motion detection feature, we can build a Raspberry Pi Webcam Video Server for browsing from web. It is more effective to monitor environment from outside. In the following, I will describe the installation steps of a application call motionPie to build a web server.

The MotionPie Logo

1. Download & Format the SD Card

  1. Download the Motion Pie SD Card Image from the Motion Pie GitHub repository or my link <<HERE>>.
  2. You will need a formatting tool. Visit the SD Association’s website and download SD Formatter 4.0 for either Windows or Mac.
  3. Follow the instructions to install the formatting software.
  4. Insert your SD card into the computer or laptop’s SD card reader and check the drive letter allocated to it, e.g. I:/
  5. In SD Formatter, select the drive letter for your SD card (eg. I:/) and format

2. Install the Motion Pie Image onto the SD Card

  1. Download the Win32DiskImager.
  2. Now unzip the MotionPie ISO file so you can install it onto the Pi safely.
  3. Select the MotionPie ISO file and the drive letter your SD card is assigned (Eg. I:/)
  4. Confirm you have the correct details and click on Write.
  5. Once done you can safely remove your SD card from the computer.
win32diskimager-motionpie

Booting/Setting up MotionPie

Now we’re ready for boot up, so insert the SD Card, an Ethernet cord and the power cord. We will need to communicate to the Pi over the network rather than directly like I have done in most of the previous tutorials.

So now go ahead and boot the PI up and then we can move onto getting it setup correctly.

Setting up the Raspberry Pi Security Camera

Once the Pi has booted you will need to do the following:

  1. First we will need the IP or host name so we’re able to connect to the Pi.
    • If you’re using Windows simply go to network on the right hand side in the File Explorer.
    • You should see a computer names something like MP-xxxxxxx
    • Go to your browser and add this to your browser bar eg. http://MP-xxxxxxx
    • You should now have the Motion Pie interface up.
  2. Alternatively you can find out the IP of the Pi by going to your router. Since all routers are different I will not go into how this is done. Please refer to your manufactures manual.
  3. To login as the admin go to key symbol in the upper left corner. The username is admin and the password is blank, this can be changed later.
  4. You can access all the setting for the camera stream here. If you’re interested in altering these settings keep reading as I explain them as much as possible below.

picam_init

Now we should have a working security hub that we can configure! Require the security camera to be wireless? No problem! Require to alert you with an email? No problem! Read on more to find out what the settings do in Motion Pie.

How to setup multiple network Raspberry Pi security cameras.

If you want to run more than one Pi cameras it is pretty easy to set this up so you have all the streams under in one window. You can even add a stream that has been setup using the Raspberry Pi Webcam server tutorial.

  1. First click on the 3 lines with dots on them in the upper left hand corner.
  2. Now up in the upper left hand corner and click on the dropdown box and select add camera.
  3. In here you have four settings to set up.
  4. Device: This is allows you to select where the camera is located(network/local) and type. (Eg. motionEye, MJEPG camera)
  5. URL: This is the URL to the other network camera. Eg. http://othercamera:8080
  6. Username: This is the username to the camera device. (If no username/password required leave the fields blank)
  7. Password: This is the password for the username chosen above.
  8. Camera: Select the camera you wish to add.
motionpie-setup

Connecting to the surveillance outside your network

Now that you have your Raspberry Pi security cameras setup it might be worth considering allowing access to the central Pi so you can monitor your cameras elsewhere.

To do this simply head over to my guide on how to setup port forwarding and also how to setup dynamic DNS, you can find the guide at Raspberry Pi Dynamic DNS & Port Forwarding.

A few important bits of information you will need for the setting up the port forwarding.

  • The IP of your Raspberry Pi for example mine is 192.168.5.78
  • Internal port is 80.

Ensure you have also setup passwords on both the admin and the surveillance user to help avoid unwanted visitors.

Once setup should now be able to connect using your external IP address such as XX.XXX.XXX.XXX:80 (80 should be changed to something else, I would recommended changing it to avoid easy access for unwanted visitors)

Configuring the Settings in MotionPie

General Settings

In here you are able to set the administrator username and password. This account will have access to all the settings you’re seeing at the moment.

Surveillance username and password can also be set in here this can be used to just access the camera interface.

To view all the settings available to set turn the show advanced settings to on.

Wireless Network

Turn this on if you plan on connecting to the network via a wireless dongle. There are two things you will need to fill in here.

  1. Network Name – Enter the network name/SSID you wish to connect to in here.
  2. Network Key – Enter the network password/network key in here for the network you’re connecting to.

Once done you should be a able to disconnect the Ethernet cord and remain connected to the network.

Video Device

Under this menu you’re able to set certain settings regarding the Raspberry Pi camera device.

  1. Camera Name: Set this to whatever you would like the camera to be named. For example kitchen would work well for a camera in a kitchen.
  2. Camera Device: You’re unable to edit this one but this is the device name of the camera.
  3. Light Switch Detection: Enable this if you want sudden changes such as a light being switched on to not be treated as motion. (This will help prevent false positives)
  4. Automatic Brightness: This will enable software automatic brightness, this means the camera software will make adjustments for the brightness. You don’t need to activate this if your camera already handles this.
    • In here you change the brightness, contrast and saturation of the video of the camera.
  5. Video Resolution: Here you can set the video resolution of the camera. The higher the resolution the more room it will take up and the more bandwidth it will need to use in order to stream the footage. I set mine to 1280×800 and that seems to work perfectly fine.
  6. Video Rotation: You can rotate your video from the Raspberry Pi security if you’re finding that it is looking the wrong way.
  7. Frame Rate: This sets the amount of frames that will be sent be every second. The higher this is the smoother the video but again this will increase the storage used and bandwidth.

File Storage

Under this menu you can specify where you would like the files stored for the Raspberry Pi Security Camera. This can be a custom path on the Pi, the predetermined path or the network path.

Text Overlay

In here you can set the text overlay on the output of the camera. By default the left text reads the camera name and the right read the time stamp (Todays date and current time).

Video Streaming

This menu you’re able to set the video streaming options, this is the video you see in the browser.

  • Streaming Frame Rate: This is exactly the same as mentioned above under video device.
  • Streaming Quality: You can reduce the video streaming quality. This is good to reduce if you need to access the camera on a low bandwidth device often.
  • Streaming Image Resizing: Enable this if you want MotionPie to resize the images before being sent to a browser. (Not recommended on a Pi)
  • Streaming Port: This is the port that the device will listen to for connections looking to view the stream. Eg. http://motionpie:8081
  • Motion Optimization: This will reduce the frame rate whenever no motion is detected. This will save you bandwidth.

You can also see three URLs that can be used to access different footage. These URLs are very important if you have multiple cameras per Pi as each camera will have a unique port that you listen to the stream on.

Still Images

Here you can set the Raspberry Pi security camera to take still images whenever motion is triggered, during specific intervals or all the time.

Motion Detection

In here you activate the Raspberry Pi security camera motion detection that is included in the software. You are able to make adjustments to the settings here so that you can get better motion detection.

Motion Movies

In you here you can set the Pi to record movies whenever motion is detected

Motion Notifications

You’re able to set up email notifications, web hook notifications or even run a command whenever motion is detected. This will allow you to be notified whenever activity is detected on the cameras, perfect if they are monitoring areas with low traffic.

Working Schedule

Here you can set the days and the hours of operation you would like the system to be monitoring (If you leave this off then it is 24/7). This option is perfect if you only need it running during specific hours.

Summary

The Raspberry Pi security camera system is a great way to have multiple cameras hooked up both locally and over a network. All the extra setting motion pie provides allows you to have a  strong functioning security hub for your home, office or wherever you’re setting this up.

Information Source:

http://pimylifeup.com/raspberry-pi-security-camera/

Note:

In past, we often used “Motion” package (“sudo apt-get install motion”) for webserver, but this method doesn’t work on the Raspberry Pi 2.

Install OpenCV 3.0 for both Python 2.7+ and Python 3+ on your Raspberry Pi 2

Information source: http://www.pyimagesearch.com/2015/07/27/installing-opencv-3-0-for-both-python-2-7-and-python-3-on-your-raspberry-pi-2/

So if you’re interested in building awesome computer vision based projects like this, then follow along with me and we’ll have OpenCV 3.0 with Python bindings installed on your Raspberry Pi 2 in no time.

UPDATE: The tutorial you are reading now covers how to install OpenCV 3 with Python 2.7 and Python 3 bindings on Raspbian Wheezy. This tutorial works perfectly, but if you are looking to install OpenCV 2.4 on Raspbian Wheezy or OpenCV 3 on Raspbian Jessie, please see these tutorials:

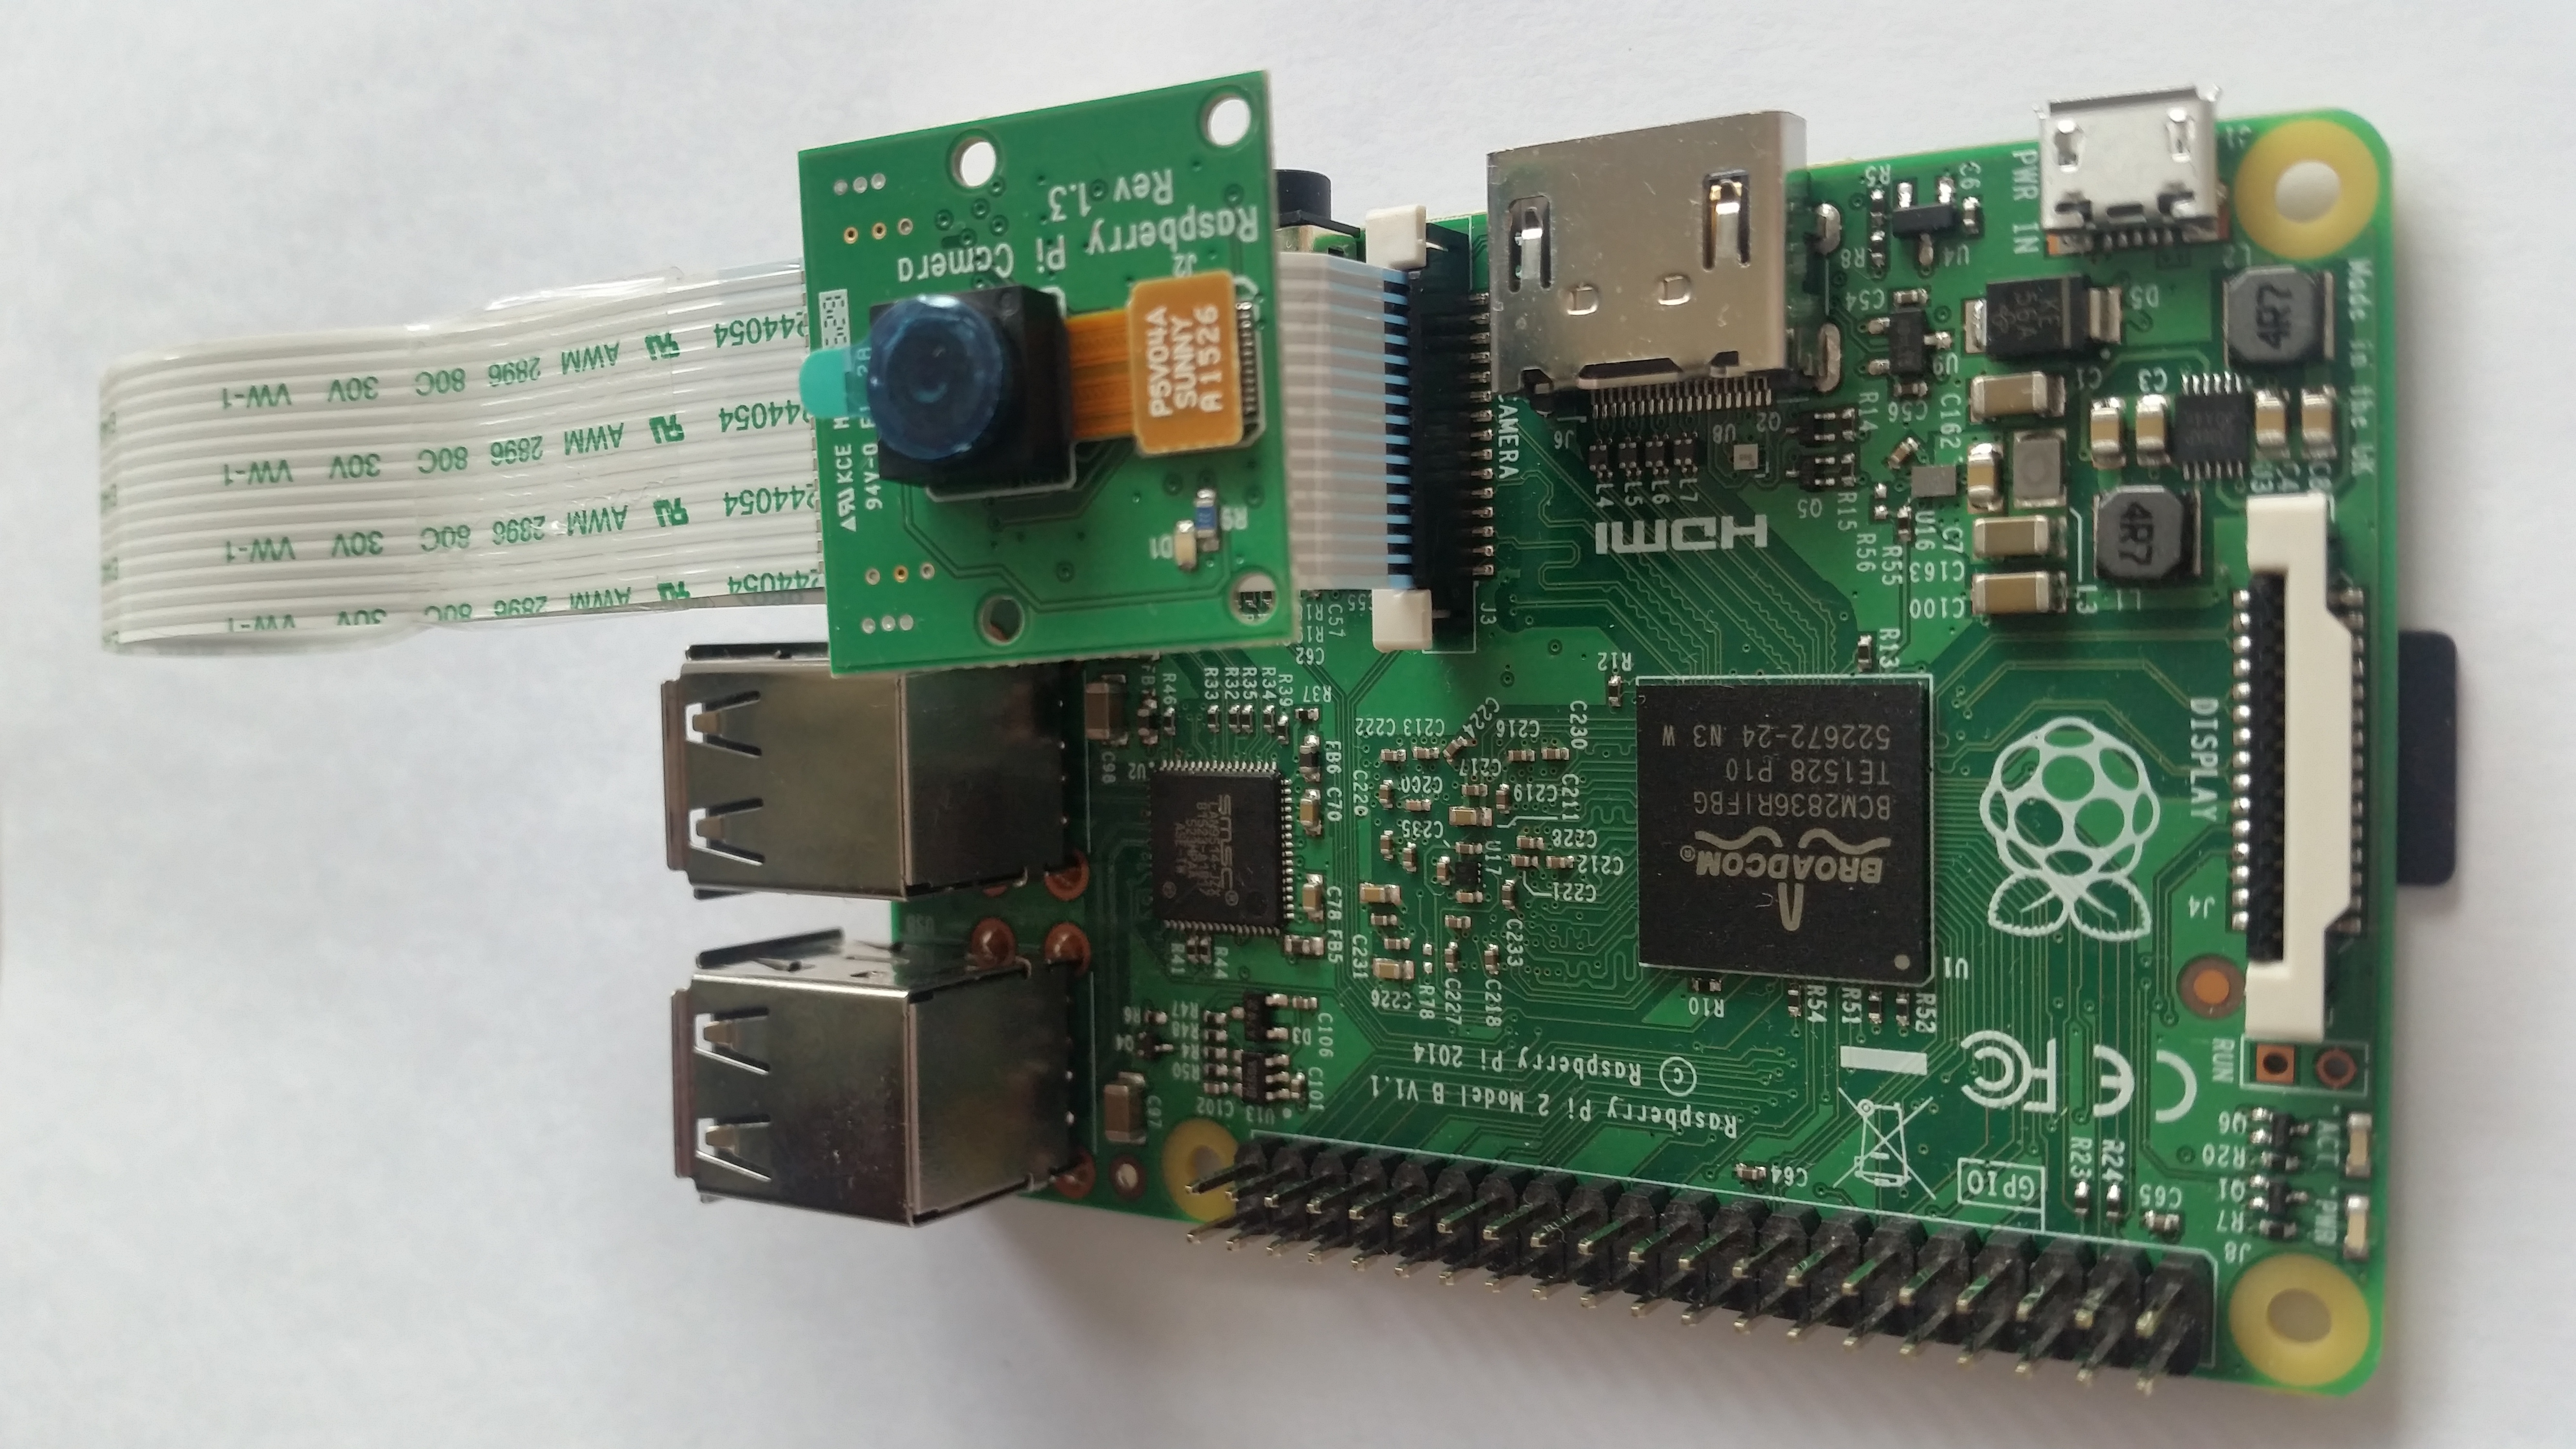
The rest of this blog post will detail how to install OpenCV 3.0 for both Python 2.7 and Python 3+ on your Raspberry Pi 2. These install instructions could also be used for the B+, but I highly recommend that you use the Pi 2 for running OpenCV applications — the added speed and memory makes the Pi 2 much more suitable for computer vision.

In order to keep this tutorial concise and organized, I have broken down the OpenCV 3.0 install process into four sections:

  • Section 1: Configuring your Raspberry Pi by installing the required packages and libraries. Regardless of whether you are using Python 2.7 or Python 3+, we need to take some steps in order to prepare our Raspberry Pi for OpenCV 3.0 — these steps are mainly calls to aptget  , followed by installing the required packages and libraries.
  • Section 2: Compiling OpenCV 3.0 with Python 2.7+ support. If you want to install OpenCV 3.0 with Python 2.7+ bindings on your Raspberry Pi, then this is the section that you’ll want to go to. After you complete this section,  skip Section 3 and head right to Section 4.
  • Section 3: Compiling OpenCV 3.0 with Python 3+ support. Similarly, if you want to install OpenCV 3.0 with Python 3+ bindings on your Pi 2, then complete Section 1 and skip right to Section 3.
  • Section 4: Verifying your OpenCV 3.0 install. After you have installed OpenCV 3.0 with Python support on your Raspberry Pi 2, you’ll want to confirm that is is indeed installed correctly and working as expected. This section will show you how to verify your OpenCV 3.0 install and ensure it’s working correctly.

Python 2.7+ or Python 3+?

Before we get started, take a second and consider which version of Python you are going to use. Are you going to compile OpenCV 3.0 with Python 2.7 bindings? Or are you going to compile OpenCV 3.0 Python 3 bindings?

There are pros and cons of each, but the choice is honestly up to you. If you use Python 3 regularly and are comfortable with it, then go ahead and compile with Python 3 bindings. However, if you do a lot of scientific Python development, you might want to stick with Python 2.7 (for the time being at least). While packages such as NumPy, Scipy, and scikit-learn are certainly increasing the Python 3+ adoption rate in the scientific community, there are still many scientific packages that still require Python 2.7 — because of this, you can easily pigeonhole yourself if you go with Python 3 and then realize that many of the packages you use on a daily basis only support Python 2.7.

When in doubt, I normally suggest that scientific developers use Python 2.7 since it ensures capability with a larger set of scientific packages and allows you to run experiments with legacy code. However, that is quickly changing — so proceed with whichever Python version you are most comfortable with!

Section 1: Configuring your Raspberry Pi by installing required packages and libraries

Let’s kick off this OpenCV 3.0 install tutorial by updating our Raspberry Pi:

Timing: 9m 5s

Now we can install developer tools required to build OpenCV from source:

Timing: 43s

As well as install packages used to load various image formats from disk:

Timings: 27s

Let’s install some video I/O packages:

Timings: 26s

Install GTK, which handles OpenCV’s GUI operations:

Timings: 2m 20s

We can also optimize various functions (such as matrix operations) inside OpenCV by installing these packages:

Timings: 46s

At this point we have all our prerequisites installed, so let’s pull down the OpenCV repository from GitHub and checkout the 3.0.0  version:

Timings: 8m 34s

Update (3 January 2016): You can replace the 3.0.0  version with whatever the current release is (as of right now, it’s 3.1.0 ). Be sure to check OpenCV.org for information on the latest release.

For the full, complete install of OpenCV 3.0, grab the opencv_contrib repo as well:

Timings: 1m 7s

Again, make sure that you checkout the same version for opencv_contrib  that you did for opencv  above, otherwise you could run into compilation errors.

Now we’re at at a crossroads, a sort of Choose Your Own (OpenCV) Adventure!

You can either follow Section 2 and compile OpenCV 3.0 with Python 2.7+ bindings. Or you can head to Section 3 and install OpenCV 3.0 with Python 3+ bindings. The choice is up to you — but choose wisely! Once you make the choice it will be non-trivial to change your mind later.

Note: It’s certainly possible to install OpenCV 3.0 for both versions of Python (it’s actually not too hard), but it’s outside the scope of this tutorial; I’ll be sure to cover this technique in a future post.

Section 2: Compiling OpenCV 3.0 with Python 2.7+ support

Install the Python 2.7 header files so we can compile the OpenCV 3.0 bindings:

Timings: 1m 20s

Install pip , a Python package manager that is compatible with Python 2.7:

Timings: 33s

Just as we did in the original tutorial on installing OpenCV 2.4.X on your Raspberry Pi, we are going to utilize virtualenv and virtualenvwrapper which allow us to create separate Python environments for each of our Python projects. Installing virtualenv  and virtualenvwrapper  is certainly not a requirement when installing OpenCV and Python bindings; however, it’s a standard Python development practiceone that I highly recommend, and the rest of this tutorial will assume you are using them!

Installing virtualenv  and virtualenvwrapper  is as simple as using the pip  command:

Timings: 17s

Next up, we need to update our ~/.profile  file by opening it up in your favorite editor and adding the following lines to the bottom of the file.

And if your ~/.profile  file does not exist, create it.

Now that your ~/.profile  file has been updated, you need to reload it so the changes take affect. To force a reload of the . profile , you can: logout and log back in; close your terminal and open up a new one; or the most simple solution is to use the source  command:

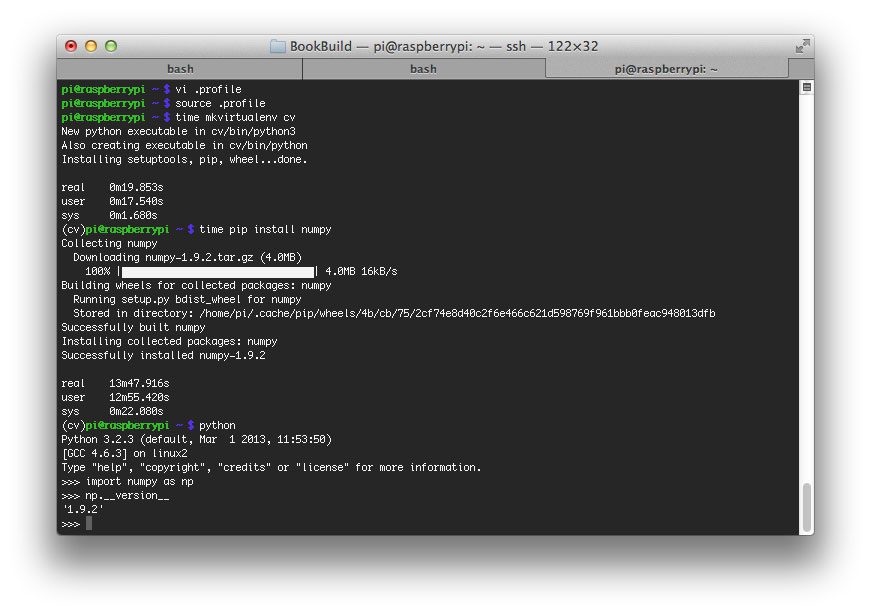
Time to create the cv3  virtual environment where we’ll do our computer vision work:

Timings: 19s

If you ever need to access the cv3  virtual environment (such as after you logout or reboot your Pi), just source  your ~/.profile  file (to ensure it has been loaded) and use the workon  command:

And your shell will be updated to only use packages in the cv3  virtual environment.

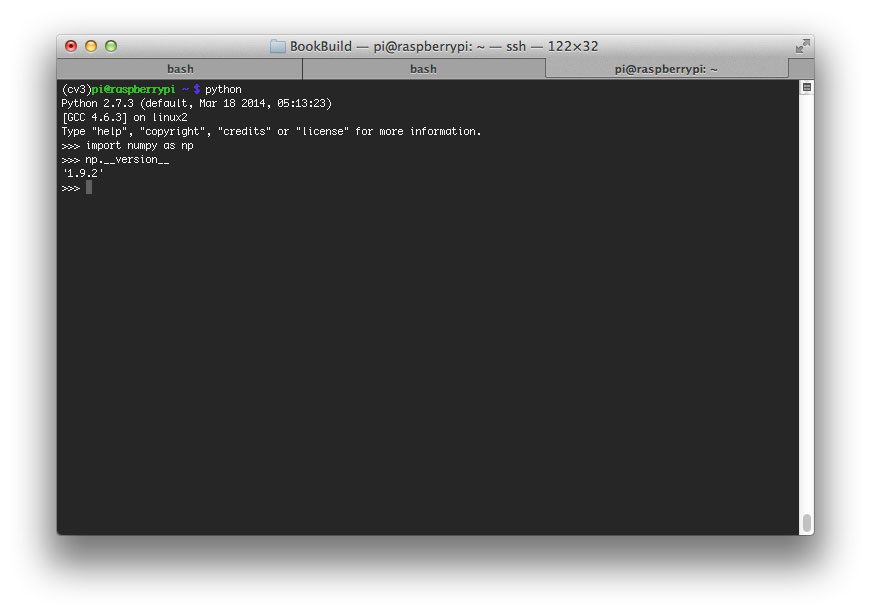
Moving on, the only Python dependency we need is NumPy, so ensure that you are in the cv3  virtual environment and install NumPy:

Timings 13m 47s

While unlikely, I have seen instances where the .cache  directory gives a “Permission denied” error since we used the sudo  command to install pip . If that happens to you, just remove the .cache/pip  directory and re-install NumPy:

Awesome, we’re making progress! You should now have NumPy installed on your Raspberry Pi in the cv3  virtual environment, as shown below:

Figure 1: NumPy has been successfully installed into our virtual environment for Python 2.7+.

Note: Performing all these steps can be time consuming, so it’s perfectly normal to logout/reboot and come back later to finish the install. However, if you have logged out or rebooted your Pi then you will need to drop back into your cv3  virtual environment prior to moving on with this guide. If you do not, OpenCV 3.0 will not compile and install correctly and you’ll likely run into import errors.

So I’ll say this again, before you run any other command, you’ll want to ensure that you are in the cv3  virtual environment:

And once you are in cv3  virtual environment, you can use cmake  to setup the build:

Update (3 January 2016): In order to build OpenCV 3.1.0 , you need to set D INSTALL_C_EXAMPLES=OFF  (rather than ON ) in the cmake  command. There is a bug in the OpenCV v3.1.0 CMake build script that can cause errors if you leave this switch on. Once you set this switch to off, CMake should run without a problem.

CMake will run for about 30 seconds, and after it has completed (assuming there are no errors), you’ll want to inspect the output, especially the Python 2 section:

Figure 2: The output of CMake looks good -- OpenCV 3.0 will compile with Python 2.7 bindings using the Python interpreter and NumPy package associated with our virtual environment.

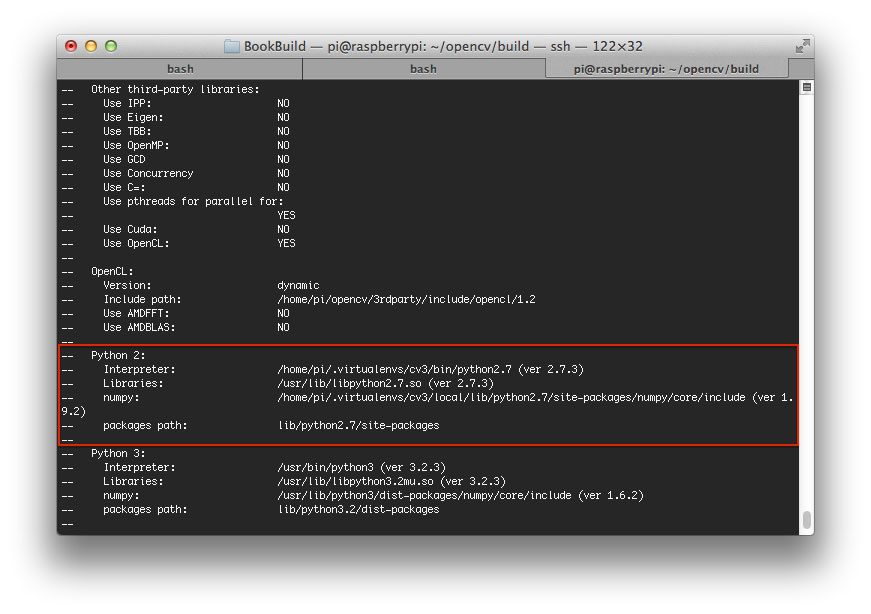
The key here is to ensure that CMake has picked up on the Python 2.7 interpreter and numpy  package associated with the cv3  virtual environment.

Secondly, be sure look at the packages path  configuration — this is the path to the directory where your OpenCV 3.0 bindings will be compiled and stored. From the output above, we can see that my OpenCV bindings will be stored in /usr/local/lib/python2.7/sitepackages

All that’s left now is to compile OpenCV 3.0:

Where the 4 corresponds to the 4 cores on our Raspberry Pi 2.

Timings: 65m 33s

Assuming OpenCV has compiled without an error, you can now install it on your Raspberry Pi:

At this point, OpenCV 3.0 has been installed on your Raspberry Pi 2 — there is just one more step to take.

Remember how I mentioned the packages path  above?

Take a second to investigate the contents of this directory, in my case /usr/local/lib/python2.7/sitepackages/ :

Figure 3: Our Python 2.7+ bindings for OpenCV 3.0 have been successfully installed on our system. The last step is to sym-link the cv2.so file into our virtual environment.

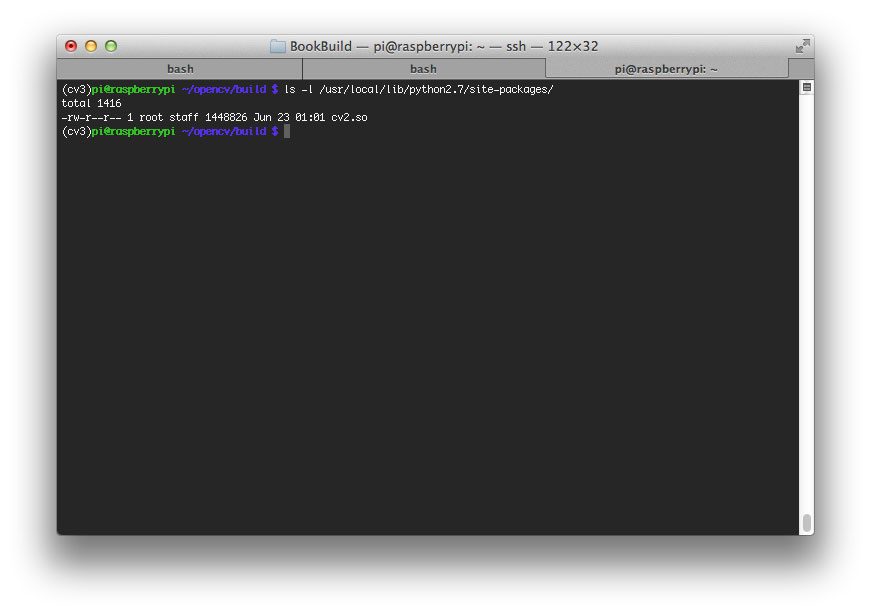
You should see a file named cv2.so , which is our actual Python bindings. The last step we need to take is sym-link the cv2.so  file into the sitepackages  directory of our cv3  environment:

And there you have it! You have just compiled and installed OpenCV 3.0 with Python 2.7 bindings on your Raspberry Pi! 

Proceed to Section 4 to verify that your OpenCV 3.0 install is working correctly.

Section 3: Compiling OpenCV 3.0 with Python 3+ support

First up: Install the Python 3 header files so we can compile the OpenCV 3.0 bindings:

Timings: 54s

Install pip , ensuring that it is compatible with Python 3 (note that I am executing python3  rather than just python ):

Timings: 28s

Just like in the original tutorial on installing OpenCV 2.4.X on your Raspberry Pi 2, we are going to make use of virtualenv and virtualenvwrapper. Again, this is not a requirement to get OpenCV 3.0 installed on your system, but I highly recommend that you use these packages to manage your Python environments. Furthermore, the rest of this tutorial will assume you are using virtualenv  and virtualenvwrapper .

Use the pip3  command to install virtualenv  and virtualenvwrapper :

Timings: 17s

Now that virtualenv  and virtualenvwrapper  are installed on our system, we need to update our ~/.profile  file that is loaded each time we launch a terminal. Open up your ~/.profile  file in your favorite text editor (if it doesn’t exist create it) and add in the following lines:

In order to make the changes to our ~/.profile  file take affect, you can either (1) logout and log back in, (2) close your current terminal and open up a new one, or (3) simply use the source  command:

Let’s create our cv  virtual environment where OpenCV will be compiled and accessed from:

Timings: 19s

Note: I gathered the Python 2.7+ and Python 3+ install instructions on the same Raspberry Pi so I could not use the same virtual environment name for each installation. In this case, the cv3  virtual environment refers to my Python 2.7 environment and the cv  virtual environment refers to my Python 3+ environment. You can name these environments whatever you wish, I simply wanted to offer a clarification and hopefully remove any confusion.

This command will create your cv  virtual environment which is entirely independent of the system Python install. If you ever need to access this virtual environment, just use the workon  command:

And you’ll be dropped down into your cv  virtual environment.

Anyway, the only Python dependency we need is NumPy, so ensure that you are in the cv  virtual environment and install NumPy:

Timings 13m 47s

If for some reason your .cache  directory is giving you a Permission denied error, just remove it and re-install NumPy, otherwise you can skip this step:

At this point you should have a nice clean install of NumPy, like this:

Figure 3: NumPy has been successfully installed for Python 2.7 in the cv virtual environment.

Alright, it’s taken awhile, but we are finally ready to compile OpenCV 3.0 with Python 3+ bindings on your Raspberry Pi.

It’s important to note that if you have logged out or rebooted, that you will need to drop back into your cv  virtual environment before compiling OpenCV 3.0. If you do not, OpenCV 3.0 will not compile and install correctly and you’ll be scratching your head in confusion when you try to import OpenCV and get the dreaded ImportError: No module named cv2  error.

So again, before you run any other command in this section, you’ll want to ensure that you are in the cv  virtual environment:

After you are in the cv  virtual environment, we can setup our build:

Update (3 January 2016): In order to build OpenCV 3.1.0 , you need to set D INSTALL_C_EXAMPLES=OFF  (rather than ON ) in the cmake  command. There is a bug in the OpenCV v3.1.0 CMake build script that can cause errors if you leave this switch on. Once you set this switch to off, CMake should run without a problem.

After CMake has run, take a second to inspect the output of the make configuration, paying close attention to the Python 3 section:

Figure 4: Definitely take the time to ensure that CMake has found the correct Python 3+ interpreter before continuing on to compile OpenCV 3.0.

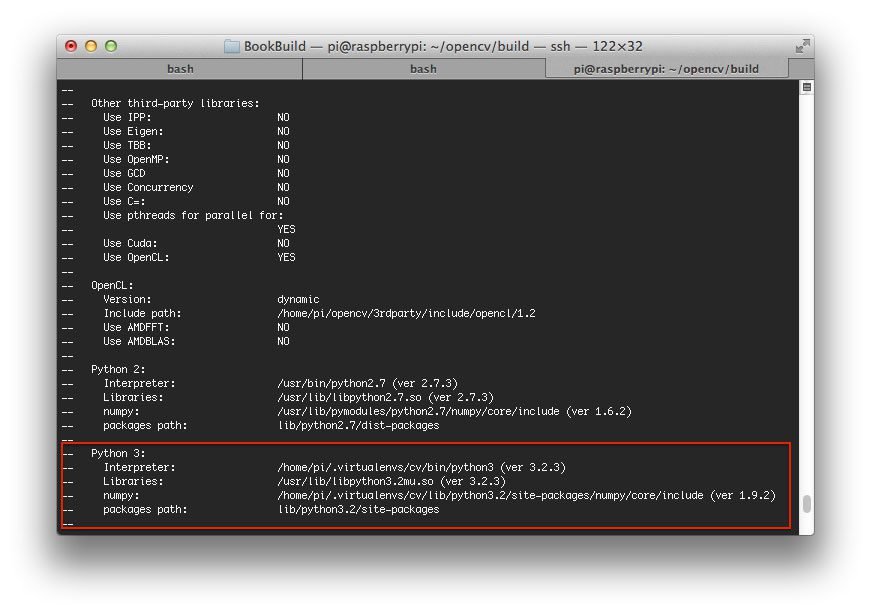
Specifically, you’ll want to make sure that CMake has picked up your Python 3 interpreter!

Since we are compiling OpenCV 3.0 with Python 3 bindings, I’m going to examine the Python 3 section and ensure that my Interpreter  and numpy  paths point to my cv  virtual environment. And as you can see from above, they do.

Also, take special note of the packages path  configuration — this is the path to the directory where your OpenCV 3.0 bindings will be compiled and stored. After the running the make  command (detailed below), you’ll be checking in this directory for your OpenCV 3.0 bindings. In this case,  my packages path  is lib/python3.2/sitepackages , so I’ll be checking /usr/local/lib/python3.2/sitepackages  for my compiled output file.

All that’s left now is to compile OpenCV 3.0:

Where the 4 corresponds to the 4 cores on our Raspberry Pi 2. Using multiple cores will dramatically speedup the compile time and bring it down from 2.8 hours to just above 1 hour!

Timings: 65m 33s

Assuming OpenCV has compiled without an error, you can now install it on your Raspberry Pi:

Timings: 39s

At this point OpenCV 3.0 has been installed on our Raspberry Pi!

However, we’re not quite done yet.

Remember how I mentioned the packages path  above?

Well, let’s list the contents of that directory and see if our OpenCV bindings are in there:

Here we can see there is a file named cv2.cpython32mu.so , which is our actual Python bindings.

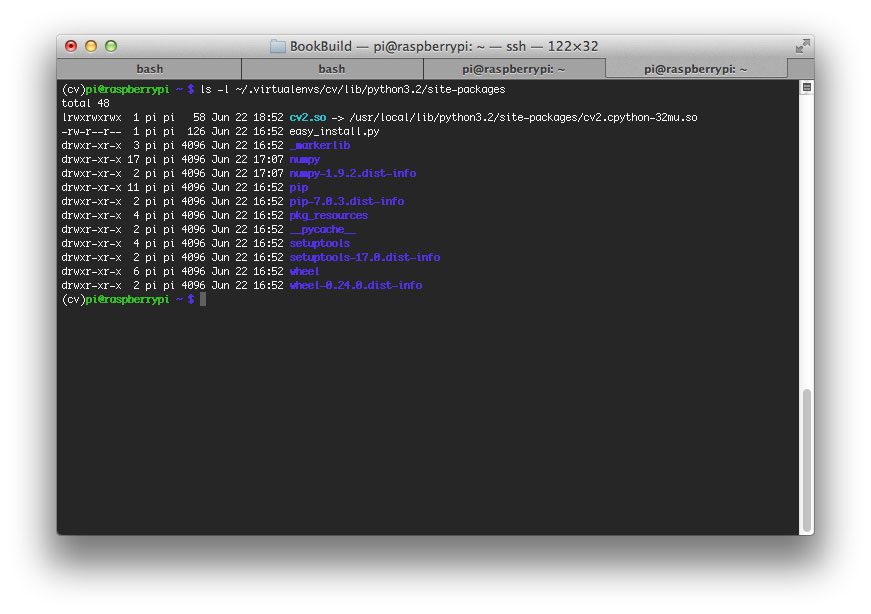
However, in order to use OpenCV 3.0 in our cv  virtual environment, we first need to sym-link the OpenCV binary into the sitepackages  directory of the cv  environment:

So now when you list the contents of the sitepackages  directory associated with our cv  virtual environment, you’ll see our OpenCV 3.0 bindings (the cv2.so  file):

Figure 5: A good validation step to take is to list the contents of the site-packages directory for the cv virtual environment. You should see your cv2.so file sym-linked into the directory.

And there you have it! OpenCV 3.0 with Python 3+ support is now successfully installed on your system!

Section 4: Verifying your OpenCV 3.0 install

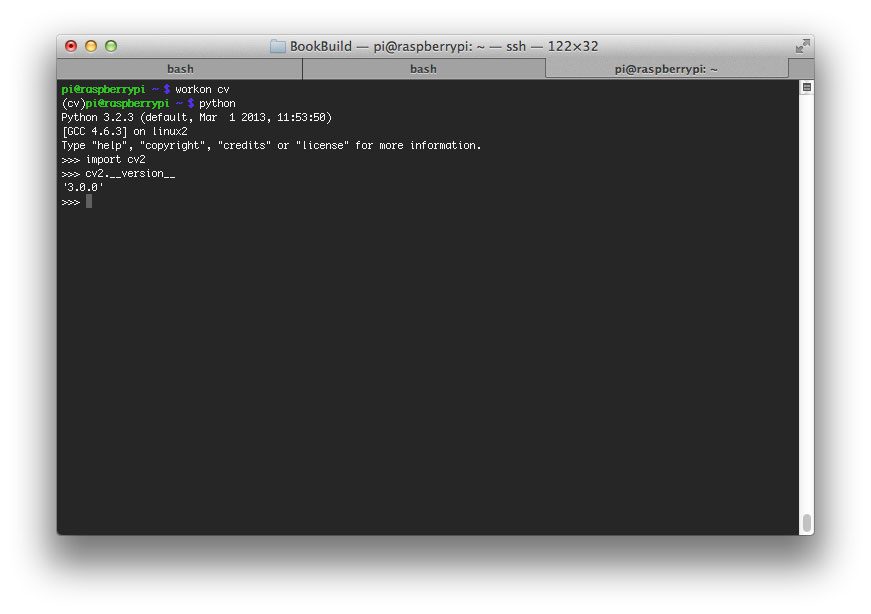
Before we wrap this tutorial up, let’s ensure that our OpenCV bindings have installed correctly. Open up a terminal, enter the cv  virtual environment (or cv3 , if you followed the Python 2.7+ install steps), fire up your Python shell import OpenCV:

And sure enough, we can see OpenCV 3.0 with Python 3+ support has been installed on my Raspberry Pi:

Figure 6: Success! OpenCV 3.0 with Python bindings has been successfully installed on our Raspberry Pi 2!

Summary

In this blog post, I have detailed how to install OpenCV 3.0 with Python 2.7+ and Python 3+ bindings on your Raspberry Pi 2. Timings for each installation step were also provided so you could plan your install accordingly. Just keep in mind that if you ever logout or reboot your Pi after setting up virtualenv  and virtualenvwrapper  that you’ll need to execute the workon  command to re-access your computer vision virtual environment prior to continuing the steps I have detailed. If you do not, you could easily find yourself in a situation with the dreaded ImportError: No module named cv2  error.

As the Raspberry Pi and the Raspbian/NOOBS operating system evolves, so will our installation instructions. If you run across any edge cases, please feel free to let me know so I can keep these install instructions updated.

And of course, in future blog posts we’ll be doing some really amazing projects using OpenCV 3.0 and the Raspberry Pi, so consider entering your email address in the form below to be notified when these posts go live!

Python Motion Detection Program on Raspberry Pi

Introduction

Raspberry Pi can connect to a camera to capture picture and video. As an advance feature, it can be used as a CCTV to monitor the environment. For example, from official Raspberry Pi web site “https://www.raspberrypi.org/forums/viewtopic.php?t=45235”, there shows a simple and efficient motion detection script in Python using PIL.

While watching for motion it pipes a thumbnail image from raspistill at around 1fps to analyse (it keeps everything in memory to avoid wearing out the SD card). Once motion is detected it calls raspistill again to write a high-res jpeg to disk. It also checks free disk space and if under a set limit it starts to delete the oldest images to make sure there is always enough free space for new images. While running on my rev1 B it consumes around 12% CPU / 4% ram and manages to capture a full size image once ever 2-3 secs.

picamera

picamera

In the following, I will show you the step of of installation of this motion detection python script.

Step 1. Install PIL by running “sudo aptitude install python-imaging-tk”

Step 2. Create a python script with file name “picam.py” as below:

#!/usr/bin/python

# original script by brainflakes, improved by pageauc, peewee2 and Kesthal
# www.raspberrypi.org/phpBB3/viewtopic.php?f=43&t=45235

# You need to install PIL to run this script
# type “sudo apt-get install python-imaging-tk” in an terminal window to do this

import StringIO
import subprocess
import os
import time
from datetime import datetime
from PIL import Image

# Motion detection settings:
# Threshold          – how much a pixel has to change by to be marked as “changed”
# Sensitivity        – how many changed pixels before capturing an image, needs to be higher if noisy view
# ForceCapture       – whether to force an image to be captured every forceCaptureTime seconds, values True or False
# filepath           – location of folder to save photos
# filenamePrefix     – string that prefixes the file name for easier identification of files.
# diskSpaceToReserve – Delete oldest images to avoid filling disk. How much byte to keep free on disk.
# cameraSettings     – “” = no extra settings; “-hf” = Set horizontal flip of image; “-vf” = Set vertical flip; “-hf -vf” = both horizontal and vertical flip
threshold = 10
sensitivity = 20
forceCapture = True
forceCaptureTime = 60 * 60 # Once an hour
filepath = “/home/pi/picam”
filenamePrefix = “capture”
diskSpaceToReserve = 40 * 1024 * 1024 # Keep 40 mb free on disk
cameraSettings = “”

# settings of the photos to save
saveWidth   = 1296
saveHeight  = 972
saveQuality = 15 # Set jpeg quality (0 to 100)

# Test-Image settings
testWidth = 100
testHeight = 75

# this is the default setting, if the whole image should be scanned for changed pixel
testAreaCount = 1
testBorders = [ [[1,testWidth],[1,testHeight]] ]  # [ [[start pixel on left side,end pixel on right side],[start pixel on top side,stop pixel on bottom side]] ]
# testBorders are NOT zero-based, the first pixel is 1 and the last pixel is testWith or testHeight

# with “testBorders”, you can define areas, where the script should scan for changed pixel
# for example, if your picture looks like this:
#
#     ….XXXX
#     ……..
#     ……..
#
# “.” is a street or a house, “X” are trees which move arround like crazy when the wind is blowing
# because of the wind in the trees, there will be taken photos all the time. to prevent this, your setting might look like this:

# testAreaCount = 2
# testBorders = [ [[1,50],[1,75]], [[51,100],[26,75]] ] # area y=1 to 25 not scanned in x=51 to 100

# even more complex example
# testAreaCount = 4
# testBorders = [ [[1,39],[1,75]], [[40,67],[43,75]], [[68,85],[48,75]], [[86,100],[41,75]] ]

# in debug mode, a file debug.bmp is written to disk with marked changed pixel an with marked border of scan-area
# debug mode should only be turned on while testing the parameters above
debugMode = False # False or True

# Capture a small test image (for motion detection)
def captureTestImage(settings, width, height):
    command = “raspistill %s -w %s -h %s -t 200 -e bmp -n -o -” % (settings, width, height)
    imageData = StringIO.StringIO()
    imageData.write(subprocess.check_output(command, shell=True))
    imageData.seek(0)
    im = Image.open(imageData)
    buffer = im.load()
    imageData.close()
    return im, buffer

# Save a full size image to disk
def saveImage(settings, width, height, quality, diskSpaceToReserve):
    keepDiskSpaceFree(diskSpaceToReserve)
    time = datetime.now()
    filename = filepath + “/” + filenamePrefix + “-%04d%02d%02d-%02d%02d%02d.jpg” % (time.year, time.month, time.day, time.hour, time.minute, time.second)
    subprocess.call(“raspistill %s -w %s -h %s -t 200 -e jpg -q %s -n -o %s” % (settings, width, height, quality, filename), shell=True)
    print “Captured %s” % filename

# Keep free space above given level
def keepDiskSpaceFree(bytesToReserve):
    if (getFreeSpace() < bytesToReserve):
        for filename in sorted(os.listdir(filepath + “/”)):
            if filename.startswith(filenamePrefix) and filename.endswith(“.jpg”):
                os.remove(filepath + “/” + filename)
                print “Deleted %s/%s to avoid filling disk” % (filepath,filename)
                if (getFreeSpace() > bytesToReserve):
                    return

# Get available disk space
def getFreeSpace():
    st = os.statvfs(filepath + “/”)
    du = st.f_bavail * st.f_frsize
    return du

# Get first image
image1, buffer1 = captureTestImage(cameraSettings, testWidth, testHeight)

# Reset last capture time
lastCapture = time.time()

while (True):

    # Get comparison image
    image2, buffer2 = captureTestImage(cameraSettings, testWidth, testHeight)

    # Count changed pixels
    changedPixels = 0
    takePicture = False

    if (debugMode): # in debug mode, save a bitmap-file with marked changed pixels and with visible testarea-borders
        debugimage = Image.new(“RGB”,(testWidth, testHeight))
        debugim = debugimage.load()

    for z in xrange(0, testAreaCount): # = xrange(0,1) with default-values = z will only have the value of 0 = only one scan-area = whole picture
        for x in xrange(testBorders[z][0][0]-1, testBorders[z][0][1]): # = xrange(0,100) with default-values
            for y in xrange(testBorders[z][1][0]-1, testBorders[z][1][1]):   # = xrange(0,75) with default-values; testBorders are NOT zero-based, buffer1[x,y] are zero-based (0,0 is top left of image, testWidth-1,testHeight-1 is botton right)
                if (debugMode):
                    debugim[x,y] = buffer2[x,y]
                    if ((x == testBorders[z][0][0]-1) or (x == testBorders[z][0][1]-1) or (y == testBorders[z][1][0]-1) or (y == testBorders[z][1][1]-1)):
                        # print “Border %s %s” % (x,y)
                        debugim[x,y] = (0, 0, 255) # in debug mode, mark all border pixel to blue
                # Just check green channel as it’s the highest quality channel
                pixdiff = abs(buffer1[x,y][1] – buffer2[x,y][1])
                if pixdiff > threshold:
                    changedPixels += 1
                    if (debugMode):
                        debugim[x,y] = (0, 255, 0) # in debug mode, mark all changed pixel to green
                # Save an image if pixels changed
                if (changedPixels > sensitivity):
                    takePicture = True # will shoot the photo later
                if ((debugMode == False) and (changedPixels > sensitivity)):
                    break  # break the y loop
            if ((debugMode == False) and (changedPixels > sensitivity)):
                break  # break the x loop
        if ((debugMode == False) and (changedPixels > sensitivity)):
            break  # break the z loop

    if (debugMode):
        debugimage.save(filepath + “/debug.bmp”) # save debug image as bmp
        print “debug.bmp saved, %s changed pixel” % changedPixels
    # else:
    #     print “%s changed pixel” % changedPixels

    # Check force capture
    if forceCapture:
        if time.time() – lastCapture > forceCaptureTime:
            takePicture = True

    if takePicture:
        lastCapture = time.time()
        saveImage(cameraSettings, saveWidth, saveHeight, saveQuality, diskSpaceToReserve)

    # Swap comparison buffers
    image1 = image2
    buffer1 = buffer2

Step 3: Change execute mode of picam.py by running the command “sudo chmod 755 picam.py

Step 4: Make a directory by running the command “mkdir /home/pi/picam” which is a hard code path in the picam.py script.

Step 5: Run the picam.py script by execute the command “sudo python picam.py

Step 6: You will see that a series of picture files will be created under the /home/pi/picam directory.

Step 7: If you want to auto-start this program at boot-up, you should create the following script by download a file to directory “/etc/init.d/picam_init” as below link –> https://infotechmanagefactory.com/wp-content/uploads/2016/01/picam_init.zip.

Step 8. change its mode as: sudo chmod 755 /etc/init.d/picam_init

Step 9: make the boot system aware of this script as “sudo update-rc.d picam_init defaults

Step 10: This script will now start and shutdown along with the Raspberry Pi. You can also manually control it like any other daemon. Running “/etc/init.d/picam_init stop" will stop the script and “/etc/init.d/picam_init start" will start it.

Reference Doc Link : https://www.maketecheasier.com/raspberry-pi-as-surveillance-camera/