Temperature Sensor Setup on Raspberry Pi

Introduction

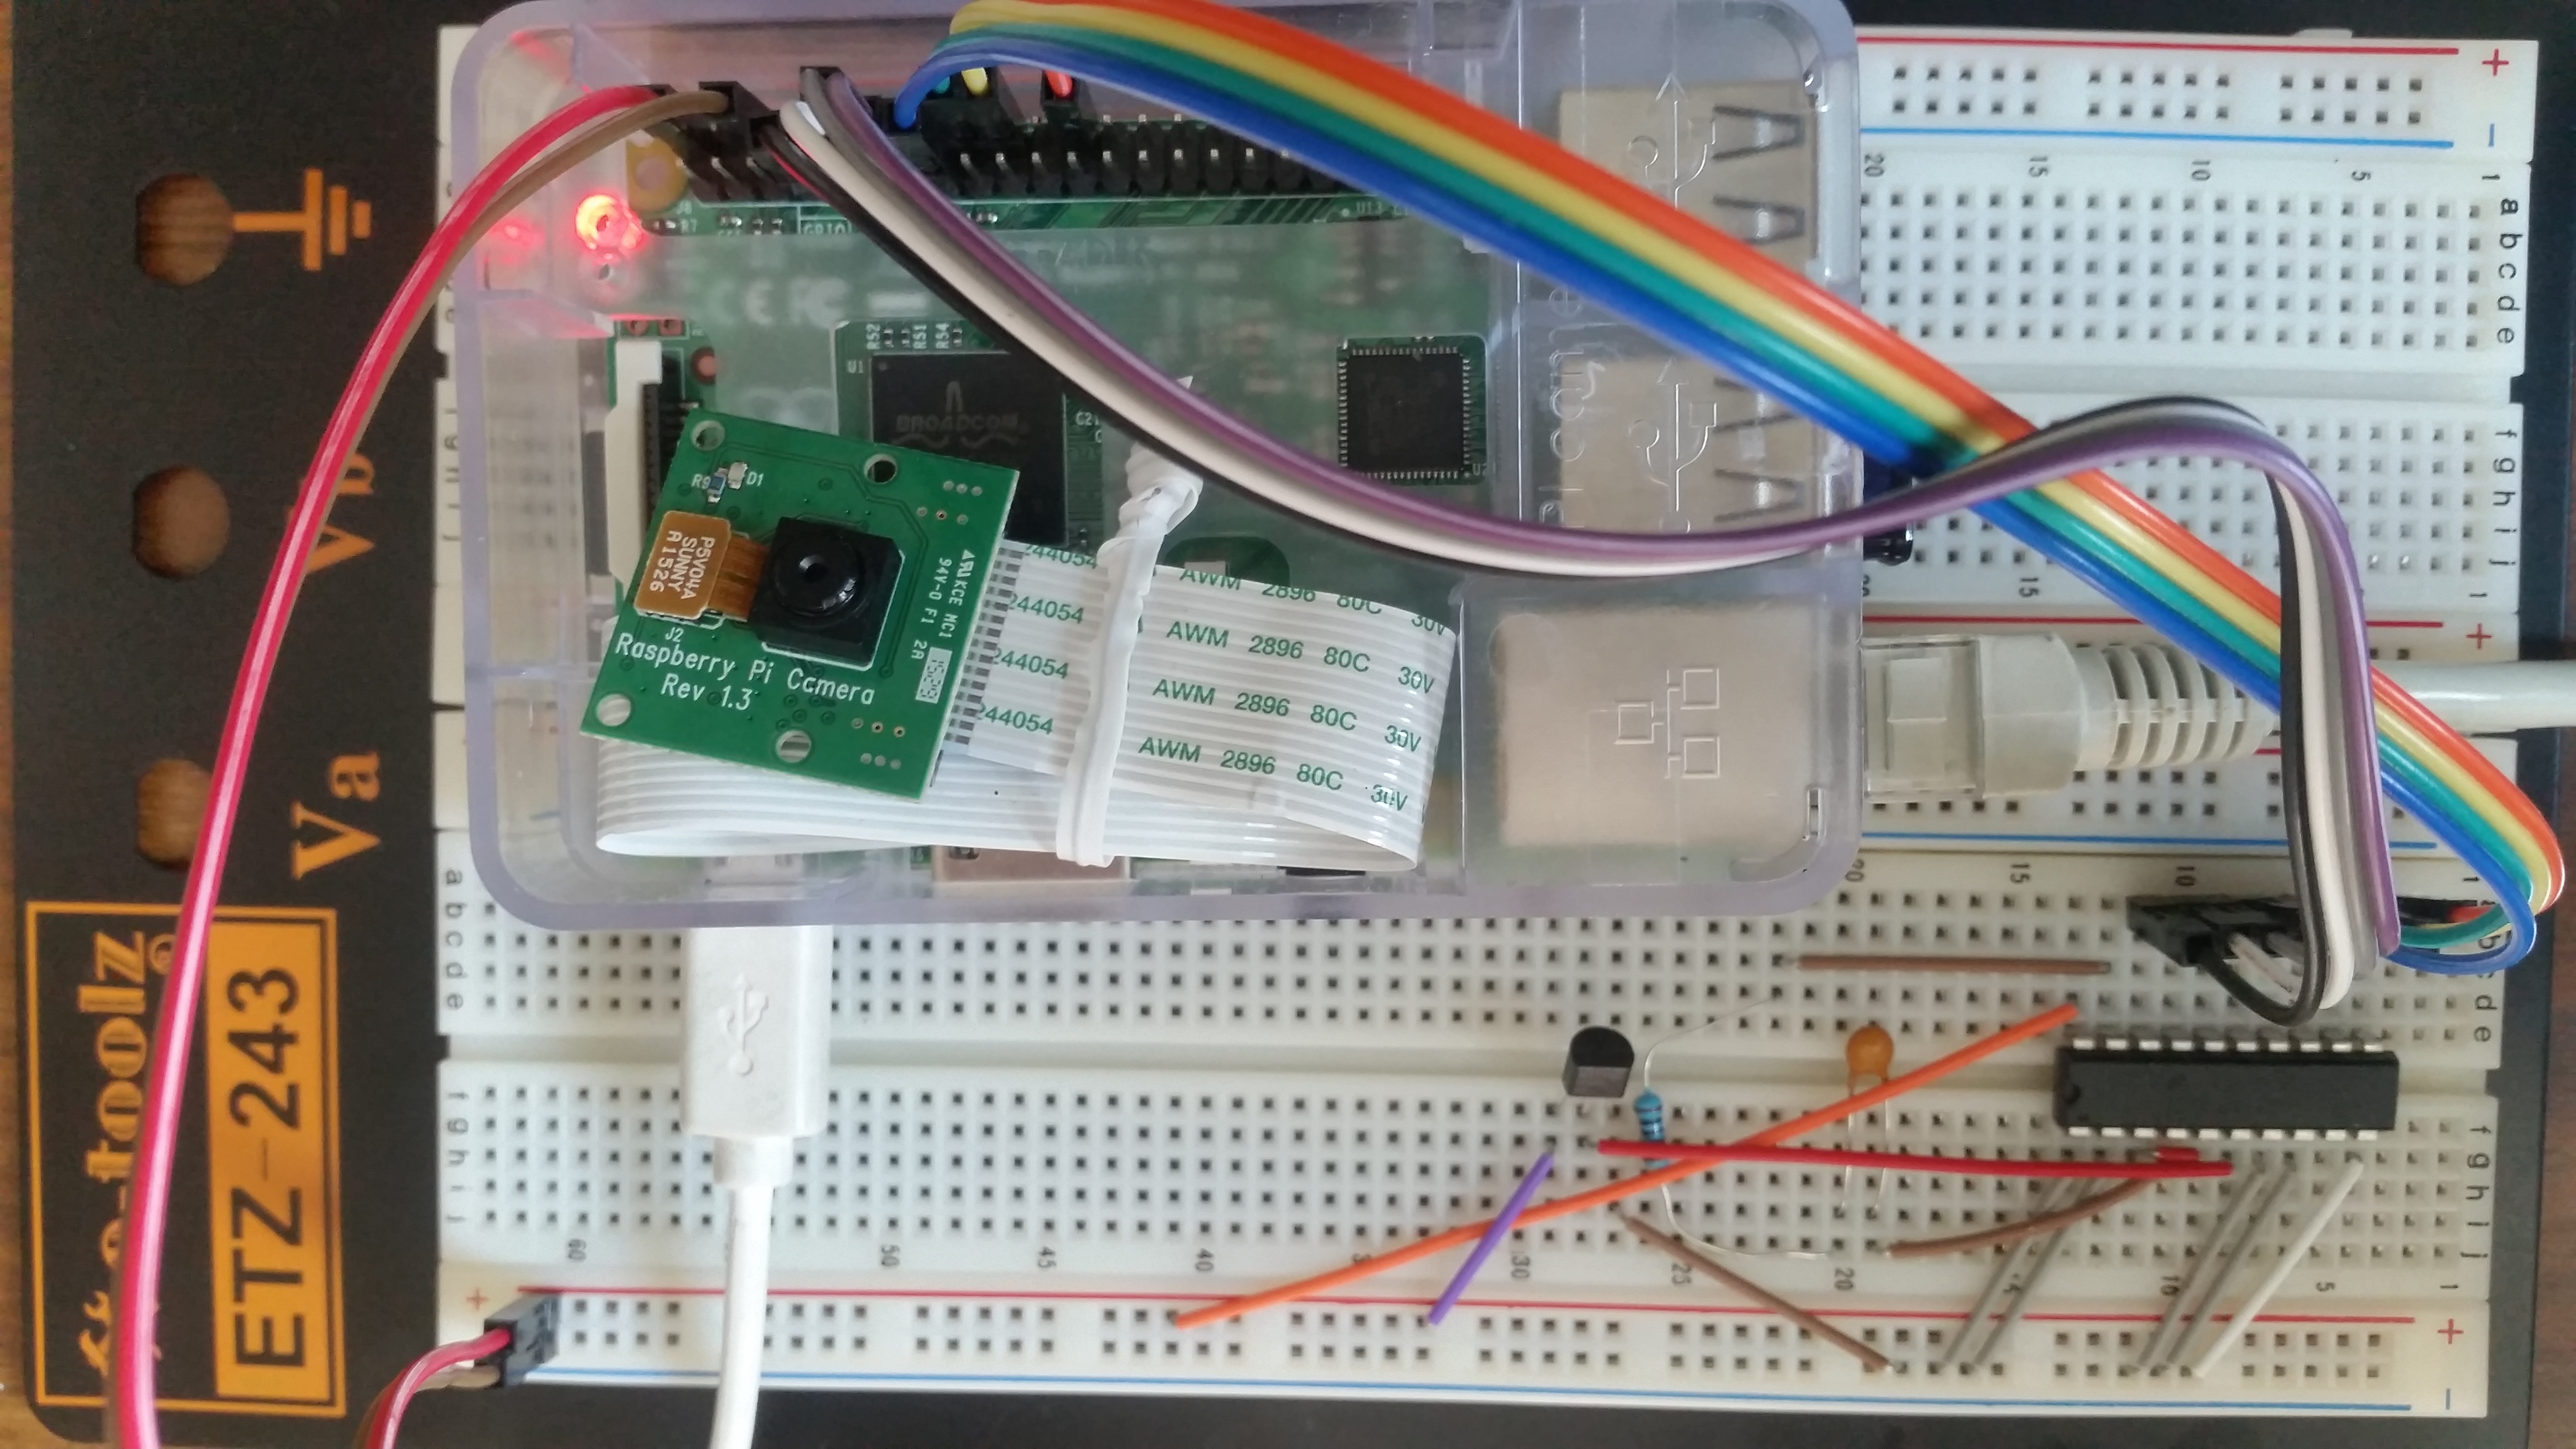
Today, I setup my raspberry pi as a temperature sensor. I mainly use a LM35 temperature sensor and an IC “ADC0804” as an analog to digital converter. I also setup a database to record down the temperature data and then display result on web browser with Chat format. The connection of the whole electronics circuit is as below diagram. temp0

Program script:

1) The coding the a python program to take temperature data is as the temp_url.py program below:

#!/usr/bin/env python
# author: Powen Ko    Program Name:  temp_url.py
import time, RPi.GPIO as GPIO
import urllib

def fetch_thing(url, params, method):
params = urllib.urlencode(params)
if method==’POST’:
f = urllib.urlopen(url, params)
else:
f = urllib.urlopen(url+’?’+params)
return (f.read(), f.code)

GPIO.setmode(GPIO.BOARD)
GPIO.setup(7, GPIO.IN)
GPIO.setup(11, GPIO.IN)
GPIO.setup(12, GPIO.IN)
GPIO.setup(13, GPIO.IN)
GPIO.setup(15, GPIO.IN)
GPIO.setup(16, GPIO.IN)
GPIO.setup(18, GPIO.IN)
GPIO.setup(22, GPIO.IN)
while True:
     a0 = GPIO.input(7)
     a1 = GPIO.input(11)
     a2 = GPIO.input(12)
     a3 = GPIO.input(13)
     a4 = GPIO.input(15)
     a5 = GPIO.input(16)
     a6 = GPIO.input(18)
     a7 = GPIO.input(22)
     total=a0+(a1*2)+(a2*4)+(a3*8)+(a4*16)+(a5*32)+(a6*64)+(a7*128)
     temp=total*5*1000/256/10;
     print a7,a6,a5,a4,a3,a2,a1,a0,”[“,total,”]”,”[C=”,temp,”]”
     content, response_code = fetch_thing(
                    ‘http://127.0.0.1/settemp.php’,
                    {‘id’: 1, ‘temp’: temp},
                    ‘GET’
                    )
     time.sleep(5)

2) Then, I save the temperature data into the database via a web php program as below:

<?php
$con=mysqli_connect(“localhost”,”root”,”infotech”,”raspberryDB”);
if (mysqli_connect_errno()) {
echo “Failed to connect to MySQL: ” . mysqli_connect_error();
}

$now= date(‘Ymdhms’);
$id = $_GET[‘id’];
$temp = $_GET[‘temp’];
mysqli_query($con,”INSERT INTO temp (datatime,temp,userid)
VALUES ($now,$temp,$id)”);

mysqli_close($con);
echo “powenko.com get it”.”, date time=”.$now.”, temp=”.$temp.”, id=”.$id;
?>

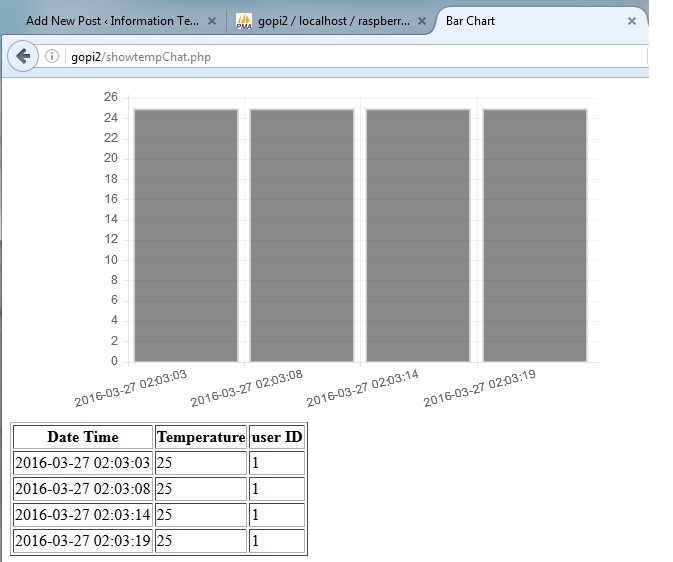
Finally, I view data by using a php web browser program as below and also screen dump result as below:

<!doctype html>
<html>
        <head>
                <title>Bar Chart</title>
                <script src=”Chart.js-master/Chart.js”></script>
        </head>
        <body>
                <div style=”width: 50%”>
                        <canvas id=”canvas” height=”450″ width=”800″></canvas>
                </div>
<?php
$con=mysqli_connect(“localhost”,”root”,”infotech”,”raspberryDB”);
if (mysqli_connect_errno()) {
  echo “Failed to connect to MySQL: ” . mysqli_connect_error();
}

$result = mysqli_query($con,”SELECT * FROM temp”);

echo “<table border=’1′>
<tr>
<th>Date Time</th>
<th>Temperature</th>
<th>user ID </>

</tr>”;

while($row = mysqli_fetch_array($result))
{
  echo “<tr>”;
  echo “<td>” . $row[‘datatime’] . “</td>”;
  echo “<td>” . $row[‘temp’] . “</td>”;
  echo “<td>” . $row[‘userid’] . “</td>”;
  echo “</tr>”;
  $Lables=$Lables.'”‘. $row[‘datatime’].'”,’;
  $temps=$temps.'”‘. $row[‘temp’].'”,’;
}

echo “</table>”;
mysqli_close($con);
?>

        <script>
var barChartData = {
                labels : [<?php echo  $Lables;  ?>],
                datasets : [
                        {
                                fillColor : “rgba(20,20,20,0.5)”,
                                strokeColor : “rgba(220,220,220,0.8)”,
                                highlightFill: “rgba(220,220,220,0.75)”,
               highlightStroke: “rgba(220,220,220,1)”,
                                data : [<?php echo  $temps;  ?>
                                ]
                       }
                ]
        }
        window.onload = function(){
                var ctx = document.getElementById(“canvas”).getContext(“2d”);
                window.myBar = new Chart(ctx).Bar(barChartData, {
                        responsive : true
                });
        }
        </script>
        </body>
</html>

temp3

IT人在工廠日記 – 生意不景,又要找新工作

我在現時這家醫療設備工廠做了差不多一年,看著它由四條生產線減至一、二條生產線,工人由七百減至三百,但是要負擔百多名職員,今年的盈虧已經可以預計了,如果未來幾個月的生意不能改善,裁員是不可避免的。我要做好準備,又要開始積極地找另一份新工作了。

Speech with Raspberry Pi

Introduction

Raspberry Pi is an excellent automation control unit, and we can use it to build a voice recognition feature in order to make it as a voice automation control unit. Yeah, is it very interesting ! In the following, I will show you the script to build voice feature, including converting speech to text, converting text to speech, auto-reply a text question.

Script to convert Speech to Text

I take the benefit of using google speech recognition ver 2 feature and arecord feature of Raspberry Pi. To remind that you should apply your google api key for usage in this script, as below:

#!/bin/bash
echo “Recording…”
arecord -D plughw:1,0 -f cd -t wav -r 16000 –duration=4 test.wav
avconv -i test.wav -y -ar 16000 -ac 1 test.flac

echo “Processing…”
wget -q -U “Mozilla/5.0” –post-file test.flac –header “Content-Type: audio/x-flac; rate=16000” -O – “https://www.google.com/speech-api/v2/recognize?client=chromium&lang=en_US&key=AIzaSyB0RJilwaAhMpftgmgRhgEzd4lZnia1MwQ” |cut -d” -f8 >stt.txt
echo “You said: “
value=`cat stt.txt`
echo “$value”

The screen dump result to run speech2text.sh program is as below:

speech2text

Script to Auto-Reply a Query

It is a python program using Wolframalpha’s API add-on tools to process a question as below script, and you should apply a app ID from http://products.wolframalpha.com/api/:

import wolframalpha
import sys

# Get a free API key here http://products.wolframalpha.com/api/
# This is a fake ID, go and get your own, instructions on my blog.
app_id=”VWQU6P-YPRRG752XH”

client = wolframalpha.Client(app_id)

query = ‘ ‘.join(sys.argv[1:])
res = client.query(query)

if len(res.pods) > 0:
    texts = “”
    pod = res.pods[1]
    if pod.text:
        texts = pod.text
    else:
        texts = “I have no answer for that”
        # to skip ascii character in case of error
    texts = texts.encode(‘ascii’, ‘ignore’)
    print(texts)
else:
    print(“Sorry, I am not sure.”)

To run the python program as script –> python3 queryprocess.py “What is your name”, then we can get a reply result as “My name is Walfram|Alpha.”, as below screen dump.

speech-reply

Convert Text to Speech

We can use Espeak utility to convert text to speech under Raspberry Pi. Its installation is very simple as below:

$ sudo apt-get install espeak

After installation, you can run the espeak program to speech, for example,

$ espeak "Hello World"

Question and Answer Program with Speech and Voice Reply

I develop a script to combine the above three program into one, so that you can use it to speech a question and wait for a voice answer. Let’s see the script of main.sh program as below:

#!/bin/bash
echo “Recording… Press Ctrl+C to Stop.”
./speech2text.sh > /dev/null 2>&1
QUESTION=$(cat stt.txt)
echo “Me: “ $QUESTION
python3 queryprocess.py $QUESTION > ans1.txt
ANSWER=$(cut -c3- ans1.txt)
ANSWER1=$(echo “$ANSWER” | sed -e ‘s/\n/ /g’)
ANSWER2=${ANSWER1::-1}
echo “Robot: “ $ANSWER2
espeak “$ANSWER2” > /dev/null 2>&1

To run this program as script –> ./main.sh, then we can get a reply result as below screen dump, and with voice reply, too.

speech-main

Reference Document:

How to Capture Weather Forecast from web using Raspberry Pi’s Python Program

Introduction

We can use python to develop a program to capture any city’s weather forecast from openweathermap.org web site under our Raspberry Pi computer. I list our program and screen capture result in the following for your reference.

Program Source Code under Python ver 3 as below:

import urllib.request,json

city = input(“Enter City: “)

def getForecast(city) :
    #url = “http://api.openweathermap.org/data/2.5/forecast/daily?cnt=7&units=meteric&mode=json&q=”
    #url = “http://api.openweathermap.org/data/2.5/forecast/city?id=524901&APPID=42443ecbdcad3d01842205e3745895cd”
    #url = “http://api.openweathermap.org/data/2.5/forecast/daily?cnt=7&units=meteric&mode=json&q=LONDON&lang=zh_cn&APPID=42443ecbdcad3d01842205e3745895cd”
    url = “http://api.openweathermap.org/data/2.5/forecast/daily?cnt=7&units=meteric&mode=json&q=”
    url = url + city + “&lang=zh_cn&APPID=42443ecbdcad3d01842205e3745895cd”
    req = urllib.request.Request(url)
    response=urllib.request.urlopen(req)
    return json.loads(response.read().decode(“UTF-8”))

forecast = getForecast(city)

print(“Forecast for “, city, forecast[‘city’][‘country’])

day_num=1
for day in forecast[‘list’]:
    print(“Day : “, day_num)
    print(day[‘weather’][0][‘description’])
    print(“Cloud Cover : “, day[‘clouds’])
    print(“Temp Min : “, round(day[‘temp’][‘min’]-273.15, 1), “degrees C”)
    print(“Temp Max : “, round(day[‘temp’][‘max’]-273.15, 1), “degrees C”)
    print(“Humidity : “, day[‘humidity’], “%”)
    print(“Wind Speed : “, day[‘speed’], “m/s”)
    print()
    day_num = day_num+1

Screen Dump Result as below:

weather-pi

Further Development:

This function can be further developed to save weather forecast data to database, and then display in a chart format on screen. I may do it if I have time in future.

Network Communication Script for Raspberry Pi

Introduction

We can use python programs to start a server side and client side network communication service and allow them to transmit message  to each other under a Raspberry Pi. For example, we start two LXTerminal Sessions under a Raspberry Pi (or two difference Pi), and then run the following script.

In Server Side, run the following script:

import socket
comms_socket = socket.socket()
comms_socket.bind((‘localhost’, 50000))
comms_socket.listen(10)
connection, address = comms_socket.accept()
while True:
    print(connection.recv(4096).decode(“UTF-8”))
    send_data = input(“Reply: “)
    connection.send(bytes(send_data, “UTF-8”))

In Client Side, run the following script:

import socket
comms_socket = socket.socket()
comms_socket.connect((‘localhost’, 50000))
while True:
    send_data = input(“message: “)
    comms_socket.send(bytes(send_data, “UTF-8”))
    print(comms_socket.recv(4096).decode(“UTF-8”))

The testing result is shown as below screen dump for your reference:

network-communicate-pi

Most Easy Way to Start a Web Server Service Using Python

Introduction

Although it is easy to start-up IIS under Window O/S or Apache under Unix O/S, we still have another choice to start a web server service using Python programming tools. You only need to install python, and then start python and run the following script line by line:

import http.server, os
#define the server document directory with unix path;
os.chdir(“UsersadministratorDocuments”)
#if it is window env with directory as c:UsersadministratorDocuments
os.chdir(“/Users/goldmanau/Documents”)
httpd = http.server.HTTPServer((‘127.0.0.1’, 8000),
http.server.SimpleHTTPRequestHandler)
httpd.serve_forever()

This script can work under either python 2.7 or 3.x version under window or Unix environment. If you put the index.html to the server document path, then, you can start a web browser and input the link as http://127.0.0.1:8000/index.html in order to display your web page. It is the most easy, simple, fast way to start a web server service.

Setup to upload & access Dropbox on Raspberry Pi

Introduction

If you want to upload file from or to DropBox through Raspberry Pi, it is easy to do so. The following will show you a a installation program and its setup steps.

Step 1. Setup DropBox account and apps from web

First of all you need a DropBox account and apps account through the following links. Hop on over to dropbox is free.

http://www.dropbox.com

You then need to visit this link https://www.dropbox.com/developers/apps, login to DropBox and create an “app” by clicking the “create app” button.

Then choose “Dropbox API app”, “Files and Datastores”, and answer the final question “Can your app be limited to its own, private folder?” – either answer is OK, depending on your needs. The result will be as below:

raspberrypi-dropbox0

Step 2. Set Up DropBox Uploader in Raspberry Pi

Get Dropbox Uploader onto your Pi

$ cd ~    (this ensures you are in /home/pi)
$ git clone https://github.com/andreafabrizi/Dropbox-Uploader.git
$ ls

(If this fails, you may need to install git with sudo apt-get install git-core)

You should be able to see a directory called Dropbox-Uploader

$ cd Dropbox-Uploader
$ ls

You should now see three files, one of which is called dropbox_uploader.sh. This is the script we’re going to use.

$ ./dropbox_uploader.sh

Run the script with ./dropbox_uploader.sh (if it fails, try chmod +x dropbox_uploader.sh)

If access right problem still occurs, run the following command:

$ sudo ./dropbox_upload.sh

Sorting out the DropBox API keys and authorization. You need to give your app a unique name, and you will be assigned some keys to go with the name. Now you need to enter your app’s DropBox API keys and secret. Once you’ve entered your keys and answered the question “app” or “full”, your Pi will request an authorisation token and you will be given a web URL you need to visit to activate it…

The following is the whole setup screen dump from my Raspberry Pi for your reference:

pi@gopi2:~ $ git clone https://github.com/andreafabrizi/Dropbox-Uploader.git
Cloning into ‘Dropbox-Uploader’…
remote: Counting objects: 718, done.
remote: Total 718 (delta 0), reused 0 (delta 0), pack-reused 718
Receiving objects: 100% (718/718), 213.12 KiB | 190.00 KiB/s, done.
Resolving deltas: 100% (369/369), done.
Checking connectivity… done.

pi@gopi2:~ $ cd Dropbox-Uploader

pi@gopi2:~/Dropbox-Uploader $ ls
CHANGELOG.md dropbox_uploader.sh dropShell.sh LICENSE README.md

pi@gopi2:~/Dropbox-Uploader $ ./dropbox_uploader.sh
This is the first time you run this script.
1) Open the following URL in your Browser, and log in using your account: https://www.dropbox.com/developers/apps
2) Click on “Create App”, then select “Dropbox API app”
3) Now go on with the configuration, choosing the app permissions and access restrictions to your DropBox folder
4) Enter the “App Name” that you prefer (e.g. MyUploader271401743117612)
Now, click on the “Create App” button.
When your new App is successfully created, please type the
App Key, App Secret and the Permission type shown in the confirmation page:
# App key: 0pmq2laok7xxxxx
# App secret: d5fh2kgyd2xxxxx
Permission type:
App folder [a]: If you choose that the app only needs access to files it creates
Full Dropbox [f]: If you choose that the app needs access to files already on Dropbox
# Permission type [a/f]: a
App key is 0pmq2laok7tinna, App secret is d5fh2kgyd2uyftx and Access level is App Folder. Looks ok? [y/n]: y
Token request… OK
Please open the following URL in your browser, and allow Dropbox Uploader to access your DropBox folder:
https://www.dropbox.com/1/oauth/authorize?oauth_token=qH829qJuKZpxxxxx
Press enter when done…
Access Token request… OK

Finally, your DropBox account connected to your “app”

Besides Raspberry Pi operation, you also need to allow the access of Dropbox from Raspberry Pi as below two screens:

raspberrypi-dropbox1

raspberrypi-dropbox2

Step 3. Now you can test to upload from Raspberry Pi to DropBox

$ cd home/pi/Dropbox-Uploader
$ ./dropbox_uploader.sh upload /home/pi/upload_file_fr name_of_upload_file_to

This will upload the file you choose to your DropBox account.

…or use it in a Python script like this…

from subprocess import call  
photofile = “/home/pi/Dropbox-Uploader/dropbox_uploader.sh upload /home/pi/photo00001.jpg photo00001.jpg” 
call ([photofile], shell=True)

If we upload “license” & “license1” files to Dropbox, it will show the result as below:

raspberrypi-dropbox3

Finally, if you look at the DropBox Uploader documentation, there’s a lot more commands you can make use of…

  • upload
  • download
  • delete
  • move
  • list
  • share
  • mkdir


Backup of Raspberry Pi system image from SIM card

Introduction

If you want to backup your Raspberry Pi system image from SIM card, you can use the HDD Raw Copy Tool as described below.

Developer: HDDGURU.COM

License terms: Freeware

Supported OS: MS Windows XP, Vista, 7, 8, Server 2003, 2008, 2008R2

HDD Raw Copy Tool is a utility for low-level, sector-by-sector hard disk duplication and image creation.

  • Supported interfaces: S-ATA (SATA), IDE (E-IDE), SCSI, SAS, USB, FIREWIRE.
  • Big drives (LBA-48) are supported.
  • Supported HDD/SSD Manufacturers: Intel, OCZ, Samsung, Kingston, Maxtor, Hitachi, Seagate, Samsung, Toshiba, Fujitsu, IBM, Quantum, Western Digital, and almost any other not listed here.
  • The program also supports low-level duplication of FLASH cards (SD/MMC, MemoryStick, CompactFlash, SmartMedia, XD) using a card-reader.

HDD Raw Copy tool makes an exact duplicate of a SATA, IDE, SAS, SCSI or SSD hard disk drive. Will also work with any USB and FIREWIRE external drive enclosures as well as SD, MMC, MemoryStick and CompactFlash media.

The tool creates a sector-by-sector copy of all areas of the hard drive (MBR, boot records, all partitions as well as space in between). HDD Raw Copy does not care about the operating system on the drive – it could be Windows, Linux, Mac, or any other OS with any number of partitions (including hidden ones). Bad sectors are skipped by the tool.

If your media has a supported interface then it can be copied with HDD Raw Copy!

In addition, HDD Raw Copy can create an exact raw (dd) or compressed image of the entire media (including service data such as MBR, Boot records, etc). Again, all filesystems (even hidden) are supported.

Examples of possible uses

  • Data recovery: make a copy of the damaged drive to attempt recovery on the copy
  • Data recovery: copy a damaged hard drive and skip bad sectors
  • Migration: completely migrate from one hard drive to another
  • Ultimate backup: Make an exact copy of the hard drive for future use
  • Backup: create an image of a USB flash stick and copy/restore at any moment
  • Software QA engineers: restore your OS hard drives at any moment from a compressed image
  • Duplicate/Clone/Save full image of any type of media!

Sound Control on Raspberry Pi

Introduction

Raspberry Pi has a build-in sound card, HDMI and phone jack output to play sound. If you connect to HDMI display or plug-in a headphone to it, you can play sound. The setup of sound feature is easy as described below.

raspberrypi-phone

Step 1. Install PiAUISuite sound software

$ sudo apt-get install git-core

$ git clone git://github.com/StevenHickson/PiAUISuite.git

$ ./InstallAUISite.sh

(be aware to answer pop-up question to continue installation)

Step 2. Setup Sound Device

$ modprobe snd_bcm2835

$ amixer controls
numid=3,iface=MIXER,name=’PCM Playback Route’
numid=2,iface=MIXER,name=’PCM Playback Switch’
numid=1,iface=MIXER,name=’PCM Playback Volume’

$ amixer cset numid=3 1

where 0 for auto-select, 1 for headphone, 2 for HDMI.

$ sudo amixer cset numid=1 60%

to set the volume between 0 – 100%, 0 for mute.

$ sudo amixer set PCM – 60%

Step 3. To Play Sound

$ sudo omxplayer voice.mp3

If omxplayer’s auto-detection of the correct audio output device fails, you can force output over hdmi with:

$ sudo omxplayer-o hdmivoice.mp3

or you can force output over the headphone jack with:

$ sudo omxplayer-o localvoice.mp3

Note: you should be able to play sound on VLC connection, too.

Reference Link:

Bonus:

You can install alsa to control sound. Make sure alsa-utils is installed and run alsamixer as below:

$ sudo apt-get install -y alsa-utils

$ alsamixer

Then use the F1-F6 keys and UI to push up the volume.

sound-control

Use the arrow keys to jack up the volume and quit.

To save what you changed in alsamixer as defaults, do:

sudo alsactl store 0

Pls consider to buy Headphone from Amazon as below link:

Build a Raspberry Pi Webcam Server for Motion Detection

Introduction

Raspberry Pi can be connected to a camera to capture picture and video in order to use it as a CCTV motion detection device, which I have described in my previous post. To further enhance the motion detection feature, we can build a Raspberry Pi Webcam Video Server for browsing from web. It is more effective to monitor environment from outside. In the following, I will describe the installation steps of a application call motionPie to build a web server.

The MotionPie Logo

1. Download & Format the SD Card

  1. Download the Motion Pie SD Card Image from the Motion Pie GitHub repository or my link <<HERE>>.
  2. You will need a formatting tool. Visit the SD Association’s website and download SD Formatter 4.0 for either Windows or Mac.
  3. Follow the instructions to install the formatting software.
  4. Insert your SD card into the computer or laptop’s SD card reader and check the drive letter allocated to it, e.g. I:/
  5. In SD Formatter, select the drive letter for your SD card (eg. I:/) and format

2. Install the Motion Pie Image onto the SD Card

  1. Download the Win32DiskImager.
  2. Now unzip the MotionPie ISO file so you can install it onto the Pi safely.
  3. Select the MotionPie ISO file and the drive letter your SD card is assigned (Eg. I:/)
  4. Confirm you have the correct details and click on Write.
  5. Once done you can safely remove your SD card from the computer.
win32diskimager-motionpie

Booting/Setting up MotionPie

Now we’re ready for boot up, so insert the SD Card, an Ethernet cord and the power cord. We will need to communicate to the Pi over the network rather than directly like I have done in most of the previous tutorials.

So now go ahead and boot the PI up and then we can move onto getting it setup correctly.

Setting up the Raspberry Pi Security Camera

Once the Pi has booted you will need to do the following:

  1. First we will need the IP or host name so we’re able to connect to the Pi.
    • If you’re using Windows simply go to network on the right hand side in the File Explorer.
    • You should see a computer names something like MP-xxxxxxx
    • Go to your browser and add this to your browser bar eg. http://MP-xxxxxxx
    • You should now have the Motion Pie interface up.
  2. Alternatively you can find out the IP of the Pi by going to your router. Since all routers are different I will not go into how this is done. Please refer to your manufactures manual.
  3. To login as the admin go to key symbol in the upper left corner. The username is admin and the password is blank, this can be changed later.
  4. You can access all the setting for the camera stream here. If you’re interested in altering these settings keep reading as I explain them as much as possible below.

picam_init

Now we should have a working security hub that we can configure! Require the security camera to be wireless? No problem! Require to alert you with an email? No problem! Read on more to find out what the settings do in Motion Pie.

How to setup multiple network Raspberry Pi security cameras.

If you want to run more than one Pi cameras it is pretty easy to set this up so you have all the streams under in one window. You can even add a stream that has been setup using the Raspberry Pi Webcam server tutorial.

  1. First click on the 3 lines with dots on them in the upper left hand corner.
  2. Now up in the upper left hand corner and click on the dropdown box and select add camera.
  3. In here you have four settings to set up.
  4. Device: This is allows you to select where the camera is located(network/local) and type. (Eg. motionEye, MJEPG camera)
  5. URL: This is the URL to the other network camera. Eg. http://othercamera:8080
  6. Username: This is the username to the camera device. (If no username/password required leave the fields blank)
  7. Password: This is the password for the username chosen above.
  8. Camera: Select the camera you wish to add.
motionpie-setup

Connecting to the surveillance outside your network

Now that you have your Raspberry Pi security cameras setup it might be worth considering allowing access to the central Pi so you can monitor your cameras elsewhere.

To do this simply head over to my guide on how to setup port forwarding and also how to setup dynamic DNS, you can find the guide at Raspberry Pi Dynamic DNS & Port Forwarding.

A few important bits of information you will need for the setting up the port forwarding.

  • The IP of your Raspberry Pi for example mine is 192.168.5.78
  • Internal port is 80.

Ensure you have also setup passwords on both the admin and the surveillance user to help avoid unwanted visitors.

Once setup should now be able to connect using your external IP address such as XX.XXX.XXX.XXX:80 (80 should be changed to something else, I would recommended changing it to avoid easy access for unwanted visitors)

Configuring the Settings in MotionPie

General Settings

In here you are able to set the administrator username and password. This account will have access to all the settings you’re seeing at the moment.

Surveillance username and password can also be set in here this can be used to just access the camera interface.

To view all the settings available to set turn the show advanced settings to on.

Wireless Network

Turn this on if you plan on connecting to the network via a wireless dongle. There are two things you will need to fill in here.

  1. Network Name – Enter the network name/SSID you wish to connect to in here.
  2. Network Key – Enter the network password/network key in here for the network you’re connecting to.

Once done you should be a able to disconnect the Ethernet cord and remain connected to the network.

Video Device

Under this menu you’re able to set certain settings regarding the Raspberry Pi camera device.

  1. Camera Name: Set this to whatever you would like the camera to be named. For example kitchen would work well for a camera in a kitchen.
  2. Camera Device: You’re unable to edit this one but this is the device name of the camera.
  3. Light Switch Detection: Enable this if you want sudden changes such as a light being switched on to not be treated as motion. (This will help prevent false positives)
  4. Automatic Brightness: This will enable software automatic brightness, this means the camera software will make adjustments for the brightness. You don’t need to activate this if your camera already handles this.
    • In here you change the brightness, contrast and saturation of the video of the camera.
  5. Video Resolution: Here you can set the video resolution of the camera. The higher the resolution the more room it will take up and the more bandwidth it will need to use in order to stream the footage. I set mine to 1280×800 and that seems to work perfectly fine.
  6. Video Rotation: You can rotate your video from the Raspberry Pi security if you’re finding that it is looking the wrong way.
  7. Frame Rate: This sets the amount of frames that will be sent be every second. The higher this is the smoother the video but again this will increase the storage used and bandwidth.

File Storage

Under this menu you can specify where you would like the files stored for the Raspberry Pi Security Camera. This can be a custom path on the Pi, the predetermined path or the network path.

Text Overlay

In here you can set the text overlay on the output of the camera. By default the left text reads the camera name and the right read the time stamp (Todays date and current time).

Video Streaming

This menu you’re able to set the video streaming options, this is the video you see in the browser.

  • Streaming Frame Rate: This is exactly the same as mentioned above under video device.
  • Streaming Quality: You can reduce the video streaming quality. This is good to reduce if you need to access the camera on a low bandwidth device often.
  • Streaming Image Resizing: Enable this if you want MotionPie to resize the images before being sent to a browser. (Not recommended on a Pi)
  • Streaming Port: This is the port that the device will listen to for connections looking to view the stream. Eg. http://motionpie:8081
  • Motion Optimization: This will reduce the frame rate whenever no motion is detected. This will save you bandwidth.

You can also see three URLs that can be used to access different footage. These URLs are very important if you have multiple cameras per Pi as each camera will have a unique port that you listen to the stream on.

Still Images

Here you can set the Raspberry Pi security camera to take still images whenever motion is triggered, during specific intervals or all the time.

Motion Detection

In here you activate the Raspberry Pi security camera motion detection that is included in the software. You are able to make adjustments to the settings here so that you can get better motion detection.

Motion Movies

In you here you can set the Pi to record movies whenever motion is detected

Motion Notifications

You’re able to set up email notifications, web hook notifications or even run a command whenever motion is detected. This will allow you to be notified whenever activity is detected on the cameras, perfect if they are monitoring areas with low traffic.

Working Schedule

Here you can set the days and the hours of operation you would like the system to be monitoring (If you leave this off then it is 24/7). This option is perfect if you only need it running during specific hours.

Summary

The Raspberry Pi security camera system is a great way to have multiple cameras hooked up both locally and over a network. All the extra setting motion pie provides allows you to have a  strong functioning security hub for your home, office or wherever you’re setting this up.

Information Source:

http://pimylifeup.com/raspberry-pi-security-camera/

Note:

In past, we often used “Motion” package (“sudo apt-get install motion”) for webserver, but this method doesn’t work on the Raspberry Pi 2.