Step by Step Installation of Raspberry Pi

Introduction

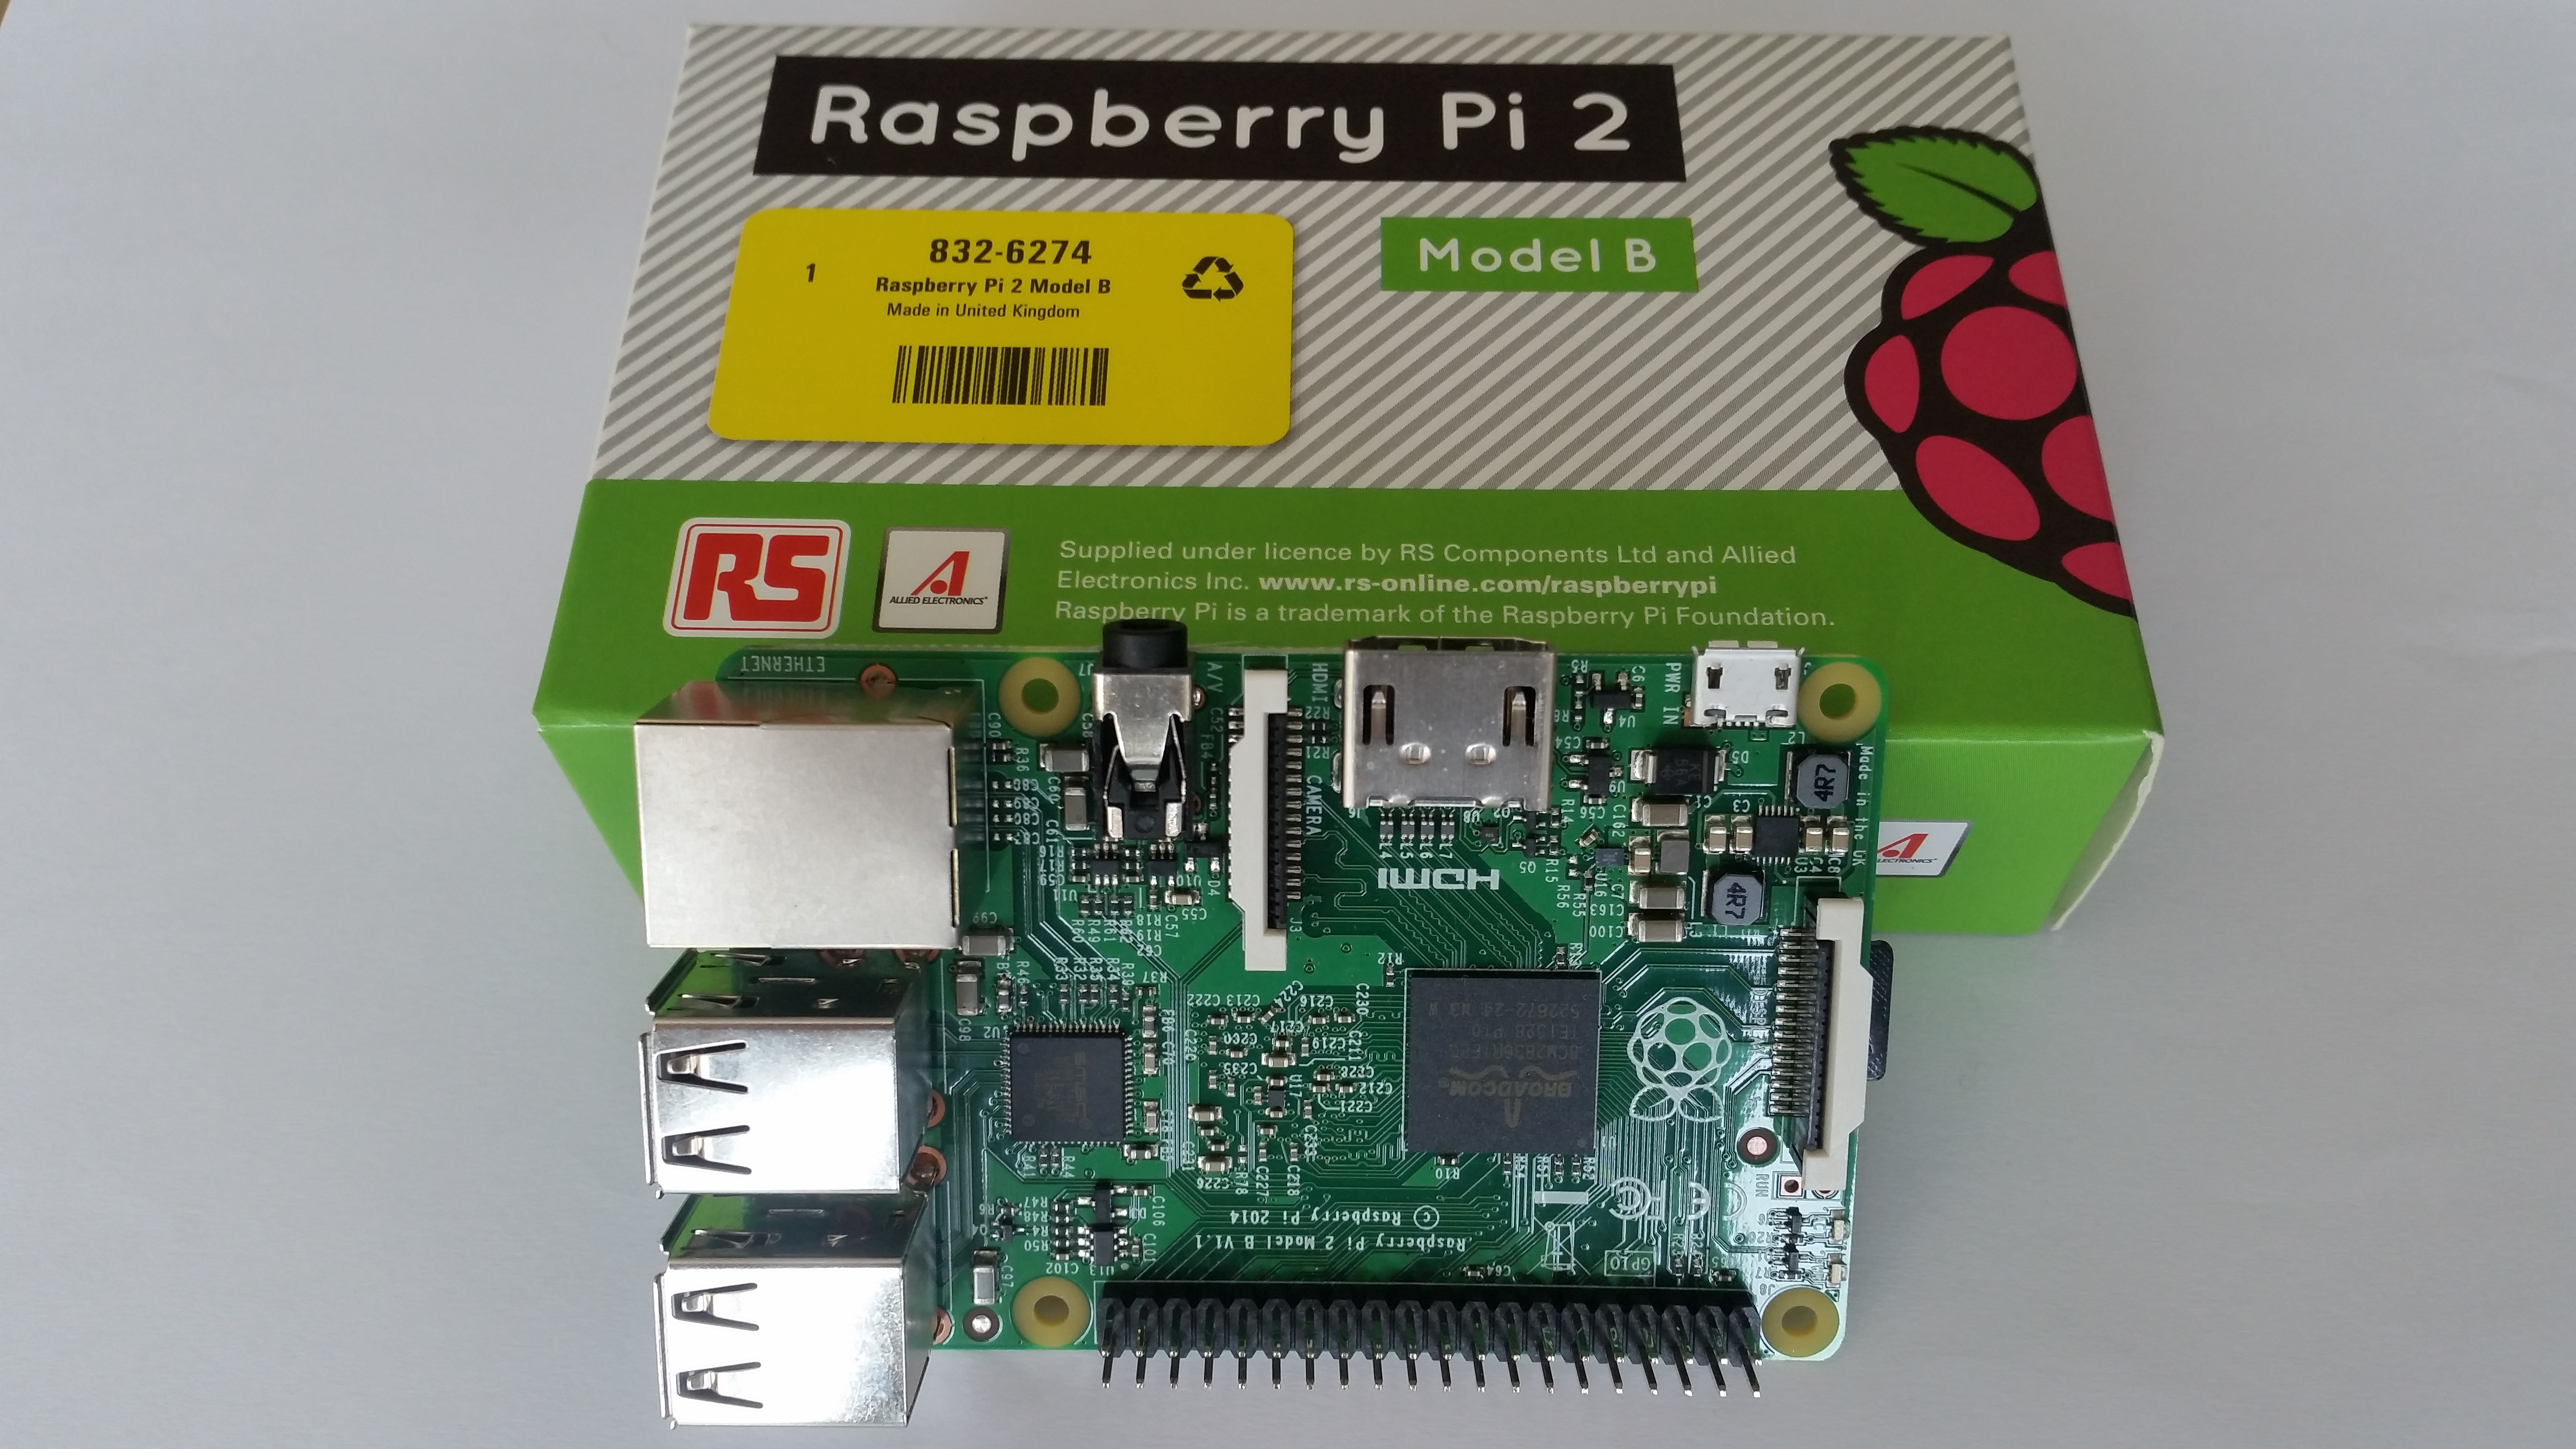
Recently, I bought a Raspberry Pi 2 B as my Christmas gift myself. Ha..Ha… It is a Good Stuff… Raspberry Pi is a very low cost Linux computer with pocket size. However, it is very powerful, and you can use it as a calculation processor, web hosting computer, network router, micro-controller for automatically, etc.Attractive… Right … To provide you information to start to use it, I would like to explain its installation as below. Hope it is help to you. If you are interested in it, feel free to check more information from amazon link click –> <<here>> .

20151219_131739

Step 1: Format SD Card via SDFFormatter

Download SDFFormatter from https://www.sdcard.org/downloads/formatter4/

Step 2: Write NOOBS System to SD Card

Download NOOBS from https://www.raspberrypi.org/downloads/

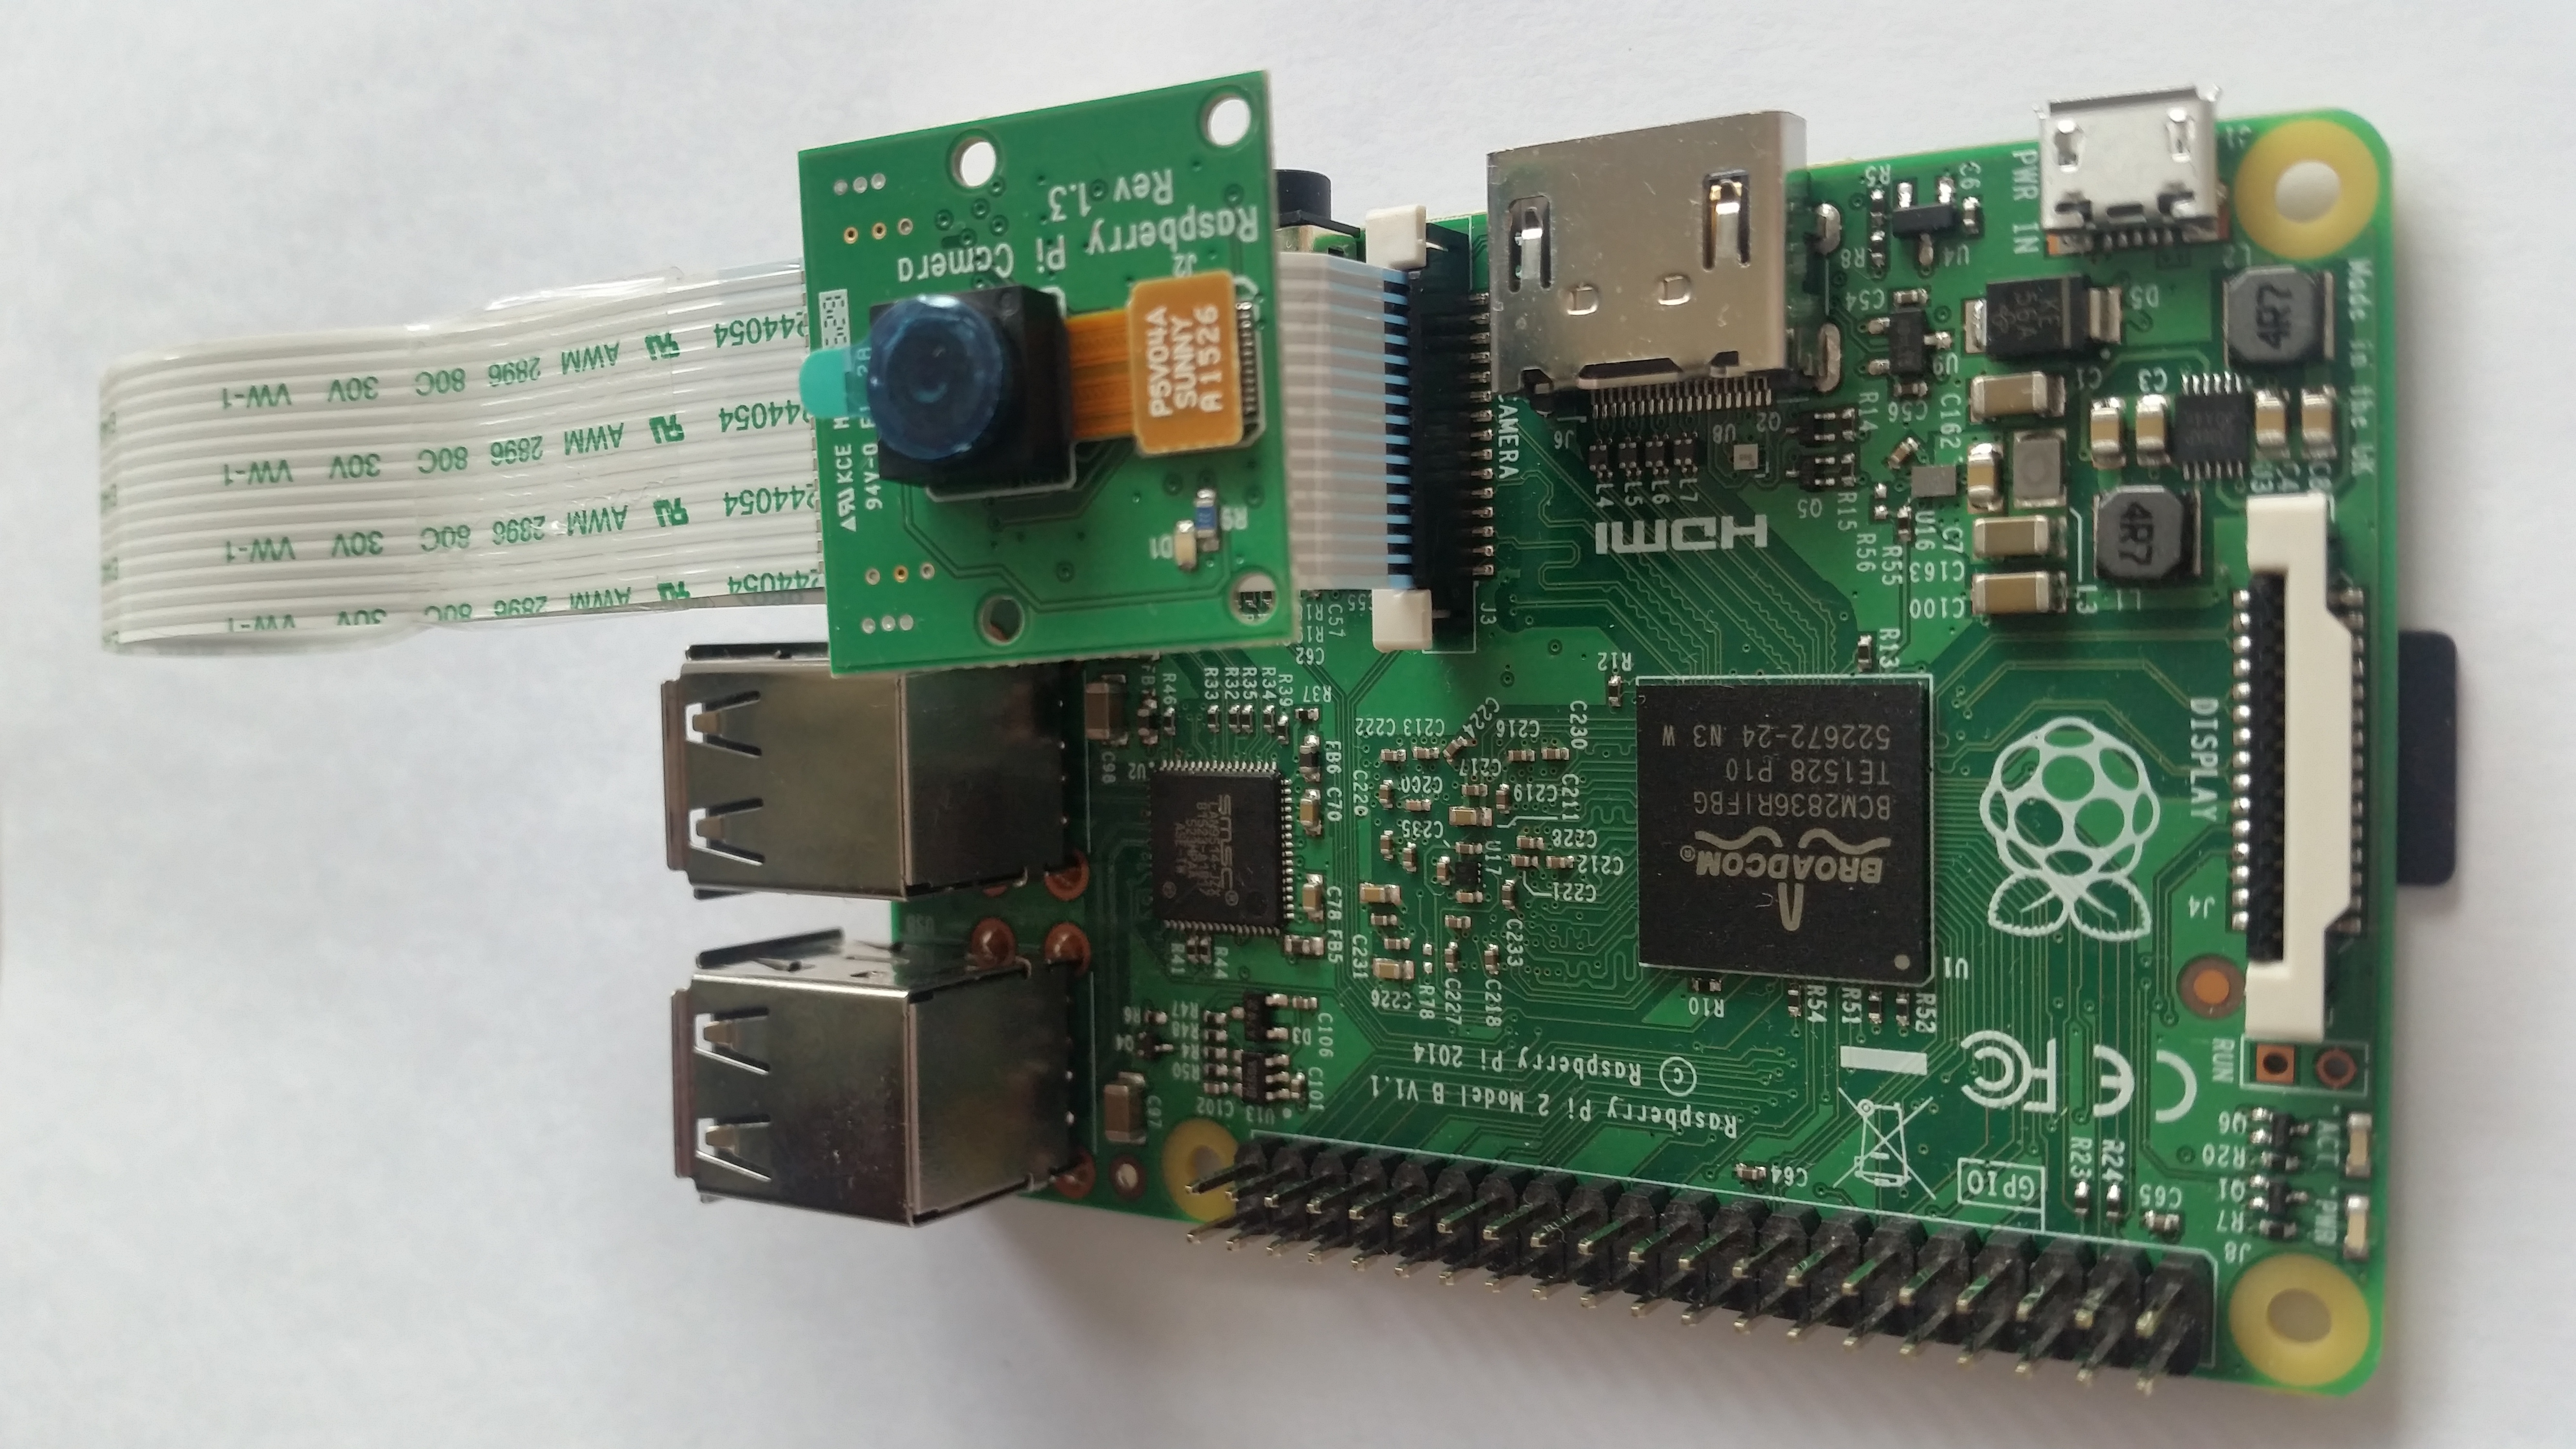
Step 3: Connect Keyboard/Mouse/HDMI monitor/SD Card/Power to Raspberry Pi

Connect power and switch-on the device, then follow the screen display to install Raspbian O/S System.

Step 4: Install to local/keyboard/country/display Chinese Char

  1. raspi-config 先設定 locales, 如utf-8 等
  2. 安裝字型 sudo apt-get install ttf-wqy-microhei
  3. Select Midori font 選字型 文泉驛微米黑
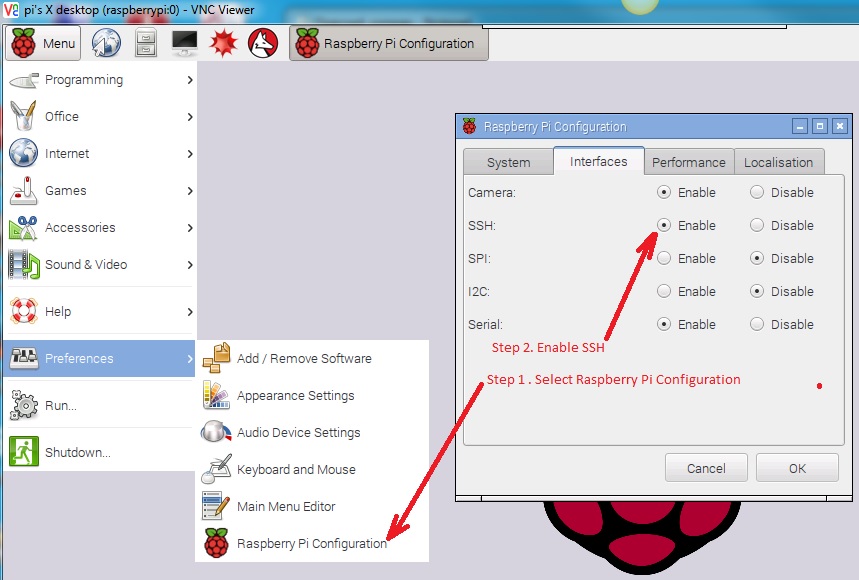
  4. Select Raspberry Configuration
    • Select keyboard as US (internation)
    • Select your country
  5. Reboot the system

Step 5: Install program to update System Time via Internet

$ sudo apt-get update

$ sudo apt-get upgrade

$ sudo apt-get install ntpdate

$ sudo service ntp restart

Step 6: Install tightvncserver program

Reference Info –> https://www.raspberrypi.org/documentation/remote-access/vnc/README.md

  • On your Pi (using a monitor or via SSH), install the TightVNC package:

$ sudo apt-get install tightvncserver

  • Next, run TightVNC Server which will prompt you to enter a password and an optional view-only password:

$ sudo tightvncserver

  • Start a VNC server from the terminal. This example starts a session on VNC display zero (:0) with full HD resolution:

$ sudo vncserver :0 -geometry 1920×1080 -depth 24

Automation and run at boot

You can create a simple file with the command to run the VNC server on the Pi, to save having to remember it:

$ sudo vi /etc/init.d/vncboot

  • Create a file containing the following shell script:

#! /bin/sh
# /etc/init.d/vncboot

### BEGIN INIT INFO
# Provides: vncboot
# Required-Start: $remote_fs $syslog
# Required-Stop: $remote_fs $syslog
# Default-Start: 2 3 4 5
# Default-Stop: 0 1 6
# Short-Description: Start VNC Server at boot time
# Description: Start VNC Server at boot time.
### END INIT INFO

USER=pi
HOME=/home/pi

export USER HOME

case “$1” in
start)
echo “Starting VNC Server”
#Insert your favoured settings for a VNC session
su – pi -c “/usr/bin/vncserver :0 -geometry 1280×800 -depth 16 -pixelformat rgb565”
;;

stop)
echo “Stopping VNC Server”
/usr/bin/vncserver -kill :0
;;

*)
echo “Usage: /etc/init.d/vncboot {start|stop}”
exit 1
;;
esac

exit 0


  • Save this file as vncboot (for example)
  • Make this file executable:

$ sudo chmod 755 vncboot

  • Enable dependency-based boot sequencing:

$ sudo update-rc.d vncboot defaults

In your client computer, use vnc client to connect to   your ip address:5900     or     Ip address:1

Step 7: Install Samba program to setup share folder

$ sudo apt-get install samba samba-common-bin

$ sudo adduser powenko

$ sudo usermod –a -G sambashare powenko

$ sudo pdbedit –a –u powenko

$ sudo mkdir /home/allusers

$ sudo chown root:sambashare /home/allusers/

$ sudo chmod 770 /home/allusers/

$ sudo chmod g+s /home/allusers/

$ sudo nano /etc/samba/smb.conf

Edit with the following:

security = user
read only = no
[allusers]
comment=Shared Folder
path=/home/allusers
read only=no
guest ok=no
browseable=yes
create mask=0700

Start Samba Server Automatically

$sudo /etc/init.d/samba restart

Connect Folder via Client Computer

\raspberrypiallusers
\raspberrypipowenko

Step 8: Install Cloud/Apache/php to setup share folder

Step 01 Install software

You’ll want Apache software and PHP for this. Install everything you need with:

$ sudo apt-get install apache2 php5 php5-json php5-gd php5-sqlite curl libcurl3 libcurl4-openssl-dev php5- curl php5-gd php5-cgi php-pear php5-dev build-essential libpcre3-dev libapache2-mod-php5 php-apc

Step 02 Setup PHP accelerator   (optional: this step only works for php 5.4 or below)

Install your accelerator with $ sudo pecl install apc

But I’m getting this error:                       ^

make: *** [apc_cache.lo] Error 1
ERROR: `make’ failed

Remark:  apc is no longer supported on PHP 5.5 and above. A quick search brought me to this;
http://grokbase.com/t/php/php-internals-win/145fj1qj14/compiling-memcache-and-apc-for-php-5-6, Which seems to confirm that it won’t work.

Then edit an ini file, use $sudo nano/etc/php5/cgi/conf.d/apc.ini and then add this to the file:

extension=apc.so
apc.enabled=1
apc.shm_size=30

Step 03 Configure file limits

Go into the Apache config file with $ sudo nano /etc/php5/apache2/php.ini. It’s a big file, but there are two filesize options you need to find, and a third extension option you need to add as below:

upload_max_filesize = 2048M
post_max_size = 2200M
extension = apc.so           # optional

Step 04 Set up SSL

First of all, you need to enable SSL in Apache; do this by using sudo nano /etc/apache2/sites-enabled/000-default.conf and change ‘None’ to ‘All’ in the AllowOverride option. Follow this up with the following two commands:

$ sudo a2enmod rewrite

$ sudo a2enmod headers

Step 05 Finish up with Apache

You now need to do two sets of commands: a big one which requires some info and then a restart:

$ sudo openssl genrsa -des3 -out server.key 1024

$ sudo openssl rsa -in server.key -out server.key. insecure

$ sudo openssl req -new -key server.key -out server.csr

$ sudo openssl x509 -req -days 365 -in server.csr -signkey server.key -out server.crt

$ sudo cp server.crt /etc/ssl/certs;sudo cp server.key /etc/ssl/private;sudo a2enmod ssl

$ sudo a2ensite default-ssl

$ sudo service apache2 restart

Step 06 Download and install ownCloud

Here you have a series of commands to run that will download, unzip and install ownCloud to the right place:

$ wget https://download.owncloud.org/community/owncloud-7.0.0.tar.bz2

(option: find the latest update from https://owncloud.org/install/#instructions-server)

$ sudo tar -xjf owncloud-7.0.0.tar.bz2

$ sudo cp -r owncloud /var/www/html/

Step 07 ownCloud permissions

Make sure your hard drive is connected and mounted as you want it. First, give webserver permission to use ownCloud:

$ sudo chown -R www-data:www-data /var/www/html/owncloud/

Next, use sudo nano /var/www/owncloud/.htaccess and make the same changes you did in the php.ini file above.

php_value_upload_max_filesize 2000Mphp_value_post_max_size 2000Mphp_value_memory_limit 2000M

Finally, give permissions to the location you mounted the hard drive to with:

$ sudo chown -R www-data:www-data [mount]

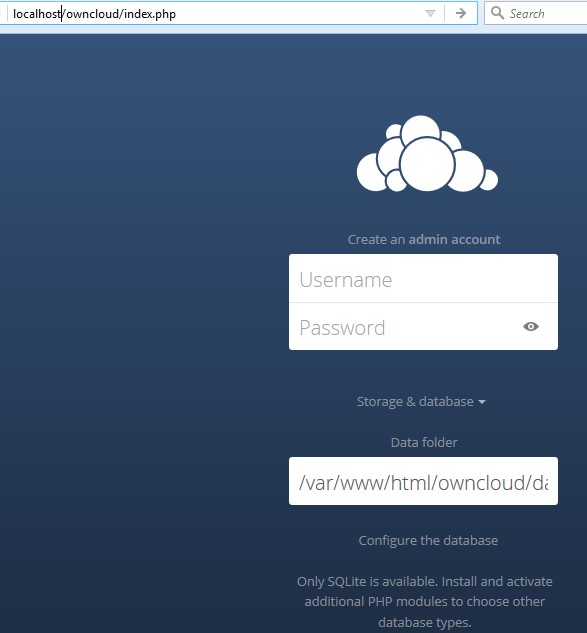
Step 08 Set up ownCloud

In your client computer web browsers,  navigate to https://[ipaddress]/owncloud to begin the ownCloud setup process, as below diagram. The first thing you’ll need to do is change the data location to the mount point of your external drive, which can be found in the advanced options.

owncloud-setup

 Order a RaspBerry Pi from Amazon as below link:
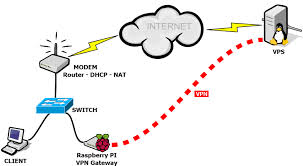
Installing pandas with Anaconda

Installing pandas and the rest of the NumPy and SciPy stack can be a little difficult for inexperienced users.

The simplest way to install not only pandas, but Python and the most popular packages that make up the SciPystack (IPython, NumPy, Matplotlib, …) is with Anaconda, a cross-platform (Linux, Mac OS X, Windows) Python distribution for data analytics and scientific computing.

After running a simple installer, the user will have access to pandas and the rest of the SciPy stack without needing to install anything else, and without needing to wait for any software to be compiled.

Installation instructions for Anaconda can be found here.

A full list of the packages available as part of the Anaconda distribution can be found here.

An additional advantage of installing with Anaconda is that you don’t require admin rights to install it, it will install in the user’s home directory, and this also makes it trivial to delete Anaconda at a later date (just delete that folder).

Windows Install

Download the Anaconda installer and double click it.

NOTE: If you encounter any issues during installation, please disable your anti-virus software.

TIP: The installer may also run in silent mode, without bringing up the graphical interface. To install Anaconda in this mode, type the following command into a command prompt, replacing the file name with the name of your downloaded install file:

Anaconda-2.4.0-Windows-x86_64.exe /S /D=C:Anaconda

The /D option specifies the install location. Quotes are not allowed here, even if there are spaces in the install location. For example, instead of /D="C:Program FilesAnaconda", use /D=C:ProgramFilesAnaconda.

Windows Uninstall

Click on “Add or remove Program” in the Control Panel, and select “Python 2.7 (Anaconda)”.

Updating from older Anaconda versions

You can easily update to the latest Anaconda version by updating conda, then Anaconda as follows:

conda update conda
conda update anaconda

Diary of IT Man – Handling of Staff Termination

Today, I need to handle the MIS work for termination of a high level staff. Very sad….

I need to setup email forwarding and password reset. Here is the step to forward 365 Email Account to another account :

1.Log into the portal as the admin, Under the Admin link, select Exchange.
2.Then select Recipients.
3.Select Mailboxes, then click the name of the user whose email you want to forward
4.Select the Edit icon (little pencil).
5.Now select Mailbox Features from the left and scroll down to the Mail Flow section, and click View details.
6.In the delivery options, Check the box next to Enable Forwarding, then select the email address to forward to using the browse button. Now you can tell it whether to continue delivering email tot he original mailbox or not. Hit save and this should start forwarding new emails immediately.

365EmailAccount-ForwardingSetup


7. Reset Email Password as below:

365Email-Reset-Pwd


Install Python’s Django on Windows

This document will guide you through installing Python and Django for basic usage on Windows. This is meant as a beginner’s guide for users working on Django projects and does not reflect how Django should be installed when developing patches for Django itself.
The steps in this guide have been tested with Windows 7 and 8. In other versions, the steps would be similar.

Install Python

Django is a Python web framework, thus requiring Python to be installed on your machine.

To install Python on your machine go to https://python.org/download/, and download a Windows MSI installer for Python. Once downloaded, run the MSI installer and follow the on-screen instructions.

After installation, open the command prompt and check the Python version by executing python --version. If you encounter a problem, make sure you have set the PATH variable correctly. You might need to adjust your PATHenvironment variable to include paths to the Python executable and additional scripts. For example, if your Python is installed in C:Python34, the following paths need to be added to PATH:

C:Python34;C:Python34Scripts;

Install Setuptools

To install Python packages on your computer, Setuptools is needed. Download the latest version of Setuptools for your Python version and follow the installation instructions given there.

Install PIP

PIP is a package manager for Python that uses the Python Package Index to install Python packages. PIP will later be used to install Django from PyPI. Python 3.4 and later include pip by default [1], so you may have pip already.

Install Django

Django can be installed easily using pip.

In the command prompt, execute the following command: pip install django. This will download and install Django.

After the installation has completed, you can verify your Django installation by executing django-admin --version in the command prompt.

Changed in Django 1.7:In Django 1.7, a .exe has been introduced, so just use django-admin in place of django-admin.py in the command prompt.

See Get your database running for information on database installation with Django.

Common pitfalls

  • If django-admin only displays the help text no matter what arguments it is given, there is probably a problem with the file association in Windows. Check if there is more than one environment variable set for running Python scripts inPATH. This usually occurs when there is more than one Python version installed.

  • If you are connecting to the internet behind a proxy, there might be problem in running the commands easy_installpip and pip install django. Set the environment variables for proxy configuration in the command prompt as follows:

    set http_proxy=http://username:password@proxyserver:proxyport
    set https_proxy=https://username:password@proxyserver:proxyport

    Git Installation

    • download from http://git-scm.com/download/win

    • Run UNIX command under Window Environment.

Title 21 CFR Part 11 Requirement

Title 21 CFR Part 11 is the part of Title 21 of the Code of Federal Regulations that establishes the United States Food and Drug Administration(FDA) regulations on electronic records and electronic signatures (ERES). Part 11, as it is commonly called, defines the criteria under which electronic records and electronic signatures are considered trustworthy, reliable, and equivalent to paper records (Title 21 CFR Part 11 Section 11.1 (a)).

Practically speaking, Part 11 applies to drug makers, medical device manufacturers, biotech companies, biologics developers, CROs, and other FDA-regulated industries, with some specific exceptions. It requires that they implement controls, including audits, system validations, audit trails, electronic signatures, and documentation for software and systems involved in processing the electronic data that FDA predicate rules require them to maintain. A predicate rule is any requirement set forth in the Federal Food, Drug and Cosmetic Act, the Public Health Service Act, or any FDA regulation other than Part 11. [1]

The rule also applies to submissions made to the FDA in electronic format (e.g., a New Drug Application) but not to paper submissions by electronic methods (i.e., faxes). It specifically does not require the 21CFR11 requirement for record retention for tracebacks by food manufacturers. Most food manufacturers are not otherwise explicitly required to keep detailed records, but electronic documentation kept for HACCP and similar requirements must meet these requirements.

As of 2007, broad sections of the regulation have been challenged as excessive[who?], and the FDA has stated in guidance that it will exercise enforcement discretion on many parts of the rule. This has led to confusion on exactly what is required, and the rule is being revised. In practice, the requirements on access controls are the only part routinely enforced.[citation needed] The “predicate rules” that required organizations to keep records the first place are still in effect. If electronic records are illegible, inaccessible, or corrupted, manufacturers are still subject to those requirements.

If a regulated firm keeps “hard copies” of all required records, those paper documents can be considered the authoritative document for regulatory purposes, and the computer system is not in scope for electronic records requirements—though systems that control processes subject to predicate rules still require validation.[citation needed] Firms should be careful to make a claim that “hard copies” of required records are authoritative document. For the “hard copy” produced from electronic source to be the authoritative document, the “hard copy” must be a complete and accurate copy of the electronic source. The manufacturer must use the hard copy (rather than electronic versions stored in the system) of the records for regulated activities. The current technical architecture of computer systems increasingly makes the burden of proof for the complete and accurate copy requirement extremely high.[2]

Information Source: https://en.wikipedia.org/wiki/Title_21_CFR_Part_11

IT人在工廠日記 – IT人員通常的職業病痛

在二十多年的工作生涯中,我除了賺到工資外,但是也帶來很多職業病痛。其一就是肩背痛,四年前開始發作,那時痛了二、三星期才痊愈,之後只是間歇的少痛,尤其是不跟大陸同事渴白酒後,已沒大問題,可是現在剛剛轉了新工作,肩背痛又發作,令我痛了一星期,醫生說是初期的肩周炎,現在要認真治理了。另外,二年前我曾經生蛇,應該是因為工作和生活壓力的,幸好沒有後遺症。再之後,一年半前,開始腰痛發作,不知是因為工作或是床鋪問題,總之就是痛。最後,還有一樣很普遍的辦公室人員的職業病,就是痔瘡,我已經記不起什麼時候開始的,因為一直沒大困擾,只是近年開始令我坐立不安,尤其是多行更差,很討厭呢。

雖然工作重要,但是身體健康更重要,我要多多留意健康,處理病痛呢!

Video Conference Device Comparsion between Polycom Vs Tandberg

Bandwidth Optimization – Polycom can send 720HD at lower speeds but Tandberg can send more than CIF4CIF7201080, which I’ll take that over the lower HD speeds any day.
Central Admin – Tandbery is great for admin (if you have several hundred end-point, you definitely choose Tandbery. Polycom was beta and their provisioning wasn’t ready yet.
End User Usability – This is real close and I give favor to Polycom.
Reliability/Maintenance – I once had some one tell me Polycom is like Mircosoft and Tandberg is like Cisco. Polycom looks good but has bugs while Tandberg might not be as flashy but is rock solid. I’d pick Tandberg.
Cost – if you could compare apples to apples they’d be close but looking at just the bottom line Polycom is the winner.

Conclusion: If you have only a few connection VC points and have a loose network control (e.g. not using Cisco device), I suggest to use Polycom because it is easy to setup. For company with many VC end-points (say > 50), I will prefer to choose Tandberg which is more security and easy to manage.

Diary of IT Guy in Factory – poor Dongguan beggar

When I go and return from China factory and pass across the china border, I always see some poor beggers on street. Most are disabled, e.g. without arm or leg, I know that this kind of disabled is human-made. Those beggers was controlled and forced by bad guys. They are living in a very very poor life. Please China Government help those beggers.

————–

http://www.youtube.com/watch?v=jKW2pQElPYA