AWS Command Interface Setup

Installing the AWS Command Line Interface

The primary distribution method for the AWS CLI on Linux, Windows, and macOS is pip, a package manager for Python that provides an easy way to install, upgrade, and remove Python packages and their dependencies.

Current AWS CLI Version

The AWS CLI is updated frequently with support for new services and commands. To see if you have the latest version, see the releases page on GitHub.

Requirements

  • Python 2 version 2.6.5+ or Python 3 version 3.3+
  • Windows, Linux, macOS, or Unix

Note

Older versions of Python may not work with all AWS services. If you seeInsecurePlatformWarning or deprecation notices when you install or use the AWS CLI, update to a recent version.

If you already have pip and a supported version of Python, you can install the AWS CLI with the following command:

$ pip install awscli --upgrade --user

The --upgrade option tells pip to upgrade any requirements that are already installed. The --user option tells pip to install the program to a subdirectory of your user directory to avoid modifying libraries used by your operating system.

If you encounter issues when you attempt to install the AWS CLI with pip, you can install the AWS CLI in a virtual environment to isolate the tool and its dependencies, or use a different version of Python than you normally do.

Standalone Installers

For offline or automated installations on Linux, macOS, or Unix, try the bundled installer. The bundled installer includes the AWS CLI, its dependencies, and a shell script that performs the installation for you.

On Windows, you can also use the MSI installer. Both of these methods simplify the initial installation, with the tradeoff of being more difficult to upgrade when a new version of the AWS CLI is released.

After you install the AWS CLI, you may need to add the path to the executable file to your PATH variable. For platform specific instructions, see the following topics:

Verify that the AWS CLI installed correctly by running aws --version.

$ aws --version
aws-cli/1.11.84 Python/3.6.2 Linux/4.4.0-59-generic botocore/1.5.47

The AWS CLI is updated regularly to add support for new services and commands. To update to the latest version of the AWS CLI, run the installation command again.

$ pip install awscli --upgrade --user

If you need to uninstall the AWS CLI, use pip uninstall.

$ pip uninstall awscli

If you don’t have Python and pip, use the procedure for your operating system:

Sections

Configuring the AWS CLI

This section explains how to configure settings that the AWS Command Line Interface uses when interacting with AWS, such as your security credentials and the default region.

Note

The AWS CLI signs requests on your behalf, and includes a date in the signature. Ensure that your computer’s date and time are set correctly; if not, the date in the signature may not match the date of the request, and AWS rejects the request.

Quick Configuration

For general use, the aws configure command is the fastest way to set up your AWS CLI installation.

$ aws configure
AWS Access Key ID [None]: AKIAIOSFODNN7EXAMPLE
AWS Secret Access Key [None]: wJalrXUtnFEMI/K7MDENG/bPxRfiCYEXAMPLEKEY
Default region name [None]: us-west-2
Default output format [None]: json

The AWS CLI will prompt you for four pieces of information. AWS Access Key ID and AWS Secret Access Key are your account credentials.

To get the access key ID and secret access key for an IAM user

Access keys consist of an access key ID and secret access key, which are used to sign programmatic requests that you make to AWS. If you don’t have access keys, you can create them from the AWS Management Console. We recommend that you use IAM access keys instead of AWS account root user access keys. IAM lets you securely control access to AWS services and resources in your AWS account.

The only time that you can view or download the secret access keys is when you create the keys. You cannot recover them later. However, you can create new access keys at any time. You must also have permissions to perform the required IAM actions. For more information, see Delegating Permissions to Administer IAM Users, Groups, and Credentials in the IAM User Guide.

  1. Open the IAM console.
  2. In the navigation pane of the console, choose Users.
  3. Choose your IAM user name (not the check box).
  4. Choose the Security credentials tab and then choose Create access key.
  5. To see the new access key, choose Show. Your credentials will look something like this:
    • Access key ID: AKIAIOSFODNN7EXAMPLE
    • Secret access key: wJalrXUtnFEMI/K7MDENG/bPxRfiCYEXAMPLEKEY
  6. To download the key pair, choose Download .csv file. Store the keys in a secure location.Keep the keys confidential in order to protect your account, and never email them. Do not share them outside your organization, even if an inquiry appears to come from AWS or Amazon.com. No one who legitimately represents Amazon will ever ask you for your secret key.

Related topics

Default region is the name of the region you want to make calls against by default. This is usually the region closest to you, but it can be any region. For example, type us-west-2 to use US West (Oregon).

Note

You must specify an AWS region when using the AWS CLI. For a list of services and available regions, see Regions and Endpoints. The region designators used by the AWS CLI are the same names that you see in AWS Management Console URLs and service endpoints.

Default output format can be either jsontext, or table. If you don’t specify an output format, json is used.

If you have multiple profiles, you can configure additional, named profiles by using the --profile option.

$ aws configure --profile user2
AWS Access Key ID [None]: AKIAI44QH8DHBEXAMPLE
AWS Secret Access Key [None]: je7MtGbClwBF/2Zp9Utk/h3yCo8nvbEXAMPLEKEY
Default region name [None]: us-east-1
Default output format [None]: text

To update any of your settings, simply run aws configure again and enter new values as appropriate. The next sections contain more information on the files that aws configure creates, additional settings, and named profiles.

Configuration Settings and Precedence

The AWS CLI uses a provider chain to look for AWS credentials in a number of different places, including system or user environment variables and local AWS configuration files.

The AWS CLI looks for credentials and configuration settings in the following order:

  1. Command line options – region, output format and profile can be specified as command options to override default settings.
  2. Environment variables – AWS_ACCESS_KEY_IDAWS_SECRET_ACCESS_KEY, and AWS_SESSION_TOKEN.
  3. The AWS credentials file – located at ~/.aws/credentials on Linux, macOS, or Unix, or at C:UsersUSERNAME .awscredentials on Windows. This file can contain multiple named profiles in addition to a default profile.
  4. The CLI configuration file – typically located at ~/.aws/config on Linux, macOS, or Unix, or at C:UsersUSERNAME .awsconfig on Windows. This file can contain a default profile, named profiles, and CLI specific configuration parameters for each.
  5. Container credentials – provided by Amazon EC2 Container Service on container instances when you assign a role to your task.
  6. Instance profile credentials – these credentials can be used on EC2 instances with an assigned instance role, and are delivered through the Amazon EC2 metadata service.

Tips on using Microsoft Azure

Tips 1. How to find password of wordpress logon

  • The default user account of wordpress in Azure is ‘user’.
  • The application password is randomly generated during the first boot. This password can be viewed as follows:

In the “Support + Troubleshooting” menu, select the “Boot diagnostics” option.Application credentials

Review the system log until you find the application password.

Application credentials

IMPORTANT: This password is only shown the first time you start the image. Please save your password in a safe place. We also recommend changing it in your application to a different value.

Tips 1. How to Setup Nested Virtualization in Azure

Deploy Azure VM

To setup Nested Virtualization inside an Azure Virtual Machine, you first need to create a new Virtual Machines using one of the new instance sizes like Ev3 or Dv3 and Windows Server 2016.I also recommend to install all the latest Windows Server patches to the system.

Optional: Optimize Azure VM Storage

This step is optional, but if you want to better performance and more storage for your Nested Virtual Machines to run on, this makes sense.

Azure VM Data Disks

In my case I attached 2 additional data disks to the Azure VM. Of course you can choose more or different sizes. Now you can see 2 new data disk inside your Azure Virtual Machine. Do not format them, because we gonna create a new storage spaces pool and a simple virtual disk, so we get the performance form both disks at the same time. In the past this was called disk striping.

Azure VM Storage Spaces

With that you can create a new Storage Spaces Storage Pool and a new Virtual Disk inside the VM using the storage layout “Simple” which basically configures it as striping.

Azure VM Storage Spaces PowerShell

I also formatted the disk and set the drive letter to V:, this will be the volume where I will place my nested virtual machines.

Install Hyper-V inside the Azure VM

Install Hyper-V on Windows Server using PowerShell

The next step would be to install the Hyper-V role in your Azure Virtual Machine. You can use PowerShell to do this since this is a regular Windows Server 2016.This command will install Hyper-V and restart the virtual machine.

Azure VM Hyper-V

After the installation you have Hyper-V installed and enabled inside your Azure Virtual Machine, now you need to configure the networking for the Hyper-V virtual machines. For this we will use NAT networking.

Configure Networking for the Nested Environment

Hyper-V NAT Network inside Azure VM

To allow the nested virtual machine to access the internet, we need to setup Hyper-V networking in the right why. For this we use the Hyper-V internal VM Switch and NAT networking. I described this here: Set up a Hyper-V Virtual Switch using a NAT Network

Create a new Hyper-V Virtual Switch

First create a internal Hyper-V VM Switch

Configure the NAT Gateway IP Address

The Internal Hyper-V VM Switch creates a virtual network adapter on the host (Azure Virtual Machine), this network adapter will be used for the NAT Gateway. Configure the NAT gateway IP Address using New-NetIPAddress cmdlet.

Configure the NAT rule

After that you have finally created your NAT network and you can now use that network to connect your virtual machines and use IP Address from 172.21.21.2-172.21.21.254.

Now you can use these IP Addresses to assign this to the nested virtual machines. You can also setup a DHCP server in one of the nested VMs to assign IP addresses automatically to new VMs.

Optional: Create NAT forwards inside Nested Virtual Machines

To forward specific ports from the Host to the guest VMs you can use the following commands.

This example creates a mapping between port 80 of the host to port 80 of a Virtual Machine with an IP address of 172.21.21.2.

This example creates a mapping between port 82 of the Virtual Machine host to port 80 of a Virtual Machine with an IP address of 172.21.21.3.

Optional: Configure default Virtual Machine path

Since I have created an extra volume for my nested virtual machines, I configure this as the default path for Virtual Machines and Virtual Hard Disks.

Create Nested Virtual Machines inside the Azure VM

Azure Nested Virtualization

Now you can basically start to create Virtual Machines inside the Azure VM. You can for example use an existing VHD/VHDX or create a new VM using an ISO file as you would do on a hardware Hyper-V host.

Some crazy stuff to do

There is a lot more you could do, not all of it makes sense for everyone, but it could help in some cases.

  • Running Azure Stack Development Kit – Yes Microsoft released the Azure Stack Development Kit, you could use a large enough Azure virtual machine and run it in there.
  • Configure Hyper-V Replica and replicate Hyper-V VMs to your Azure VM running Hyper-V.
  • Nested a Nested Virtual Machine in a Azure VM – You could enable nesting on a VM running inside the Azure VM so you could do a VM inside a VM inside a VM. Just follow my blog post to created a nested Virtual Machine: Nested Virtualization in Windows Server 2016 and Windows 10

In my opinion Nested Virtualization is mostly help full if you run Hyper-V Containers, but it also works great, if you want to run some Virtual Machines inside a Azure VM, for example to run a lab or test something.

info source: https://www.thomasmaurer.ch/2017/07/how-to-setup-nested-virtualization-in-microsoft-azure/

Procedure to migration Exchange Server Email to Office365

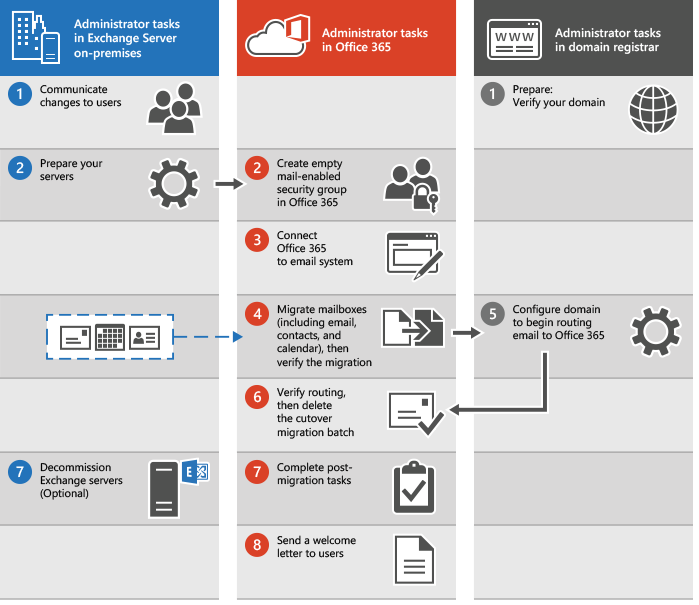
The main steps you perform for a cutover migration are shown in the following illustration.

Process for performing a cutover email migration to Office 365

  1. The administrator communicates upcoming changes to users and verifies domain ownership with the domain registrar.
  2. The administrator prepares the servers for a cutover migration and creates empty mail-enabled security groups in Office 365.
  3. The administrator connects Office 365 to the on-premises email system (this is called creating a migration endpoint).
  4. The administrator migrates the mailboxes and then verifies the migration.
  5. Grant Office 365 licences to your users.
  6. The administrator configures the domain to begin routing email directly to Office 365.
  7. The administrator verifies that routing has changed, and then deletes the cutover migration batch.
  8. The administrator completes post-migration tasks in Office 365 (assigns licenses to users and creates an Autodiscover Domain Name System (DNS) record), and optionally decommissions the on-premises Exchange servers.
  9. The administrator sends a welcome letter to users to tell them about Office 365 and to describe how to sign in to their new mailboxes.

Preparation for Microsoft Azure Solution Exam 70-532

Exam Target Audience

One of the recent hot IT topic is cloud technology. Microsoft and Amaze are two most active providers for cloud service. Microsoft’s Azure solution is very popular now. Learning Azure and obtain its cert will be very useful. The 70-532 Developing Microsoft Azure Solutions exam is targeted towards a Developer candidate. Candidates who are experienced in designing, programming, implementing, automating, and monitoring Microsoft Azure solutions. Candidates are also proficient with development tools, techniques, and approaches used to build scalable and resilient solutions.If you’re an experienced .NET developer, then you’ll likely have an easier time preparing for this exam. As a result, the exam will assume you are proficient with development tools, techniques and have experience developing scalable and resilient solutions.

Skills Measured

Here’s a high level break down of the exam objectives:

  • Design and implement websites (15-20%)
  • Create and manage virtual machines (20-25%)
  • Design and implement cloud services (20-25%)
  • Design and implement a storage strategy (20-25%)
  • Manage application and network services (15-20%)

Note: The percentage next to each is the approximate break out of how much of the exam focuses on each objective area. As you can see it’s pretty evenly distributed across the 5 areas.

The full exam objectives are listed on the official page for the 70-532 Developing Microsoft Azure Solutions exam.

Free Video Courses / Training

There are many video training courses available for the 70-532 Developing Microsoft Azure Solutions exam. The courses top on my list are over at the Microsoft Virtual Academy (MVA), but there are many more. Here’s a list of video courses I used while studying for this exam with the approximate length of the training courses.

Another video training option that’s not Free, but there is a Free Trial available is Opsgility on-demand Azure training.

Books

There are a number of books on Microsoft Azure. The one geared towards studying for the exam is the “Exam Ref 70-532 Developing Microsoft Azure Solutions” from Microsoft Press. This book is an excellent study resource to accompany all the other materials, as it’s condensed to cover the exam objectives list.

Note: Do NOT rely to heavily on any single study resources, even books.

Here a list of some Free eBooks available for download:

Documentation

The documentation for Azure is an excellent study resource too! It’s been built out pretty heavily and even accepts contributions from the community via GitHub. I really encourage you to browse around the documentation and read, read, read in addition to all of your other study efforts.

Practice Tests

The typical practice test vendors do not currently offer any practice exams for the 70-532 Developing Microsoft Azure Solutions exam. Due to this fact, I actually developed some of my own practice test questions to help me prepare for the exam, and I put them up free for anyone to use!

Take the practice tests: Developing Microsoft Azure Solutions (70-532) Practice Test

While the list of questions I put together is not an exhaustive list, this offers yet another tool you can use to help prepare for the exam. Please don’t complain about the quality or the extensiveness of the questions. It takes a lot of time to write test questions! Also, I put these up on GitHub so feel free to browse the source code, fork it or whatever.

Play Time

It’s fine to get “book smart”, but there certainly is no substitute for just getting in there, playing around and practicing. Something Microsoft offers to encourage this is a Free Trial with $200 to spend on all Azure Services. So go dig in and experiment with how this stuff all works, and get some real world experience that will help you pass the exam. This is not just useful if you’re new to Azure. It’s also very useful if you’ve already been developing on Azure but just haven’t done much with certain features yet. Additionally, if you have an MSDN Subscription, then you already have some free monthly credits to use Azure available to you too.

Exam Study Tips

Here’s a few tips of techniques I use when studying and preparing for certification exams:

  • Make sure to go through each exam objective category and study until you’re comfortable with that topic.
  • Use at minimum 3 study resources on each topic. The variety and repetition will help you retain everything.
  • Play with stuff. “Book smarts” are good, but practical hands-on experience is better.
  • Make flash cards and/or practice test questions to help memorizing the stuff that can be memorized.
  • Don’t be afraid to fail an exam. You will learn what areas you need to focus on better and can always take it again.
  • Give yourself a deadline. Once you’re in a comfortable study pace, estimate when you’ll be ready for the exam and schedule it.
  • Get your family on board to support you spending a significant amount of time outside of work to study.
  • Choose the online proctored exam option when scheduling the exam. This way you can take the exam in a less stressful environment that is the comfort of your own home.

By using the above info, hope I can pass the exam and earn your Azure certification !

info source: http://pietschsoft.com/post/2015/06/06/How-I-passed-the-70-532-Developing-Microsoft-Azure-Solutions-certification-exam

Diary of IT Man – Got a MCSA Windows Server 2016 Certification

Cheers that I got a MCSA Windows Server 2016 certification which I passed the exam in one take yesterday. I just needed to take one Microsoft exam # 70-743 to upgrade my MCITP window server 2008 to MCSA. If anyone want to get info to pass the 70-743, feel free to contact me. Moreover, I have a spare Microsoft exam coupon which will be expired in end of Sept 2017; I can sell it to you in great discount, feel free to contact me.

Although I knew this cert did not have any benefit to my career path, it was just the responsibility of IT guy to update his knowledge as well as academic qualification. IT field updates very fast, and it is very hard for to trace the technology. Let’s keep on learning…

Agile的Scrum項目管理

十年前開始流行的的Project Management Professional (PMP) 和 PRINCE2 項目管理認證,現時有新的競爭者叫 Certified Scrum Master (CSM)認證,現已開始越來越多人留意了。

Scrum是一種新的項目管理的架構,通常為Agile (敏捷)方式的開發工具,而且通常用於軟件開發項目上。Agile/Scrum能夠處理複雜問題,將它們分拆,及優先考慮到單獨的任務中,然後將這些任務委託給最適合解決每個任務的專門團隊成員,所以它被認為較有效率。

以下是兩編bloger文章,很好地介紹Agile/Scrum的應用,值得參考:
Scrum 是什麼(1):雙重回饋機制 –> http://teddy-chen-tw.blogspot.hk/2011/12/scrum-1.html
Scrum 是什麼(2):Scrum 的內涵 –> http://teddy-chen-tw.blogspot.hk/2011/12/scrum-2.html

Agenda of FDA Inspection

FDA-logoRecently, FDA conducted audit to my company. FDA is known as Food and Drug Administration whereas US has FDA organization and China also has CFDA organization. Its official web site is https://www.fda.gov.

I would like to post their 3 days inspection agenda for your reference. To pass FDA audit is essential for export medical product; let’s well prepare for it.

Day 1
·         Introduction
·         Opening meeting.
·         Introduction/Presentation
·         Plant Overview (Warehouse, Manufacturing and Quality control areas).
·         Tour on facilities.
Lunch
·         Quality Manual.
·         Company Organization Chart.
·         Document Control / Records.
·         Change Control of Documents
·         Human Resources (job description, hiring, training).
·         Quality System Management Review.
Day 2
·         Daily wrap up.
·         Environment Control (Clean rooms, ESD and other applicable).
·         Design Control / History File.
·         Risk Management.
·         Device Master Record (DMR).
·         Change Control of Projects.
Lunch
·         CAPA.
·         Complaint Handling.
·         Field Actions / Recall.
·         Incoming Inspections.
·         Purchasing / Incoming Goods/Warehouse Activities.
Day 3
·         Daily wrap up.
·         Device History Record (DHR).
·         Internal Audits.
·         Validation Activities.
·         Non Conforming Product.
Lunch
·         Quality control (in process and final inspections).
·         Packaging / labeling.
·         Handling / Distribution/ Shipping.
·         Final Release.
·         Identification and Traceability.
Day 4
·         Daily wrap up.
·         Calibration / Maintenance program.
·         Field service/Technical assistance.
·         Decontamination / Returned Products.
Lunch
·         Housekeeping (Cleaning, pest control, building maintenance).
·         Statistical Techniques.
·         Pending Points.
·         Inspector’s findings Discussion.
·         Closing meeting.