Build a LAMP Web Server with WordPress under Raspberry Pi

Information Source: https://www.raspberrypi.org/learning/lamp-web-server-with-wordpress/worksheet/

Learn to set up a LAMP (Linux, Apache, MySQL, PHP) stack on your Raspberry Pi and configure it to work as a web server. You’ll download and install WordPress and set up a basic website which you can access on any device on the same network as your Pi.

Set up Apache Web Server

Apache is a popular web server application you can install on the Raspberry Pi to allow it to serve web pages.

On its own, Apache can serve HTML files over HTTP, and with additional modules can serve dynamic web pages using scripting languages such as PHP.

Install Apache

First install the apache2 package by typing the following command into the terminal:

sudo apt-get install apache2 -y

Test the web server

By default, Apache puts a test HTML file in the web folder. This default web page is served when you browse to http://localhost/ on the Pi itself, or http://192.168.1.10 (whatever the Pi’s IP address is) from another computer on the network. To find out the Pi’s IP address, type hostname -I at the command line (or read more about finding your IP address) in our documentation.

Browse to the default web page, either on the Pi or from another computer on the network, and you should see the following:

Apache it works

This means you have Apache working!

Changing the default web page

This default web page is just a HTML file on the filesystem. It is located at /var/www/html/index.html.

Note: The directory was /var/www in Raspbian Wheezy but is now /var/www/html in Raspbian Jessie

Navigate to this directory in the Terminal and have a look at what’s inside:

cd /var/www/html
ls -al

This will show you:

total 12
drwxr-xr-x  2 root root 4096 Jan  8 01:29 .
drwxr-xr-x  3 root root 4096 Jan  8 01:28 ..
-rw-r--r--  1 root root  177 Jan  8 01:29 index.html

This shows that there is one file in /var/www/html/ called index.html. The . refers to the directory itself /var/www/html and the .. refers to the parent directory /www/.

What the columns mean

  1. The permissions of the file or directory
  2. The number of files in the directory (or 1 if it’s a file).
  3. The user which owns the file or directory
  4. The group which owns the file or directory
  5. The file size
  6. The last modification date & time

As you can see, by default the html directory and index.html file are both owned by the rootuser, so you’ll need to use sudo to edit them.

Try editing this file and refreshing the browser to see the web page change. Press Ctrl + X and hit Enter to save and exit.

Install PHP

PHP is a preprocessor; it’s code that runs when the server receives a request for a web page. It runs, works out what needs to be shown on the page, then sends that page to the browser. Unlike static HTML, PHP can show different content under different circumstances. Other languages are capable of this, but since WordPress is written in PHP, that’s what we need to use this time. PHP is a very popular language on the web; large projects like Facebook and Wikipedia are written in PHP.

Install the PHP and Apache packages with the following command:

sudo apt-get install php5 libapache2-mod-php5 -y

Test PHP

Create the file index.php:

sudo leafpad index.php

(or use nano)

Put some PHP content in it:

<?php echo "hello world"; ?>

Now save the file. Next delete index.html because it takes precendence over index.php:

sudo rm index.html

Refresh your browser. You should see “hello world”. This is not dynamic but it is still served by PHP. If you see the raw PHP above instead of “hello world”, reload and restart Apache like so:

sudo service apache2 restart

Otherwise try something dynamic, for example:

<?php echo date('Y-m-d H:i:s'); ?>

Or show your PHP info:

<?php phpinfo(); ?>

Install MySQL

MySQL (pronounced My Sequel or My S-Q-L) is a popular database engine. Like PHP, its overwhelming presence on web servers enhanced its popularity. This is why projects like WordPress use it, and why those projects are so popular.

Install the MySQL Server and PHP-MySQL packages by entering the following command into the terminal:

sudo apt-get install mysql-server php5-mysql -y

When installing MySQL you will be asked for a root password. You’ll need to remember this to allow your website to access the database.

Now restart Apache:

sudo service apache2 restart

Download WordPress

You can download WordPress from wordpress.org using the wget command. Helpfully, a copy of the latest version of WordPress is always available at wordpress.org/latest.tar.gz and wordpress.org/latest.zip, so you can grab the latest version without having to look it up on the website. At the time of writing, this is version 4.5.

Navigate to /var/www/html/, and download WordPress to this location. You’ll need to empty the folder first (be sure to check you’re not deleting files you need before running rm); change the ownership of this folder to the pi user too.

cd /var/www/html/
sudo rm *
sudo wget http://wordpress.org/latest.tar.gz

Now extract the tarball, move the contents of the folder it extracted (wordpress) to the current directory and remove the (now empty) folder and the tarball to tidy up:

sudo tar xzf latest.tar.gz
sudo mv wordpress/* .
sudo rm -rf wordpress latest.tar.gz

Running the ls or (tree -L 1) command here will show you the contents of a WordPress project:

.
├── index.php
├── license.txt
├── readme.html
├── wp-activate.php
├── wp-admin
├── wp-blog-header.php
├── wp-comments-post.php
├── wp-config-sample.php
├── wp-content
├── wp-cron.php
├── wp-includes
├── wp-links-opml.php
├── wp-load.php
├── wp-login.php
├── wp-mail.php
├── wp-settings.php
├── wp-signup.php
├── wp-trackback.php
└── xmlrpc.php

This is the source of a default WordPress installation. The files you edit to customise your installation belong in the wp-content folder.

You should now change the ownership of these files to the Apache user:

sudo chown -R www-data: .

Set up your WordPress Database

To get your WordPress site set up, you need a database. Run the mysql command in the terminal and provide your login credentials (e.g. username root, password password):

mysql -uroot -ppassword

Here I have provided my password (the word password) on the command line; there is no space between -p and your password.

Alternatively you can simply supply an empty -p flag and wait to be asked for a password:

mysql -uroot -p

Now you will be prompted to enter the root user password you created earlier.

Once you’re connected to MySQL, you can create the database your WordPress installation will use:

mysql> create database wordpress;

Note the semi-colon ending the statement. On success you should see the following message:

Query OK, 1 row affected (0.00 sec)

Exit out of the MySQL prompt with Ctrl + D.

WordPress Configuration

You need to find out your Pi’s IP address to access it in the browser, so in a terminal type the command hostname -I.

Navigate to http://YOUR-IP-ADDRESS e.g. http://192.168.1.5 in the web browser on your Pi.

You should see a WordPress weclome page.

WordPress welcome screen

Click the Let's go! button.

Now fill out the basic site information as follows:

Database Name:      wordpress
User Name:          root
Password:           <YOUR PASSWORD>
Database Host:      localhost
Table Prefix:       wp_

and click Submit to proceed.

Now hit the Run the install button.

Now you’re getting close.

WordPress Welcome screen

Fill out the information: give your site a title, create a username and password and enter your email address. Hit the Install WordPress button, then log in using the account you just created.

Now you’re logged in and have your site set up, you can see the website by visiting your IP address in the browser on the Pi or another computer on the network. To log in again (or on another computer), go to http://YOUR-IP-ADDRESS/wp-admin.

Friendly permalinks

It’s recommended that you change your permalink settings to make your URLs more friendly.

To do this, log in to WordPress and go to the dashboard.

Go to Settings then Permalinks.

Select the Post name option and click Save Changes.

You’ll need to enable Apache’s rewrite mod:

sudo a2enmod rewrite

You’ll also need to tell the virtual host serving the site to allow requests to be overwritten.

Edit the Apache configuration file for your virtual host:

sudo leafpad /etc/apache2/sites-available/000-default.conf

(or use nano)

Add the following lines after line 1:

<Directory "/var/www/html">
    AllowOverride All
</Directory>

ensuring it’s within the <VirtualHost *:80> like so:

<VirtualHost *:80>
    <Directory "/var/www/html">
        AllowOverride All
    </Directory>
    ...

And then restart Apache again:

sudo service apache2 restart

Customisation

WordPress is very customisable. By clicking your site name in the WordPress banner along the top of the page (when logged in), you’ll be taken to the Dashboard. From here you can change the theme, add pages and posts, edit the menu, add plugins and lots more. This is just a taster for getting something interesting set up on the Raspberry Pi’s web server.

Raspberry Pi Wireless Connection Control

Introduction

recently, I found a software to manage wireless connection under Raspberry Pi (i.e Lunix), it called wicd-curese. It is easy to install it by running the following command:

sudo apt-get install wicd-curses

However, it request to install quite a few other packages but those daemon run in the background.

After installed, you can run it with command:

sudo wicd-curses

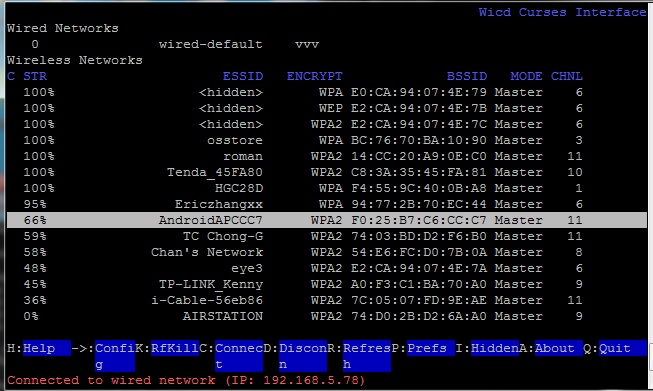
Then, the following screen will display for your setup control:

wireless-control

  • Right Key “->” to Configure
  • R to refresh the list.
  • D to Disconnect
  • C to Connect
  • F10 to save

You must be capital such as [SHIFT] C to connect. If you get a message saying no networks detected press P  and type in wlan0 in the wireless interface field and press F10 to save.

It is also manages the connection so it will reconnect to any configured wireless access points if it drops out for whatever reason but it will also try to connect to any available networks.

You might have to press C to connect to the access point. If you were wired that will most likely kill the LAN interface and bring up wireless, so, be careful for network connection.


Installation of an Open Source Prometeo-ERP System

Introduction

Although Prometeo-ERP System was a phase-out project for any further development, its follow-up project was Django-ERP. However, Django-ERP is still under development, Its function is not ready, and most features are not ready for public use at this moment. Then, I step back to continue to test Prometeo-ERP System. Prometeo-ERP has already provide many useful features, its public release free version had the following features:

  • Authentication & row-level permission system
  • Notification system
  • Custom widgets & dashboards
  • Taxonomy system
  • File browsing
  • Event calendar
  • User tasks & timesheets
  • CRM (Customer Relationship Management)
  • Products management
  • Stock management
  • Human resources management
  • Sales management
  • Project management
  • Knowledge management
  • DMS (Document Management System)

I installed the Prometeo-ERP system to my Raspberry Pi machine, i.e. free OS, free program tools, free application tools, … Great. It is still worth to study it, and I will show the installation installation in the following

Installation Steps:

1. Checkout sources from the GIT repository:

https://code.google.com/archive/p/prometeo-erp/

2. Follow the instructions in the README file as reference.

2.1 PREREQUISITES

Make sure you have the following prerequisites installed:

* python >= 2.6 (or 2.7 the public one)

$ pip install python==2.7

* pytz >= 2011h (required)
$ pip install pytz==2011h

* python-markdown >= 2.0 (required)
$ pip install markdown

* xhtml2pdf >= 0.0.3 (required)
$ pip install xhtml2pdf==0.0.3

* icalendar >= 2.2 (required)
$ pip install icalendar==2.2

* django >= 1.3.1 (required)
$ pip install django==1.3.1

* south >= 0.7.3 (optional)
$ pip install south

2.2 INSTALLATION
1. Rename the download folder to “prometeo” (It is necessary).

2. cp settings/base.py.tmpl settings/base.py, and edit several statement as below:

$ vi settings/base.py
….

ADMINS = (
# (‘Goldman’, ‘goldman.au168@gmail.com’),
)

MANAGERS = ADMINS

DATABASES = {
default’: {
‘ENGINE’: ‘django.db.backends.sqlite3’, # Add ‘postgresql_psycopg2’, ‘postgresql’, ‘mysql’, ‘sqlite3’ or ‘oracle’.
‘NAME’: ‘erp.db’, # Or path to database file if using sqlite3.
‘USER’: ”, # Not used with sqlite3.
‘PASSWORD’: ”, # Not used with sqlite3.
‘HOST’: ”, # Set to empty string for localhost. Not used with sqlite3.
‘PORT’: ”, # Set to empty string for default. Not used with sqlite3.
}

}

LANGUAGE_CODE = ‘en-us’

# List of installed applications.
INSTALLED_APPS = (
‘django.contrib.auth’,
‘django.contrib.contenttypes’,
‘django.contrib.sessions’,
‘django.contrib.sites’,
‘django.contrib.messages’,
‘django.contrib.admin’,
‘django.contrib.admindocs’,
‘django.contrib.comments’,
‘django.contrib.markup’,
‘django.contrib.redirects’,
‘django.contrib.staticfiles’,

#’south’,

‘prometeo.core’,
‘prometeo.core.filebrowser’,
‘prometeo.core.widgets’,
‘prometeo.core.menus’,
‘prometeo.core.taxonomy’,
‘prometeo.core.auth’,
‘prometeo.core.registration’,
‘prometeo.core.notifications’,
‘prometeo.core.calendar’,

‘prometeo.todo’,
‘prometeo.addressing’,
‘prometeo.partners’,
‘prometeo.documents’,
‘prometeo.products’,
‘prometeo.stock’,
‘prometeo.hr’,
‘prometeo.sales’,
‘prometeo.projects’,
‘prometeo.knowledge’,
)

3. It’s time to create the DB schema

$ python manage.py syncdb

4. Start the server:

$ python manage.py runserver

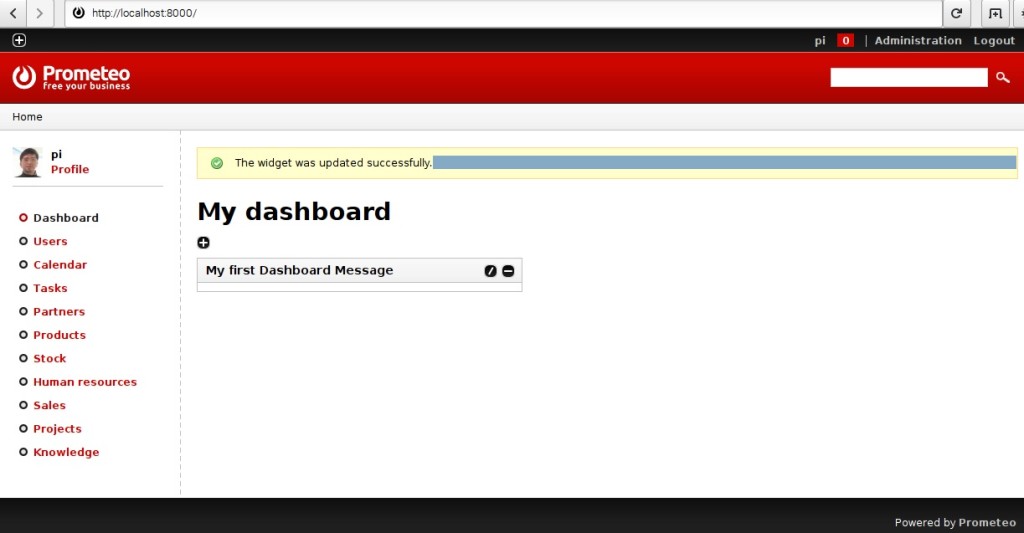
5. Test the application via link http://localhost:8000 as screen dump below:

prometeo-system


Setup Raspberry pi Car camera with Android phone WiFi

Introduction

Raspberry Pi can be widely used for Car computer with many features, such as plays DVDs, GPS, displays TV, Bluetooth (phone calls + music), MP3/MPEG4 player, CD/radio, car camera, reversing camera (comes on automatically when I put the car in reverse gear), etc. This week, I test raspberry pi to connect to android phone’s wireless hotpot, and setup camera and display feature as below. It is interesting.

Connect Raspberry Pi to an Android phone’s camera

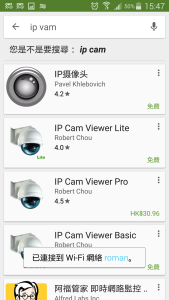
Step 1. Install Pi Camera Application in Android Phone, which you can find many from Google Play Store as below screen:

ipcam-app

Step 2. Turn on the Android Phone’s Camera Application and active its web server feature, then it will display an ip address for your external browse connection.

Step 3. Turn on the Android Phone’s wireless sharing hotpot feature, then the ip address will be refresh to its own phone address for your external connection as below:

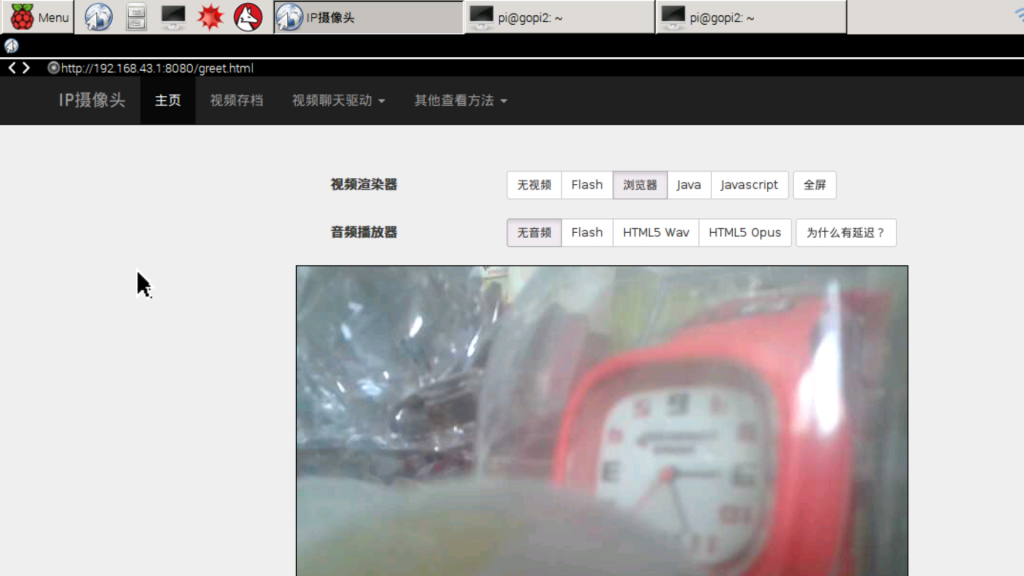
Step 4. Connect the Raspberry Pi to Android Phone Open the browser in your Raspberry Pi, and type in the ip address, then it will display the camera as below:

ipcam-display

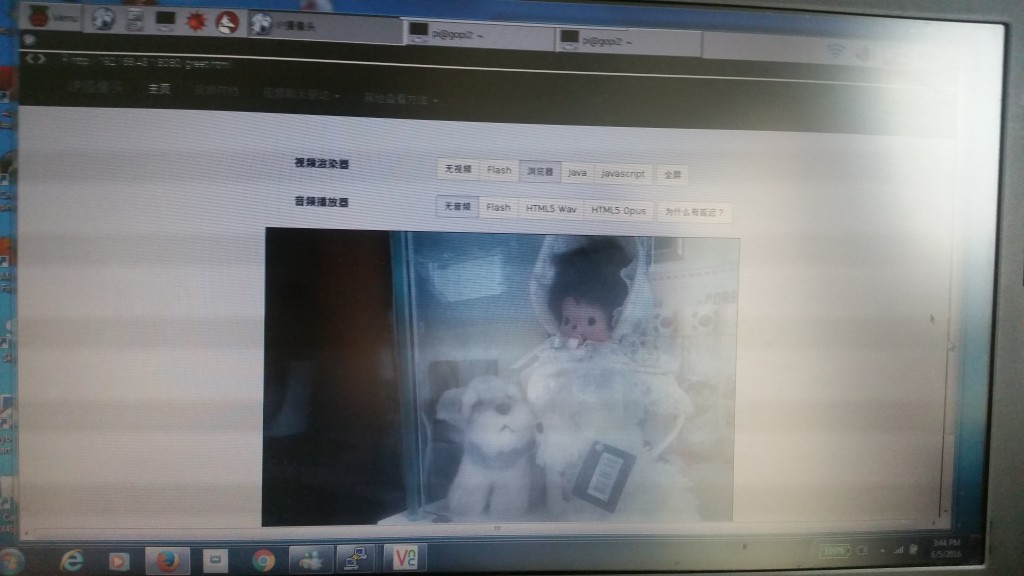
Screen Dump of Another Scene of Camera and Display as below two pictures:

cam-phone-display

cam-pi-diaplay


Display Raspberry Pi Camera to Android phone

Step 1. Install Raspberry Pi Camera and vlc software as describe in my previous post “Installation of Raspberry Pi Camera

Step 2. Start the video streaming function with command:

$ raspivid -w 640 -h 480 -o – -t 9999999 |cvlc -vvv stream:///dev/stdin –sout ‘#standard{access=http,mux=ts,dst=:8554}’ :demux=h264

Step 3. We can connect via browser with link http://ip-address:8554/.

Bonus:

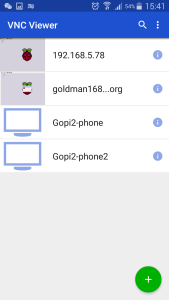
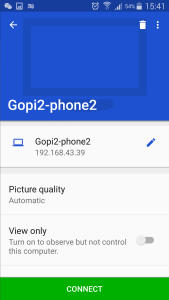
We can also use VNC to connect Raspberry Pi from Android Phone, provided that you start the VNC server function (as described in my previous post “Installation Raspberry Pi” Step 6, and then install VNC app from Google Play Store, and start VNC connection in Andriod Phone as below:

VNC-1                   VNC-2


Setup Django WorkFlow Application

Introduction

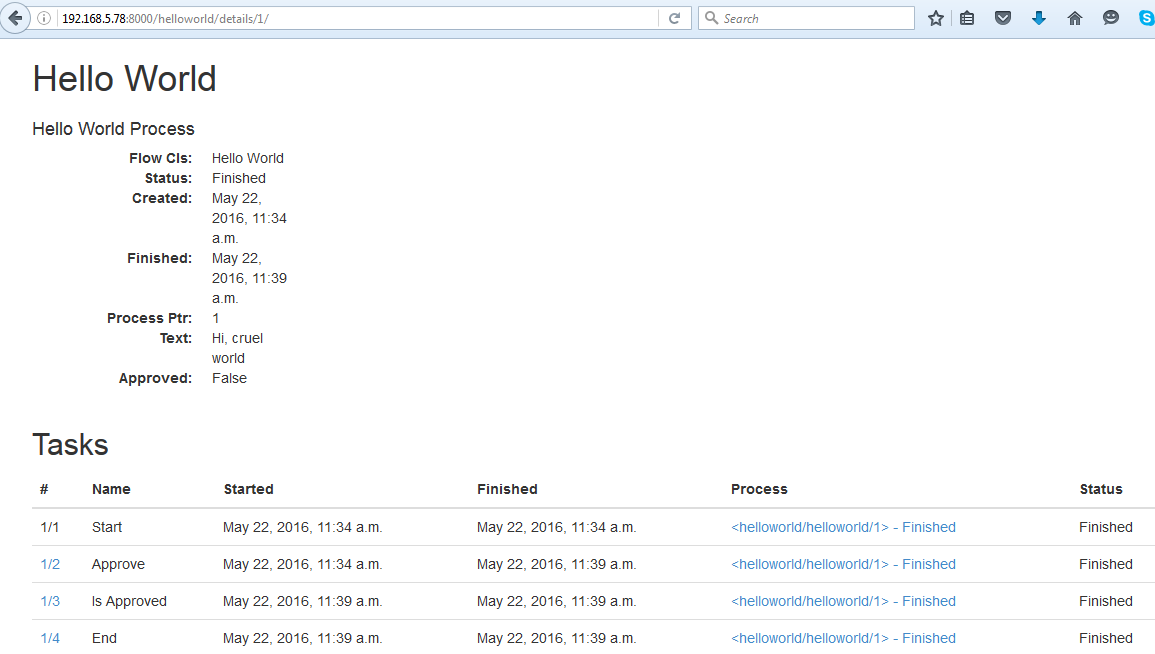
Recently, I studied how to setup a work flow program using python django. Believe me, Python Diango can provide you a high quality work flow web application. Let’s say I would like a simple workflow application as below diagram. I will show you how to setup the application as below instruction, and I will also show you the screen dump examples of running the application.

django-workflow0

Step 1. Prerequisition

This Work Flow Program requires Python 3.3 or greater, and django 1.6 or 1.7. I recommend you to setup under virtual environment. Setup the following python plug-in by running the following command:

$ pip3 install Django==1.7.1
$ pip3 install WebOb==1.4
$ pip3 install WebTest==2.0.16
$ pip3 install amqp==1.4.6
$ pip3 install anyjson==0.3.3
$ pip3 install beautifulsoup4==4.3.2
$ pip3 install billiard==3.3.0.18
$ pip3 install celery==3.1.16
$ pip3 install django-fsm==2.2.0
$ pip3 install django-viewflow==0.7.0
$ pip3 install django-webtest==1.7.7
$ pip3 install kombu==3.0.23
$ pip3 install mock==1.0.1
$ pip3 install pytz==2014.9
$ pip3 install singledispatch==3.4.0.3
$ pip3 install six==1.8.0
$ pip3 install waitress==0.8.9

Step 2. Create a standard django project and application

Run the following command:

$ django-admin.py startproject demo .

$ ./manage.py startapp helloworld

$ mv helloworld/ demo/

Step 3. Edit or Create the following files

3.1 edit demo/settings.py

INSTALLED_APPS = (
    ‘django.contrib.admin’,
    ‘django.contrib.auth’,
    ‘django.contrib.contenttypes’,
    ‘django.contrib.sessions’,
    ‘django.contrib.messages’,
    ‘django.contrib.staticfiles’,
    ‘viewflow’,
    ‘demo.helloworld’
)

TEMPLATE_CONTEXT_PROCESSORS = (
    ‘django.contrib.auth.context_processors.auth’,
    ‘django.core.context_processors.request’,
)

3.2 edit demo/urls.py

from django.conf.urls import patterns, include, url
from django.contrib import admin
from viewflow import views as viewflow
from .helloworld.flows import HelloWorldFlow

urlpatterns = patterns(
    ”,
    url(r’^helloworld/’,
        include([
            HelloWorldFlow.instance.urls,
            url(‘^$’, viewflow.ProcessListView.as_view(), name=’index’),
            url(‘^tasks/$’, viewflow.TaskListView.as_view(), name=’tasks’),
            url(‘^queue/$’, viewflow.QueueListView.as_view(), name=’queue’),
            url(‘^details/(?P<process_pk>d+)/$’,
                viewflow.ProcessDetailView.as_view(), name=’details’)],
                namespace=HelloWorldFlow.instance.namespace),
            {‘flow_cls’: HelloWorldFlow}),
    #url(r’^flows/’, include(viewflow.urls)),
    url(r’^admin/’, include(admin.site.urls)),
    url(r’^accounts/login/$’, ‘django.contrib.auth.views.login’, name=’login’),
    url(r’^accounts/logout/$’, ‘django.contrib.auth.views.logout’, name=’logout’),
)

3.3 create demo/celery.py

import os
from celery import Celery

from django.conf import settings

os.environ.setdefault(‘DJANGO_SETTINGS_MODULE’, ‘demo.settings’)

app = Celery(‘tests’)

app.config_from_object(‘django.conf:settings’)
app.autodiscover_tasks(lambda: settings.INSTALLED_APPS)

3.4 create demo/helloworld/flows.py

from viewflow import flow
from viewflow.base import Flow, this
from viewflow.contrib import celery

from . import models, views, tasks

class HelloWorldFlow(Flow):
    process_cls = models.HelloWorldProcess

    start = flow.Start(views.CreateRequestView)
        .Next(this.approve)

    approve = flow.View(views.ApproveRequestView)
        .Next(this.is_approved)

    is_approved = flow.If(lambda p: p.approved)
        .OnTrue(this.send)
        .OnFalse(this.end)

    send = celery.Job(tasks.send)
        .Next(this.end)

    end = flow.End()

3.5 edit demo/helloworld/models.py

from django.db import models
from viewflow.models import Process

class HelloWorldProcess(Process):
    text = models.CharField(max_length=250)
    approved = models.BooleanField(default=False)

3.6 edit demo/helloworld/tasks.py

from demo.celery import app as celery_app
from viewflow.flow import flow_job

@celery_app.task()
@flow_job()
def send(activation):
    print(activation.process.text)

3.7 edit demo/helloworld/views.py

from django.views import generic
from viewflow import views as flow_views

class CreateRequestView(flow_views.StartViewMixin,
                        generic.UpdateView):
    fields = [“text”]

    def get_object(self):
        return self.activation.process

class ApproveRequestView(flow_views.TaskViewMixin,
                         generic.UpdateView):
    fields = [“approved”]

    def get_object(self):
        return self.activation.process

Step 4. Start the Application Server

Run the following Command:

./manage.py createsuperuser –username=admin –email=admin@admin.com
( setup admin password )

./manage.py makemigrations

./manage.py migrate

Start the following celery in another virtual env

celery -A demo worker -l info

Start the application server:

./manage.py runserver

Step 4. Run the Application from browser

Admin Logon

http://127.0.0.1:8000/admin/

WorkFlow Application Logon

http://127.0.0.1:8000/helloworld/

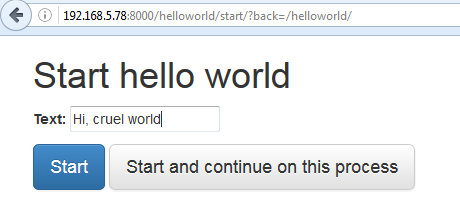
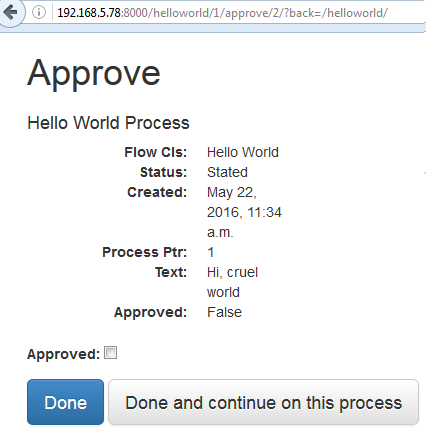
Step 5. Screen Dump Example of running the WorkFlow Application

django-workflow1

django-workflow2

django-workflow3
django-workflow4
django-workflow5

Reference Document Link:

http://viewflow.io/

http://docs.viewflow.io/material_admin.html

https://pypi.python.org/pypi/django-viewflow

Steps to Install Django-cms in Raspberry Pi

Introduction

django CMS is a modern web publishing platform built with Django, the web application framework “for perfectionists with deadlines”. Django CMS offers out-of-the-box support for the common features you’d expect from a CMS, but can also be easily customised and extended by developers to create a site that is tailored to their precise needs. The following will show you how step by step of Django CMS installation, and also with screen dump examples.

Installation Steps

start a virtual environment under Raspberry Pi
1.  sudo pip install virtualenv
2.  virtualenv env
3.  sourse env/bin/activate

Install Djangocms-Installer and create a project
1.  pip install djangocms-installer
2.  djangocms -p project project
Use default value for most questions
select lang = en, fr, de
Use default username : pi   then input your password

Start CMS Application
1.  cd project
j2.  python manage.py runserver
3.  You can browse the CMS web site via link http://127.0.0.1:8000/

Select a CMS template from Start Bootstrap
1.  http://startbootstrap.com/template-overviews/modern-business/   –> download
2.  copy css, font-awesome, fonts, js directories from download to project/project/static
3.  copy full-width.html to project/project/templates directory
4.  Edit line in settings.py

CMS_TEMPLATES = (
## Customize this
(‘fullwidth.html’, ‘Fullwidth’),
(‘sidebar_left.html’, ‘Sidebar Left’),     –> Delete
(‘sidebar_right.html’, ‘Sidebar Right’)    –> Delete
)

5.  Delete    ./templates/sidebar_left.html      sidebar_right.html

6.  Edit the full-width.html file as below:

{% load cms_tags menu_tags sekizai_tags staticfiles %}
<!DOCTYPE html>
<html lang=”{{ LANGUAGE_CODE }}”>

<head>

<meta charset=”utf-8″>
<meta http-equiv=”X-UA-Compatible” content=”IE=edge”>
<meta name=”viewport” content=”width=device-width, initial-scale=1″>
<meta name=”description” content=”{% page_attribute ‘meta_description’ %}”>
<meta name=”author” content=””>

<title>{% page_attribute ‘page_title’ %}CMS</title>

<!– Bootstrap Core CSS –>
<link href=”{% static “css/bootstrap.min.css” %}” rel=”stylesheet”>

<!– Custom CSS –>
<link href=”{% static “css/modern-business.css” %}” rel=”stylesheet”>

<!– Custom Fonts –>
<link href=”{% static “font-awesome/css/font-awesome.min.css” %}” rel=”stylesheet” type=”text/css”>

….
<![endif]–>
{% render_block “css” %}
</head>

<body>
{% cms_toolbar %}
<!– Navigation –>
….

{% show_menu 0 100 100 100 %}     and delete lines as below:
<div class=”collapse navbar-collapse” id=”bs-example-navbar-collapse-1″>
<ul class=”nav navbar-nav navbar-right”>
{% show_menu 0 100 100 100 %}
</ul>
</div>
<!– /.navbar-collapse –>
….

<!– jQuery –>
<script src=”{% static “js/jquery.js” %}”></script>

<!– Bootstrap Core JavaScript –>
<script src=”{% static “js/bootstrap.min.js” %}”></script>
<% render_block “js” %}
</body>

Change the line         <a class=”navbar-brand” href=”index.html”>Start Bootstrap</a>
To                      <a class=”navbar-brand” href=”/”>New CMS Name</a>

7.  Rename   base.html    to base-bak.html
Rename   full-width.html   base.html

8.  Restart the server and test.

Screen Dump of Installation

pi@gopi1:~ $ pip install virtualenv
pi@gopi1:~ $ virtualenv env
New python executable in /home/pi/env/bin/python
Installing setuptools, pip, wheel…done.
pi@gopi1:~ $ source env/bin/activate
(env) pi@gopi1:~ $ pip install djangocms-installer
Collecting djangocms-installer
Downloading djangocms_installer-0.8.8-py2.py3-none-any.whl (56kB)
100% |████████████████████████████████| 61kB 714kB/s
Requirement already satisfied (use –upgrade to upgrade): argparse in /usr/lib/python2.7 (from djangocms-installer)
Collecting dj-database-url>=0.4 (from djangocms-installer)
Collecting six (from djangocms-installer)
Using cached six-1.10.0-py2.py3-none-any.whl
Requirement already satisfied (use –upgrade to upgrade): pip in ./env/lib/python2.7/site-packages (from djangocms-installer)
Collecting tzlocal (from djangocms-installer)
Collecting pytz (from tzlocal->djangocms-installer)
Using cached pytz-2016.4-py2.py3-none-any.whl
Installing collected packages: dj-database-url, six, pytz, tzlocal, djangocms-installer
Successfully installed dj-database-url-0.4.1 djangocms-installer-0.8.8 pytz-2016.4 six-1.10.0 tzlocal-1.2.2
(env) pi@gopi1:~ $ djangocms -p project project
Database configuration (in URL format) [default sqlite://localhost/project.db]:
django CMS version (choices: 2.4, 3.0, 3.1, 3.2, stable, develop) [default stable]:
Django version (choices: 1.4, 1.5, 1.6, 1.7, 1.8, 1.9, stable) [default stable]:
Activate Django I18N / L10N setting; this is automatically activated if more than language is provided (choices: yes, no) [default yes]:
Install and configure reversion support (choices: yes, no) [default yes]:
Languages to enable. Option can be provided multiple times, or as a comma separated list. Only language codes supported by Django can be used here: en, fr
Optional default time zone [default Asia/Hong_Kong]:
Activate Django timezone support (choices: yes, no) [default yes]:
Activate CMS permission management (choices: yes, no) [default yes]:
Use Twitter Bootstrap Theme (choices: yes, no) [default no]:
Use custom template set [default no]:
Load a starting page with examples after installation (english language only). Choose “no” if you use a custom template set. (choices: yes, no) [default no]:
Creating the project
Please wait while I install dependencies
Dependencies installed
Creating the project

Operations to perform:
Synchronize unmigrated apps: project, staticfiles, messages, djangocms_admin_style, sitemaps, sekizai, treebeard
Apply all migrations: djangocms_file, reversion, djangocms_inherit, sessions, admin, djangocms_column, djangocms_text_ckeditor, sites, auth, djangocms_video, menus, contenttypes, djangocms_picture, djangocms_googlemap, djangocms_style, djangocms_link, cms, djangocms_teaser
Synchronizing apps without migrations:
Creating tables…
Running deferred SQL…
Installing custom SQL…
Running migrations:
Rendering model states… DONE
Applying contenttypes.0001_initial… OK
Applying auth.0001_initial… OK
Applying admin.0001_initial… OK
Applying contenttypes.0002_remove_content_type_name… OK
Applying auth.0002_alter_permission_name_max_length… OK
Applying auth.0003_alter_user_email_max_length… OK
Applying auth.0004_alter_user_username_opts… OK
Applying auth.0005_alter_user_last_login_null… OK
Applying auth.0006_require_contenttypes_0002… OK
Applying sites.0001_initial… OK
Applying cms.0001_initial… OK
Applying cms.0002_auto_20140816_1918… OK
Applying cms.0003_auto_20140926_2347… OK
Applying cms.0004_auto_20140924_1038… OK
Applying cms.0005_auto_20140924_1039… OK
Applying cms.0006_auto_20140924_1110… OK
Applying cms.0007_auto_20141028_1559… OK
Applying cms.0008_auto_20150208_2149… OK
Applying cms.0008_auto_20150121_0059… OK
Applying cms.0009_merge… OK
Applying cms.0010_migrate_use_structure… OK
Applying cms.0011_auto_20150419_1006… OK
Applying cms.0012_auto_20150607_2207… OK
Applying cms.0013_urlconfrevision… OK
Applying cms.0014_auto_20160404_1908… OK
Applying djangocms_column.0001_initial… OK
Applying djangocms_file.0001_initial… OK
Applying djangocms_file.0002_auto_20151202_1551… OK
Applying djangocms_file.0003_remove_related_name_for_cmsplugin_ptr… OK
Applying djangocms_file.0004_set_related_name_for_cmsplugin_ptr… OK
Applying djangocms_googlemap.0001_initial… OK
Applying djangocms_inherit.0001_initial… OK
Applying djangocms_inherit.0002_auto_20150622_1244… OK
Applying djangocms_link.0001_initial… OK
Applying djangocms_link.0002_auto_20140929_1705… OK
Applying djangocms_link.0003_auto_20150212_1310… OK
Applying djangocms_link.0004_auto_20150708_1133… OK
Applying djangocms_link.0005_auto_20151003_1710… OK
Applying djangocms_link.0006_remove_related_name_for_cmsplugin_ptr… OK
Applying djangocms_link.0007_set_related_name_for_cmsplugin_ptr… OK
Applying djangocms_picture.0001_initial… OK
Applying djangocms_picture.0002_auto_20151018_1927… OK
Applying djangocms_style.0001_initial… OK
Applying djangocms_style.0002_set_related_name_for_cmsplugin_ptr… OK
Applying djangocms_teaser.0001_initial… OK
Applying djangocms_text_ckeditor.0001_initial… OK
Applying djangocms_text_ckeditor.0002_remove_related_name_for_cmsplugin_ptr… OK
Applying djangocms_text_ckeditor.0003_set_related_name_for_cmsplugin_ptr… OK
Applying djangocms_video.0001_initial… OK
Applying djangocms_video.0002_set_related_name_for_cmsplugin_ptr… OK
Applying menus.0001_initial… OK
Applying reversion.0001_initial… OK
Applying reversion.0002_auto_20141216_1509… OK
Applying sessions.0001_initial… OK
Creating admin user
Username (leave blank to use ‘pi’):
Email address: goldman.au168@gmail.com
Password:
Password (again):
Superuser created successfully.
All done!
Get into “/home/pi/cmsproj” directory and type “python manage.py runserver” to start your project
(env) pi@gopi1:~ $ cd project
(env) pi@gopi1:~/project $ ls
manage.py  media  project  project.db  requirements.txt  static
(env) pi@gopi1:~/project $ python manage.py runserver
Performing system checks…

System check identified no issues (0 silenced).
May 08, 2016 – 15:05:32
Django version 1.8.13, using settings ‘project.settings’
Starting development server at http://127.0.0.1:8000/
Quit the server with CONTROL-C.
New revision!!!! RELOAD!
28495694-7c4f-409e-9605-c499bf16e97a (<type ‘str’>)
-> None (<type ‘NoneType’>)
reverse(‘my_test_app_view’): Reverse for ‘my_test_app_view’ with arguments ‘()’ and keyword arguments ‘{}’ not found. 0 pattern(s) tried: []
[08/May/2016 15:05:33] “GET /admin/ HTTP/1.1” 302 0
[08/May/2016 15:05:34] “GET /en/admin/ HTTP/1.1” 302 0
[08/May/2016 15:05:35] “GET /en/admin/login/?next=/en/admin/ HTTP/1.1” 200 3107
[08/May/2016 15:05:35] “GET /admin/ HTTP/1.1” 302 0
[08/May/2016 15:05:35] “GET /en/admin/ HTTP/1.1” 302 0
[08/May/2016 15:05:35] “GET /en/admin/login/?next=/en/admin/ HTTP/1.1” 200 3107
[08/May/2016 15:05:36] “GET /static/admin/css/base.css HTTP/1.1” 200 14049
[08/May/2016 15:05:36] “GET /static/admin/css/base.css HTTP/1.1” 200 14049
[08/May/2016 15:05:36] “GET /static/admin/css/login.css HTTP/1.1” 200 940
[08/May/2016 15:05:36] “GET /static/djangocms_admin_style/js/jquery.ui.touch-punch.min.js HTTP/1.1” 200 0
[08/May/2016 15:05:36] “GET /static/djangocms_admin_style/css/djangocms-admin.css HTTP/1.1” 200 151181
[08/May/2016 15:05:36] “GET /static/djangocms_admin_style/js/base-admin.js HTTP/1.1” 200 2910
[08/May/2016 15:05:36] “GET /static/djangocms_admin_style/js/drag-touch-support.js HTTP/1.1” 200 1200
[08/May/2016 15:05:36] “GET /static/admin/css/login.css HTTP/1.1” 200 940
[08/May/2016 15:05:37] “GET /static/djangocms_admin_style/fonts/django-admin-iconfont.woff?v=3.2.0 HTTP/1.1” 200 10612
[08/May/2016 15:07:16] “POST /en/admin/login/?next=/en/admin/ HTTP/1.1” 302 0
[08/May/2016 15:07:17] “GET /en/admin/ HTTP/1.1” 200 7525
[08/May/2016 15:07:17] “GET /static/admin/css/base.css HTTP/1.1” 304 0
[08/May/2016 15:07:17] “GET /static/admin/css/dashboard.css HTTP/1.1” 200 434
[08/May/2016 15:07:17] “GET /static/admin/css/dashboard.css HTTP/1.1” 200 434
[08/May/2016 15:07:17] “GET /static/djangocms_admin_style/css/djangocms-admin.css HTTP/1.1” 304 0
[08/May/2016 15:07:17] “GET /static/djangocms_admin_style/js/base-admin.js HTTP/1.1” 304 0
[08/May/2016 15:07:17] “GET /static/djangocms_admin_style/js/drag-touch-support.js HTTP/1.1” 304 0
[08/May/2016 15:07:17] “GET /static/djangocms_admin_style/js/jquery.ui.touch-punch.min.js HTTP/1.1” 304 0
[08/May/2016 15:07:17] “GET /static/djangocms_admin_style/img/icon_arrow_right.png HTTP/1.1” 200 15812
^C(env) pi@gopi1:~/project $ ls
manage.py  media  project  project.db  requirements.txt  static
(env) pi@gopi1:~/project $ cd project
(env) pi@gopi1:~/project/project $ ls
__init__.py   settings.py   static     urls.py   wsgi.py
__init__.pyc  settings.pyc  templates  urls.pyc  wsgi.pyc
(env) pi@gopi1:~/projectj/project $ cd /home/allusers/startboot*
(env) pi@gopi1:/home/allusers/startbootstrap-modern-business-1.0.5 $ ls
404.html          contact.html     index.html            portfolio-4-col.html
about.html        css              js                    portfolio-item.html
bin               faq.html         LICENSE               pricing.html
blog-home-1.html  font-awesome     portfolio-1-col.html  README.md
blog-home-2.html  fonts            portfolio-2-col.html  services.html
blog-post.html    full-width.html  portfolio-3-col.html  sidebar.html
(env) pi@gopi1:/home/allusers/startbootstrap-modern-business-1.0.5 $ cp -r css /home/pi/project/project/static
(env) pi@gopi1:/home/allusers/startbootstrap-modern-business-1.0.5 $ cp -r font-awesome /home/pi/project/project/static
(env) pi@gopi1:/home/allusers/startbootstrap-modern-business-1.0.5 $ cp -r fonts /home/pi/project/project/static
(env) pi@gopi1:/home/allusers/startbootstrap-modern-business-1.0.5 $ cp -r js /home/pi/project/project/static
(env) pi@gopi1:/home/allusers/startbootstrap-modern-business-1.0.5 $ cp full-width.html /home/pi/project/project/templates
(env) pi@gopi1:/home/allusers/startbootstrap-modern-business-1.0.5 $ cd /home/pi/project/project/templates
(env) pi@gopi1:~/project/project/templates $ ls
base.html        fullwidth.html     sidebar_right.html
full-width.html  sidebar_left.html
(env) pi@gopi1:~/project/project/templates $ ls -l
total 24
-rw-r–r– 1 pi pi 1122 May  8 15:01 base.html
-rwxr-xr-x 1 pi pi 6589 May  8 15:13 full-width.html
-rw-r–r– 1 pi pi  191 May  8 15:01 fullwidth.html
-rw-r–r– 1 pi pi  308 May  8 15:01 sidebar_left.html
-rw-r–r– 1 pi pi  308 May  8 15:01 sidebar_right.html
(env) pi@gopi1:~/project/project/templates $ vi full-width.html
(env) pi@gopi1:~/project/project/templates $ mv base.html base-bak.html
(env) pi@gopi1:~/project/project/templates $ mv full-width.html base.html
(env) pi@gopi1:~/project/project/templates $ cd ..
(env) pi@gopi1:~/project/project $ ls
__init__.py   settings.py   static     urls.py   wsgi.py
__init__.pyc  settings.pyc  templates  urls.pyc  wsgi.pyc
(env) pi@gopi1:~/project/project $ vi settings.py
(env) pi@gopi1:~/project/project $ cd templates
(env) pi@gopi1:~/project/project/templates $ ls
base-bak.html  base.html  fullwidth.html  sidebar_left.html  sidebar_right.html
(env) pi@gopi1:~/project/project/templates $ vi fullwidth.html
(env) pi@gopi1:~/project/project/templates $ cd ..
(env) pi@gopi1:~/project/project $ cd ..
(env) pi@gopi1:~/project $ python manage.py runserver
Performing system checks…

System check identified no issues (0 silenced).
May 08, 2016 – 15:33:06
Django version 1.8.13, using settings ‘project.settings’
Starting development server at http://127.0.0.1:8000/
Quit the server with CONTROL-C.

Screen Dump Result

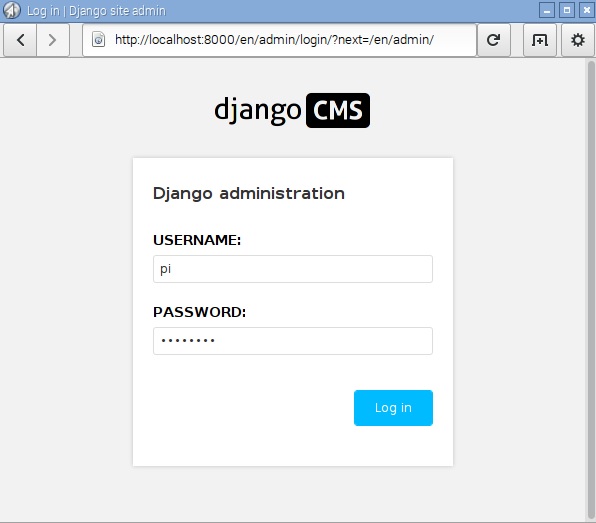
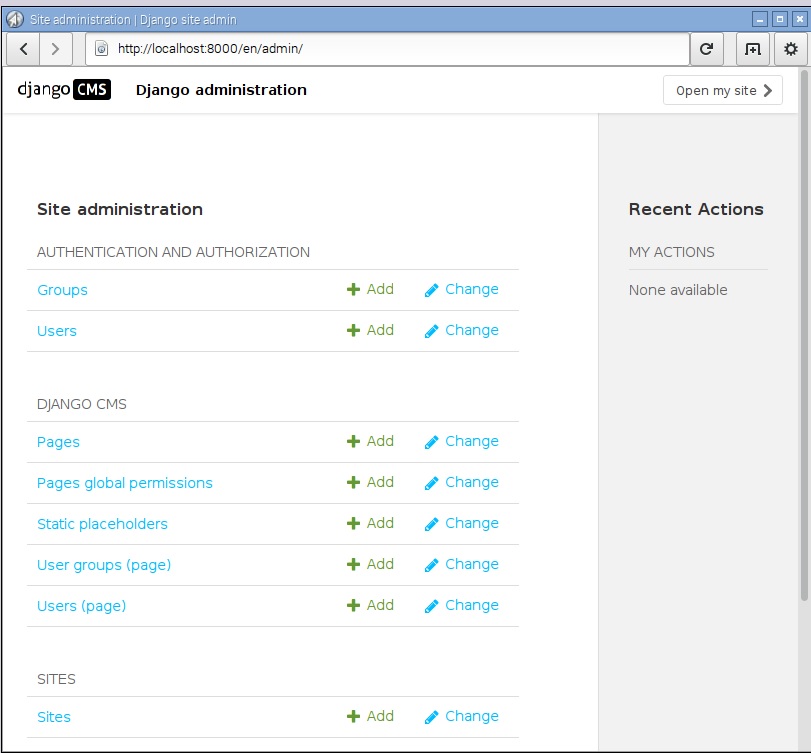
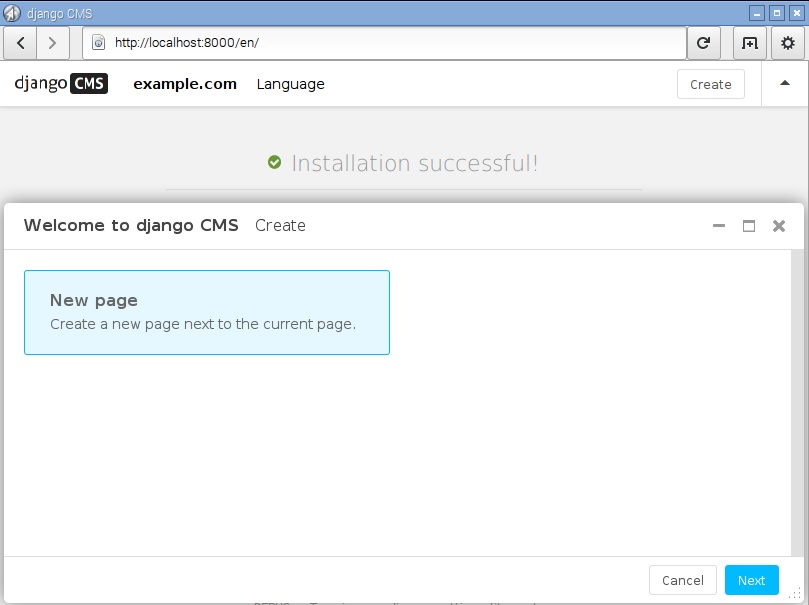
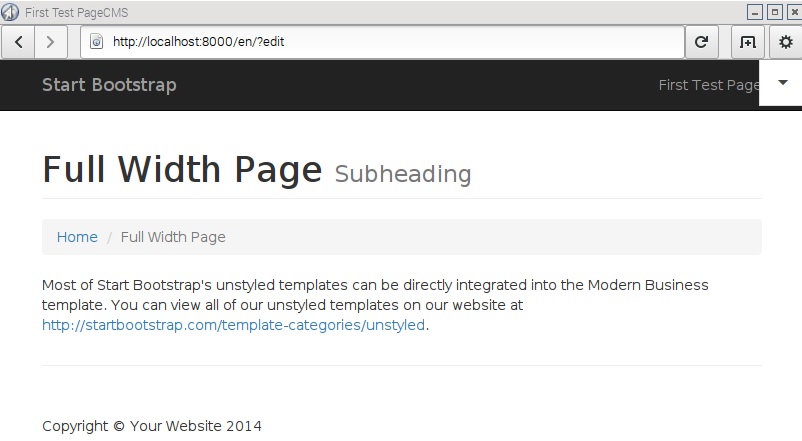
After succeeded installation, you can browse the django CMS via link http://127.0.0.1:8000 as below screen  dump results.

djangocms1 djangocms2 djangocms3 djangocms4


BONUS:

If you make any change, you can run the following command:

python manage.py makemigrations

python manage.py migrate

Useful Add-On Plug-in:

pip install aldryn-style

pip uninstall djangocms-style

pip install aldryn-bootstrap3

Integrate Django with Apache

Introduction

As production run of a Django application, we can use tradition web server tools such as apache, IIS, etc. For example, I will show you to setup django running under apache as below.

Step 1 Install wsgi

Suppose you have already installed python, django, apache, then you need to install wsgi by running command:

sudo apt-get install libapache2-mod-wsgi

Step 2

Edit /etc/apache2/sites-available/000-default.conf as below:

<VirtualHost *:80>
        ServerName www.goldman168.no-ip.org
        #ServerAllas www.localhost
        ServerAdmin goldman.au168@gmail.com

        DocumentRoot /var/www/html/django-survey-master/
        WSGIScriptAlias / /var/www/html/django-survey-master/survey/wsgi.py

        Errorlog /var/www/logs/error.log
        CustomLog /var/www/logs/custom.log combined
</VirtualHost>

Step 3.

Edit /etc/apache2/apache.conf to add the following line to the end:

WSGIPythonPath /var/www/html/django-survey-master

Step 4.

Restart apache service by running command:  /etc/init.d/apache2 restart

Step 5.

Now, you do not need to run the django command (python manage.py runserver) to start the django application, you can browse the django application with link http://localhost/ via apache.

Temperature Sensor Setup on Raspberry Pi

Introduction

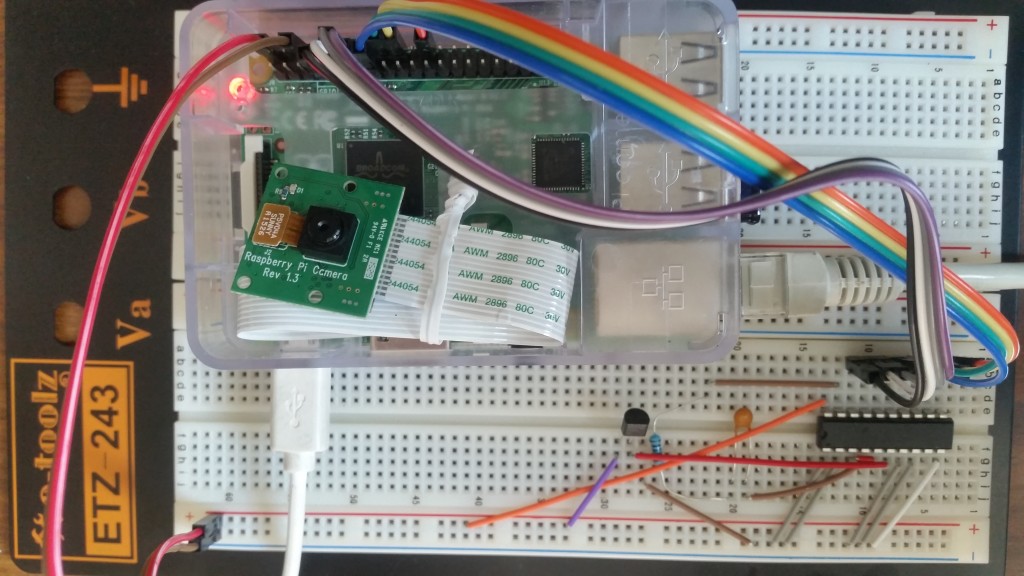
Today, I setup my raspberry pi as a temperature sensor. I mainly use a LM35 temperature sensor and an IC “ADC0804” as an analog to digital converter. I also setup a database to record down the temperature data and then display result on web browser with Chat format. The connection of the whole electronics circuit is as below diagram. temp0

Program script:

1) The coding the a python program to take temperature data is as the temp_url.py program below:

#!/usr/bin/env python
# author: Powen Ko    Program Name:  temp_url.py
import time, RPi.GPIO as GPIO
import urllib

def fetch_thing(url, params, method):
params = urllib.urlencode(params)
if method==’POST’:
f = urllib.urlopen(url, params)
else:
f = urllib.urlopen(url+’?’+params)
return (f.read(), f.code)

GPIO.setmode(GPIO.BOARD)
GPIO.setup(7, GPIO.IN)
GPIO.setup(11, GPIO.IN)
GPIO.setup(12, GPIO.IN)
GPIO.setup(13, GPIO.IN)
GPIO.setup(15, GPIO.IN)
GPIO.setup(16, GPIO.IN)
GPIO.setup(18, GPIO.IN)
GPIO.setup(22, GPIO.IN)
while True:
     a0 = GPIO.input(7)
     a1 = GPIO.input(11)
     a2 = GPIO.input(12)
     a3 = GPIO.input(13)
     a4 = GPIO.input(15)
     a5 = GPIO.input(16)
     a6 = GPIO.input(18)
     a7 = GPIO.input(22)
     total=a0+(a1*2)+(a2*4)+(a3*8)+(a4*16)+(a5*32)+(a6*64)+(a7*128)
     temp=total*5*1000/256/10;
     print a7,a6,a5,a4,a3,a2,a1,a0,”[“,total,”]”,”[C=”,temp,”]”
     content, response_code = fetch_thing(
                    ‘http://127.0.0.1/settemp.php’,
                    {‘id’: 1, ‘temp’: temp},
                    ‘GET’
                    )
     time.sleep(5)

2) Then, I save the temperature data into the database via a web php program as below:

<?php
$con=mysqli_connect(“localhost”,”root”,”infotech”,”raspberryDB”);
if (mysqli_connect_errno()) {
echo “Failed to connect to MySQL: ” . mysqli_connect_error();
}

$now= date(‘Ymdhms’);
$id = $_GET[‘id’];
$temp = $_GET[‘temp’];
mysqli_query($con,”INSERT INTO temp (datatime,temp,userid)
VALUES ($now,$temp,$id)”);

mysqli_close($con);
echo “powenko.com get it”.”, date time=”.$now.”, temp=”.$temp.”, id=”.$id;
?>

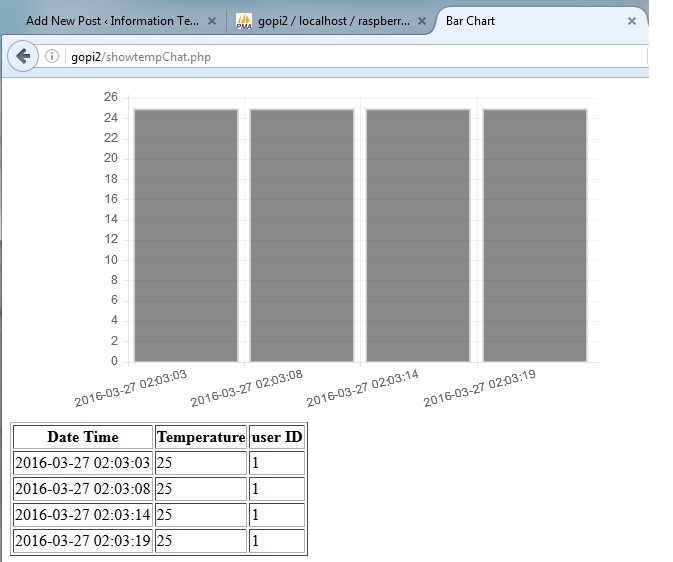
Finally, I view data by using a php web browser program as below and also screen dump result as below:

<!doctype html>
<html>
        <head>
                <title>Bar Chart</title>
                <script src=”Chart.js-master/Chart.js”></script>
        </head>
        <body>
                <div style=”width: 50%”>
                        <canvas id=”canvas” height=”450″ width=”800″></canvas>
                </div>
<?php
$con=mysqli_connect(“localhost”,”root”,”infotech”,”raspberryDB”);
if (mysqli_connect_errno()) {
  echo “Failed to connect to MySQL: ” . mysqli_connect_error();
}

$result = mysqli_query($con,”SELECT * FROM temp”);

echo “<table border=’1′>
<tr>
<th>Date Time</th>
<th>Temperature</th>
<th>user ID </>

</tr>”;

while($row = mysqli_fetch_array($result))
{
  echo “<tr>”;
  echo “<td>” . $row[‘datatime’] . “</td>”;
  echo “<td>” . $row[‘temp’] . “</td>”;
  echo “<td>” . $row[‘userid’] . “</td>”;
  echo “</tr>”;
  $Lables=$Lables.'”‘. $row[‘datatime’].'”,’;
  $temps=$temps.'”‘. $row[‘temp’].'”,’;
}

echo “</table>”;
mysqli_close($con);
?>

        <script>
var barChartData = {
                labels : [<?php echo  $Lables;  ?>],
                datasets : [
                        {
                                fillColor : “rgba(20,20,20,0.5)”,
                                strokeColor : “rgba(220,220,220,0.8)”,
                                highlightFill: “rgba(220,220,220,0.75)”,
               highlightStroke: “rgba(220,220,220,1)”,
                                data : [<?php echo  $temps;  ?>
                                ]
                       }
                ]
        }
        window.onload = function(){
                var ctx = document.getElementById(“canvas”).getContext(“2d”);
                window.myBar = new Chart(ctx).Bar(barChartData, {
                        responsive : true
                });
        }
        </script>
        </body>
</html>

temp3

Speech with Raspberry Pi

Introduction

Raspberry Pi is an excellent automation control unit, and we can use it to build a voice recognition feature in order to make it as a voice automation control unit. Yeah, is it very interesting ! In the following, I will show you the script to build voice feature, including converting speech to text, converting text to speech, auto-reply a text question.

Script to convert Speech to Text

I take the benefit of using google speech recognition ver 2 feature and arecord feature of Raspberry Pi. To remind that you should apply your google api key for usage in this script, as below:

#!/bin/bash
echo “Recording…”
arecord -D plughw:1,0 -f cd -t wav -r 16000 –duration=4 test.wav
avconv -i test.wav -y -ar 16000 -ac 1 test.flac

echo “Processing…”
wget -q -U “Mozilla/5.0” –post-file test.flac –header “Content-Type: audio/x-flac; rate=16000” -O – “https://www.google.com/speech-api/v2/recognize?client=chromium&lang=en_US&key=AIzaSyB0RJilwaAhMpftgmgRhgEzd4lZnia1MwQ” |cut -d” -f8 >stt.txt
echo “You said: “
value=`cat stt.txt`
echo “$value”

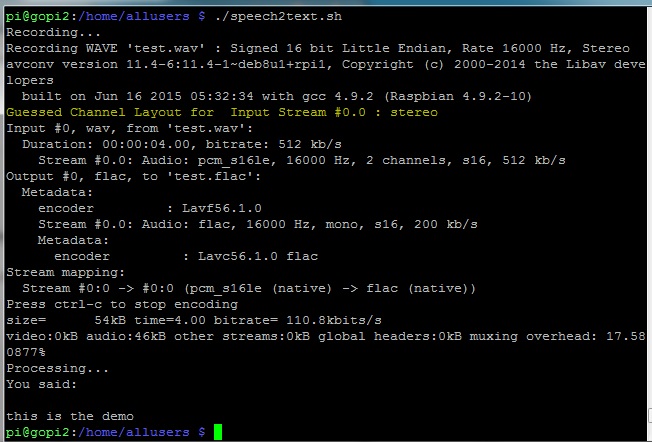
The screen dump result to run speech2text.sh program is as below:

speech2text

Script to Auto-Reply a Query

It is a python program using Wolframalpha’s API add-on tools to process a question as below script, and you should apply a app ID from http://products.wolframalpha.com/api/:

import wolframalpha
import sys

# Get a free API key here http://products.wolframalpha.com/api/
# This is a fake ID, go and get your own, instructions on my blog.
app_id=”VWQU6P-YPRRG752XH”

client = wolframalpha.Client(app_id)

query = ‘ ‘.join(sys.argv[1:])
res = client.query(query)

if len(res.pods) > 0:
    texts = “”
    pod = res.pods[1]
    if pod.text:
        texts = pod.text
    else:
        texts = “I have no answer for that”
        # to skip ascii character in case of error
    texts = texts.encode(‘ascii’, ‘ignore’)
    print(texts)
else:
    print(“Sorry, I am not sure.”)

To run the python program as script –> python3 queryprocess.py “What is your name”, then we can get a reply result as “My name is Walfram|Alpha.”, as below screen dump.

speech-reply

Convert Text to Speech

We can use Espeak utility to convert text to speech under Raspberry Pi. Its installation is very simple as below:

$ sudo apt-get install espeak

After installation, you can run the espeak program to speech, for example,

$ espeak "Hello World"

Question and Answer Program with Speech and Voice Reply

I develop a script to combine the above three program into one, so that you can use it to speech a question and wait for a voice answer. Let’s see the script of main.sh program as below:

#!/bin/bash
echo “Recording… Press Ctrl+C to Stop.”
./speech2text.sh > /dev/null 2>&1
QUESTION=$(cat stt.txt)
echo “Me: “ $QUESTION
python3 queryprocess.py $QUESTION > ans1.txt
ANSWER=$(cut -c3- ans1.txt)
ANSWER1=$(echo “$ANSWER” | sed -e ‘s/\n/ /g’)
ANSWER2=${ANSWER1::-1}
echo “Robot: “ $ANSWER2
espeak “$ANSWER2” > /dev/null 2>&1

To run this program as script –> ./main.sh, then we can get a reply result as below screen dump, and with voice reply, too.

speech-main

Reference Document: