Steps to Install Django-cms in Raspberry Pi

Introduction

django CMS is a modern web publishing platform built with Django, the web application framework “for perfectionists with deadlines”. Django CMS offers out-of-the-box support for the common features you’d expect from a CMS, but can also be easily customised and extended by developers to create a site that is tailored to their precise needs. The following will show you how step by step of Django CMS installation, and also with screen dump examples.

Installation Steps

start a virtual environment under Raspberry Pi
1.  sudo pip install virtualenv
2.  virtualenv env
3.  sourse env/bin/activate

Install Djangocms-Installer and create a project
1.  pip install djangocms-installer
2.  djangocms -p project project
Use default value for most questions
select lang = en, fr, de
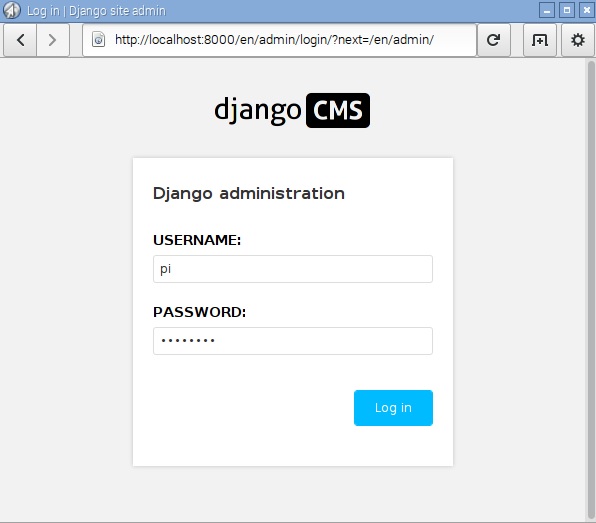
Use default username : pi   then input your password

Start CMS Application
1.  cd project
j2.  python manage.py runserver
3.  You can browse the CMS web site via link http://127.0.0.1:8000/

Select a CMS template from Start Bootstrap
1.  http://startbootstrap.com/template-overviews/modern-business/   –> download
2.  copy css, font-awesome, fonts, js directories from download to project/project/static
3.  copy full-width.html to project/project/templates directory
4.  Edit line in settings.py

CMS_TEMPLATES = (
## Customize this
(‘fullwidth.html’, ‘Fullwidth’),
(‘sidebar_left.html’, ‘Sidebar Left’),     –> Delete
(‘sidebar_right.html’, ‘Sidebar Right’)    –> Delete
)

5.  Delete    ./templates/sidebar_left.html      sidebar_right.html

6.  Edit the full-width.html file as below:

{% load cms_tags menu_tags sekizai_tags staticfiles %}
<!DOCTYPE html>
<html lang=”{{ LANGUAGE_CODE }}”>

<head>

<meta charset=”utf-8″>
<meta http-equiv=”X-UA-Compatible” content=”IE=edge”>
<meta name=”viewport” content=”width=device-width, initial-scale=1″>
<meta name=”description” content=”{% page_attribute ‘meta_description’ %}”>
<meta name=”author” content=””>

<title>{% page_attribute ‘page_title’ %}CMS</title>

<!– Bootstrap Core CSS –>
<link href=”{% static “css/bootstrap.min.css” %}” rel=”stylesheet”>

<!– Custom CSS –>
<link href=”{% static “css/modern-business.css” %}” rel=”stylesheet”>

<!– Custom Fonts –>
<link href=”{% static “font-awesome/css/font-awesome.min.css” %}” rel=”stylesheet” type=”text/css”>

….
<![endif]–>
{% render_block “css” %}
</head>

<body>
{% cms_toolbar %}
<!– Navigation –>
….

{% show_menu 0 100 100 100 %}     and delete lines as below:
<div class=”collapse navbar-collapse” id=”bs-example-navbar-collapse-1″>
<ul class=”nav navbar-nav navbar-right”>
{% show_menu 0 100 100 100 %}
</ul>
</div>
<!– /.navbar-collapse –>
….

<!– jQuery –>
<script src=”{% static “js/jquery.js” %}”></script>

<!– Bootstrap Core JavaScript –>
<script src=”{% static “js/bootstrap.min.js” %}”></script>
<% render_block “js” %}
</body>

Change the line         <a class=”navbar-brand” href=”index.html”>Start Bootstrap</a>
To                      <a class=”navbar-brand” href=”/”>New CMS Name</a>

7.  Rename   base.html    to base-bak.html
Rename   full-width.html   base.html

8.  Restart the server and test.

Screen Dump of Installation

pi@gopi1:~ $ pip install virtualenv
pi@gopi1:~ $ virtualenv env
New python executable in /home/pi/env/bin/python
Installing setuptools, pip, wheel…done.
pi@gopi1:~ $ source env/bin/activate
(env) pi@gopi1:~ $ pip install djangocms-installer
Collecting djangocms-installer
Downloading djangocms_installer-0.8.8-py2.py3-none-any.whl (56kB)
100% |████████████████████████████████| 61kB 714kB/s
Requirement already satisfied (use –upgrade to upgrade): argparse in /usr/lib/python2.7 (from djangocms-installer)
Collecting dj-database-url>=0.4 (from djangocms-installer)
Collecting six (from djangocms-installer)
Using cached six-1.10.0-py2.py3-none-any.whl
Requirement already satisfied (use –upgrade to upgrade): pip in ./env/lib/python2.7/site-packages (from djangocms-installer)
Collecting tzlocal (from djangocms-installer)
Collecting pytz (from tzlocal->djangocms-installer)
Using cached pytz-2016.4-py2.py3-none-any.whl
Installing collected packages: dj-database-url, six, pytz, tzlocal, djangocms-installer
Successfully installed dj-database-url-0.4.1 djangocms-installer-0.8.8 pytz-2016.4 six-1.10.0 tzlocal-1.2.2
(env) pi@gopi1:~ $ djangocms -p project project
Database configuration (in URL format) [default sqlite://localhost/project.db]:
django CMS version (choices: 2.4, 3.0, 3.1, 3.2, stable, develop) [default stable]:
Django version (choices: 1.4, 1.5, 1.6, 1.7, 1.8, 1.9, stable) [default stable]:
Activate Django I18N / L10N setting; this is automatically activated if more than language is provided (choices: yes, no) [default yes]:
Install and configure reversion support (choices: yes, no) [default yes]:
Languages to enable. Option can be provided multiple times, or as a comma separated list. Only language codes supported by Django can be used here: en, fr
Optional default time zone [default Asia/Hong_Kong]:
Activate Django timezone support (choices: yes, no) [default yes]:
Activate CMS permission management (choices: yes, no) [default yes]:
Use Twitter Bootstrap Theme (choices: yes, no) [default no]:
Use custom template set [default no]:
Load a starting page with examples after installation (english language only). Choose “no” if you use a custom template set. (choices: yes, no) [default no]:
Creating the project
Please wait while I install dependencies
Dependencies installed
Creating the project

Operations to perform:
Synchronize unmigrated apps: project, staticfiles, messages, djangocms_admin_style, sitemaps, sekizai, treebeard
Apply all migrations: djangocms_file, reversion, djangocms_inherit, sessions, admin, djangocms_column, djangocms_text_ckeditor, sites, auth, djangocms_video, menus, contenttypes, djangocms_picture, djangocms_googlemap, djangocms_style, djangocms_link, cms, djangocms_teaser
Synchronizing apps without migrations:
Creating tables…
Running deferred SQL…
Installing custom SQL…
Running migrations:
Rendering model states… DONE
Applying contenttypes.0001_initial… OK
Applying auth.0001_initial… OK
Applying admin.0001_initial… OK
Applying contenttypes.0002_remove_content_type_name… OK
Applying auth.0002_alter_permission_name_max_length… OK
Applying auth.0003_alter_user_email_max_length… OK
Applying auth.0004_alter_user_username_opts… OK
Applying auth.0005_alter_user_last_login_null… OK
Applying auth.0006_require_contenttypes_0002… OK
Applying sites.0001_initial… OK
Applying cms.0001_initial… OK
Applying cms.0002_auto_20140816_1918… OK
Applying cms.0003_auto_20140926_2347… OK
Applying cms.0004_auto_20140924_1038… OK
Applying cms.0005_auto_20140924_1039… OK
Applying cms.0006_auto_20140924_1110… OK
Applying cms.0007_auto_20141028_1559… OK
Applying cms.0008_auto_20150208_2149… OK
Applying cms.0008_auto_20150121_0059… OK
Applying cms.0009_merge… OK
Applying cms.0010_migrate_use_structure… OK
Applying cms.0011_auto_20150419_1006… OK
Applying cms.0012_auto_20150607_2207… OK
Applying cms.0013_urlconfrevision… OK
Applying cms.0014_auto_20160404_1908… OK
Applying djangocms_column.0001_initial… OK
Applying djangocms_file.0001_initial… OK
Applying djangocms_file.0002_auto_20151202_1551… OK
Applying djangocms_file.0003_remove_related_name_for_cmsplugin_ptr… OK
Applying djangocms_file.0004_set_related_name_for_cmsplugin_ptr… OK
Applying djangocms_googlemap.0001_initial… OK
Applying djangocms_inherit.0001_initial… OK
Applying djangocms_inherit.0002_auto_20150622_1244… OK
Applying djangocms_link.0001_initial… OK
Applying djangocms_link.0002_auto_20140929_1705… OK
Applying djangocms_link.0003_auto_20150212_1310… OK
Applying djangocms_link.0004_auto_20150708_1133… OK
Applying djangocms_link.0005_auto_20151003_1710… OK
Applying djangocms_link.0006_remove_related_name_for_cmsplugin_ptr… OK
Applying djangocms_link.0007_set_related_name_for_cmsplugin_ptr… OK
Applying djangocms_picture.0001_initial… OK
Applying djangocms_picture.0002_auto_20151018_1927… OK
Applying djangocms_style.0001_initial… OK
Applying djangocms_style.0002_set_related_name_for_cmsplugin_ptr… OK
Applying djangocms_teaser.0001_initial… OK
Applying djangocms_text_ckeditor.0001_initial… OK
Applying djangocms_text_ckeditor.0002_remove_related_name_for_cmsplugin_ptr… OK
Applying djangocms_text_ckeditor.0003_set_related_name_for_cmsplugin_ptr… OK
Applying djangocms_video.0001_initial… OK
Applying djangocms_video.0002_set_related_name_for_cmsplugin_ptr… OK
Applying menus.0001_initial… OK
Applying reversion.0001_initial… OK
Applying reversion.0002_auto_20141216_1509… OK
Applying sessions.0001_initial… OK
Creating admin user
Username (leave blank to use ‘pi’):
Email address: goldman.au168@gmail.com
Password:
Password (again):
Superuser created successfully.
All done!
Get into “/home/pi/cmsproj” directory and type “python manage.py runserver” to start your project
(env) pi@gopi1:~ $ cd project
(env) pi@gopi1:~/project $ ls
manage.py  media  project  project.db  requirements.txt  static
(env) pi@gopi1:~/project $ python manage.py runserver
Performing system checks…

System check identified no issues (0 silenced).
May 08, 2016 – 15:05:32
Django version 1.8.13, using settings ‘project.settings’
Starting development server at http://127.0.0.1:8000/
Quit the server with CONTROL-C.
New revision!!!! RELOAD!
28495694-7c4f-409e-9605-c499bf16e97a (<type ‘str’>)
-> None (<type ‘NoneType’>)
reverse(‘my_test_app_view’): Reverse for ‘my_test_app_view’ with arguments ‘()’ and keyword arguments ‘{}’ not found. 0 pattern(s) tried: []
[08/May/2016 15:05:33] “GET /admin/ HTTP/1.1” 302 0
[08/May/2016 15:05:34] “GET /en/admin/ HTTP/1.1” 302 0
[08/May/2016 15:05:35] “GET /en/admin/login/?next=/en/admin/ HTTP/1.1” 200 3107
[08/May/2016 15:05:35] “GET /admin/ HTTP/1.1” 302 0
[08/May/2016 15:05:35] “GET /en/admin/ HTTP/1.1” 302 0
[08/May/2016 15:05:35] “GET /en/admin/login/?next=/en/admin/ HTTP/1.1” 200 3107
[08/May/2016 15:05:36] “GET /static/admin/css/base.css HTTP/1.1” 200 14049
[08/May/2016 15:05:36] “GET /static/admin/css/base.css HTTP/1.1” 200 14049
[08/May/2016 15:05:36] “GET /static/admin/css/login.css HTTP/1.1” 200 940
[08/May/2016 15:05:36] “GET /static/djangocms_admin_style/js/jquery.ui.touch-punch.min.js HTTP/1.1” 200 0
[08/May/2016 15:05:36] “GET /static/djangocms_admin_style/css/djangocms-admin.css HTTP/1.1” 200 151181
[08/May/2016 15:05:36] “GET /static/djangocms_admin_style/js/base-admin.js HTTP/1.1” 200 2910
[08/May/2016 15:05:36] “GET /static/djangocms_admin_style/js/drag-touch-support.js HTTP/1.1” 200 1200
[08/May/2016 15:05:36] “GET /static/admin/css/login.css HTTP/1.1” 200 940
[08/May/2016 15:05:37] “GET /static/djangocms_admin_style/fonts/django-admin-iconfont.woff?v=3.2.0 HTTP/1.1” 200 10612
[08/May/2016 15:07:16] “POST /en/admin/login/?next=/en/admin/ HTTP/1.1” 302 0
[08/May/2016 15:07:17] “GET /en/admin/ HTTP/1.1” 200 7525
[08/May/2016 15:07:17] “GET /static/admin/css/base.css HTTP/1.1” 304 0
[08/May/2016 15:07:17] “GET /static/admin/css/dashboard.css HTTP/1.1” 200 434
[08/May/2016 15:07:17] “GET /static/admin/css/dashboard.css HTTP/1.1” 200 434
[08/May/2016 15:07:17] “GET /static/djangocms_admin_style/css/djangocms-admin.css HTTP/1.1” 304 0
[08/May/2016 15:07:17] “GET /static/djangocms_admin_style/js/base-admin.js HTTP/1.1” 304 0
[08/May/2016 15:07:17] “GET /static/djangocms_admin_style/js/drag-touch-support.js HTTP/1.1” 304 0
[08/May/2016 15:07:17] “GET /static/djangocms_admin_style/js/jquery.ui.touch-punch.min.js HTTP/1.1” 304 0
[08/May/2016 15:07:17] “GET /static/djangocms_admin_style/img/icon_arrow_right.png HTTP/1.1” 200 15812
^C(env) pi@gopi1:~/project $ ls
manage.py  media  project  project.db  requirements.txt  static
(env) pi@gopi1:~/project $ cd project
(env) pi@gopi1:~/project/project $ ls
__init__.py   settings.py   static     urls.py   wsgi.py
__init__.pyc  settings.pyc  templates  urls.pyc  wsgi.pyc
(env) pi@gopi1:~/projectj/project $ cd /home/allusers/startboot*
(env) pi@gopi1:/home/allusers/startbootstrap-modern-business-1.0.5 $ ls
404.html          contact.html     index.html            portfolio-4-col.html
about.html        css              js                    portfolio-item.html
bin               faq.html         LICENSE               pricing.html
blog-home-1.html  font-awesome     portfolio-1-col.html  README.md
blog-home-2.html  fonts            portfolio-2-col.html  services.html
blog-post.html    full-width.html  portfolio-3-col.html  sidebar.html
(env) pi@gopi1:/home/allusers/startbootstrap-modern-business-1.0.5 $ cp -r css /home/pi/project/project/static
(env) pi@gopi1:/home/allusers/startbootstrap-modern-business-1.0.5 $ cp -r font-awesome /home/pi/project/project/static
(env) pi@gopi1:/home/allusers/startbootstrap-modern-business-1.0.5 $ cp -r fonts /home/pi/project/project/static
(env) pi@gopi1:/home/allusers/startbootstrap-modern-business-1.0.5 $ cp -r js /home/pi/project/project/static
(env) pi@gopi1:/home/allusers/startbootstrap-modern-business-1.0.5 $ cp full-width.html /home/pi/project/project/templates
(env) pi@gopi1:/home/allusers/startbootstrap-modern-business-1.0.5 $ cd /home/pi/project/project/templates
(env) pi@gopi1:~/project/project/templates $ ls
base.html        fullwidth.html     sidebar_right.html
full-width.html  sidebar_left.html
(env) pi@gopi1:~/project/project/templates $ ls -l
total 24
-rw-r–r– 1 pi pi 1122 May  8 15:01 base.html
-rwxr-xr-x 1 pi pi 6589 May  8 15:13 full-width.html
-rw-r–r– 1 pi pi  191 May  8 15:01 fullwidth.html
-rw-r–r– 1 pi pi  308 May  8 15:01 sidebar_left.html
-rw-r–r– 1 pi pi  308 May  8 15:01 sidebar_right.html
(env) pi@gopi1:~/project/project/templates $ vi full-width.html
(env) pi@gopi1:~/project/project/templates $ mv base.html base-bak.html
(env) pi@gopi1:~/project/project/templates $ mv full-width.html base.html
(env) pi@gopi1:~/project/project/templates $ cd ..
(env) pi@gopi1:~/project/project $ ls
__init__.py   settings.py   static     urls.py   wsgi.py
__init__.pyc  settings.pyc  templates  urls.pyc  wsgi.pyc
(env) pi@gopi1:~/project/project $ vi settings.py
(env) pi@gopi1:~/project/project $ cd templates
(env) pi@gopi1:~/project/project/templates $ ls
base-bak.html  base.html  fullwidth.html  sidebar_left.html  sidebar_right.html
(env) pi@gopi1:~/project/project/templates $ vi fullwidth.html
(env) pi@gopi1:~/project/project/templates $ cd ..
(env) pi@gopi1:~/project/project $ cd ..
(env) pi@gopi1:~/project $ python manage.py runserver
Performing system checks…

System check identified no issues (0 silenced).
May 08, 2016 – 15:33:06
Django version 1.8.13, using settings ‘project.settings’
Starting development server at http://127.0.0.1:8000/
Quit the server with CONTROL-C.

Screen Dump Result

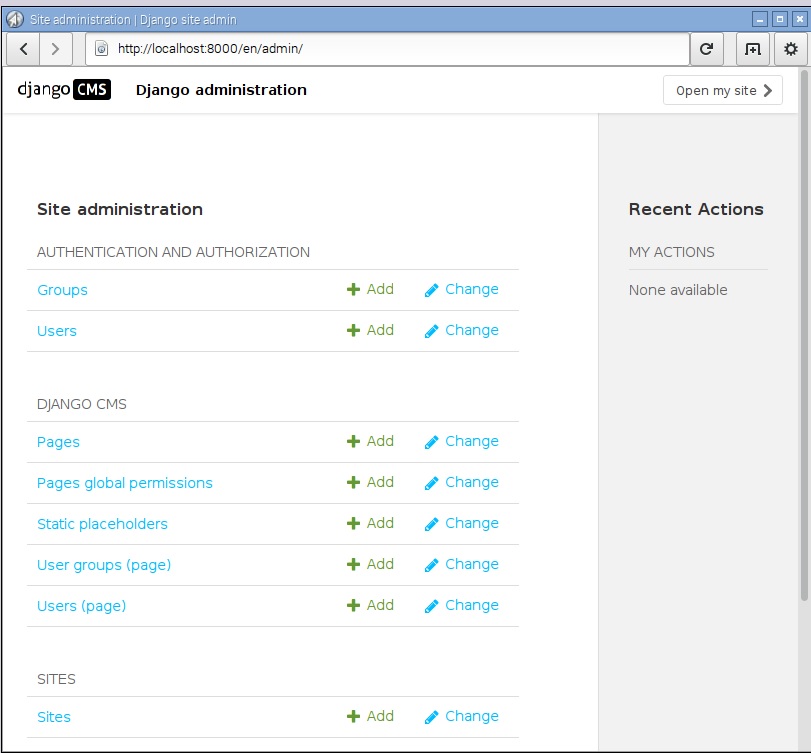
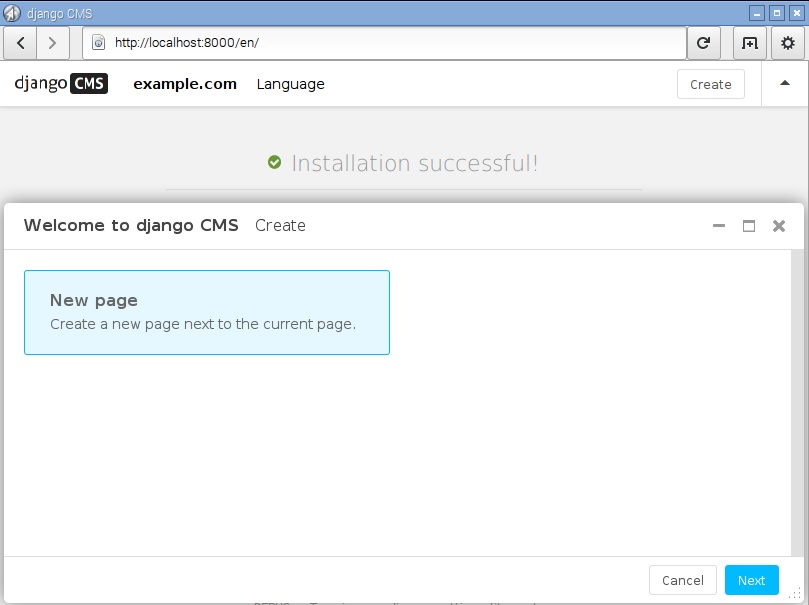
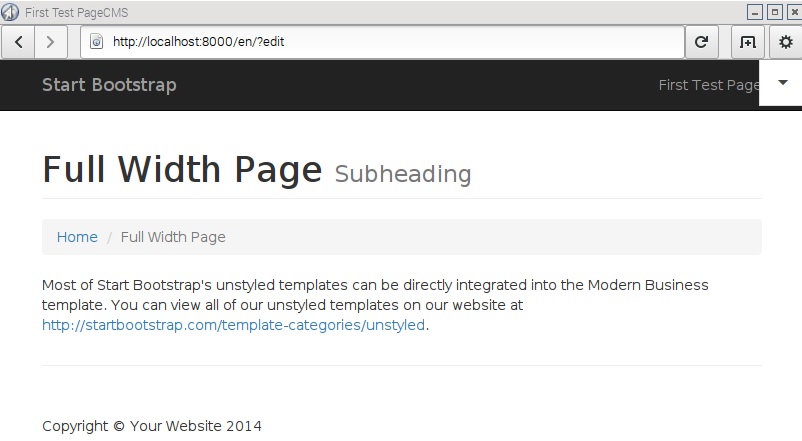
After succeeded installation, you can browse the django CMS via link http://127.0.0.1:8000 as below screen  dump results.

djangocms1 djangocms2 djangocms3 djangocms4


BONUS:

If you make any change, you can run the following command:

python manage.py makemigrations

python manage.py migrate

Useful Add-On Plug-in:

pip install aldryn-style

pip uninstall djangocms-style

pip install aldryn-bootstrap3

Integrate Django with Apache

Introduction

As production run of a Django application, we can use tradition web server tools such as apache, IIS, etc. For example, I will show you to setup django running under apache as below.

Step 1 Install wsgi

Suppose you have already installed python, django, apache, then you need to install wsgi by running command:

sudo apt-get install libapache2-mod-wsgi

Step 2

Edit /etc/apache2/sites-available/000-default.conf as below:

<VirtualHost *:80>
        ServerName www.goldman168.no-ip.org
        #ServerAllas www.localhost
        ServerAdmin goldman.au168@gmail.com

        DocumentRoot /var/www/html/django-survey-master/
        WSGIScriptAlias / /var/www/html/django-survey-master/survey/wsgi.py

        Errorlog /var/www/logs/error.log
        CustomLog /var/www/logs/custom.log combined
</VirtualHost>

Step 3.

Edit /etc/apache2/apache.conf to add the following line to the end:

WSGIPythonPath /var/www/html/django-survey-master

Step 4.

Restart apache service by running command:  /etc/init.d/apache2 restart

Step 5.

Now, you do not need to run the django command (python manage.py runserver) to start the django application, you can browse the django application with link http://localhost/ via apache.

Setup a Survey Web Site with Python & Django

Introduction

This document shows how to setup a survey web site using python 2.7 and django 1.4. We do not need to use web server software such as IIS or Apache while python can start web server service itself. This survey web site can run under window and linux env provide that it has python. I will show its setup steps as below.

Step 1.

Download the program source code “django-survey-master.zip” from web site https://github.com/jessykate/djngo-survey and unzip it to a computer with python 2.7.

Step 2.

Under the django-survey-master directory, run the command $ pip install -r requirements.txt to install django.

Step 3.

Setup the survey database as command $ python manage.py syncdb , which you need to input a username and password.

Step 4.

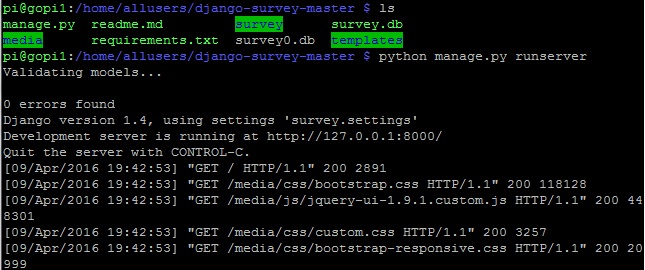
Start the survey server as command $ python manage.py runserver ,as below screen dump:

survey1

Step 5.

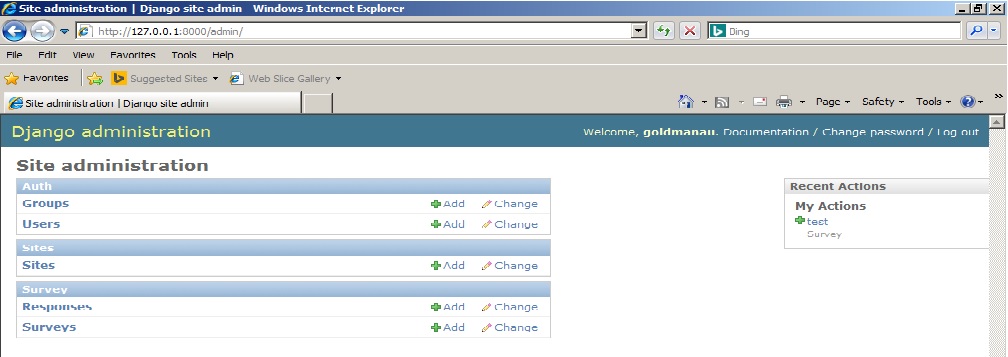
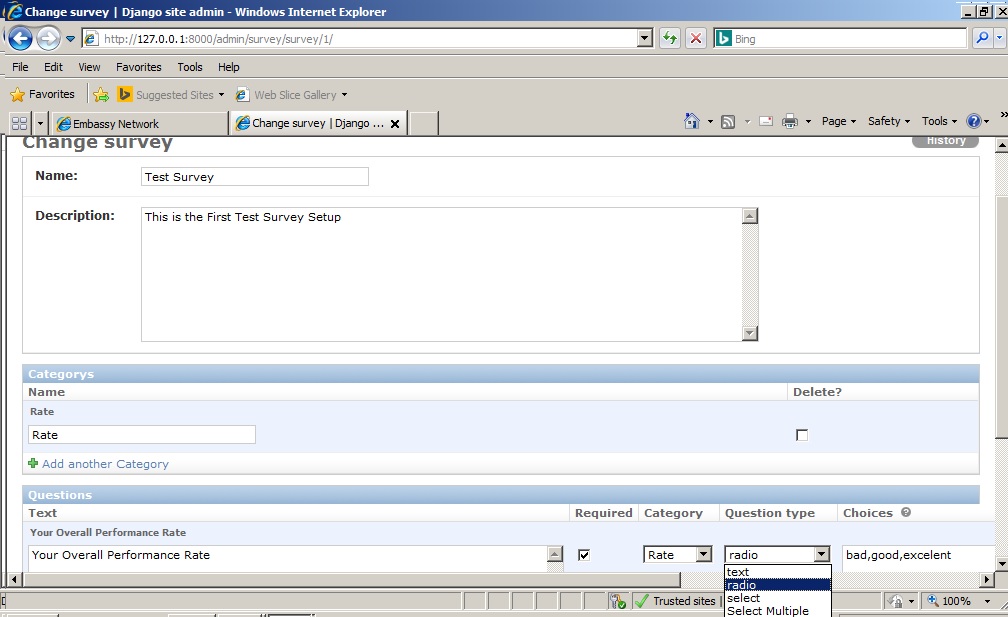
Setup a survey as below screen dump with link http://127.0.0.1:8000/admin :

survey3

survey4

Step 6.

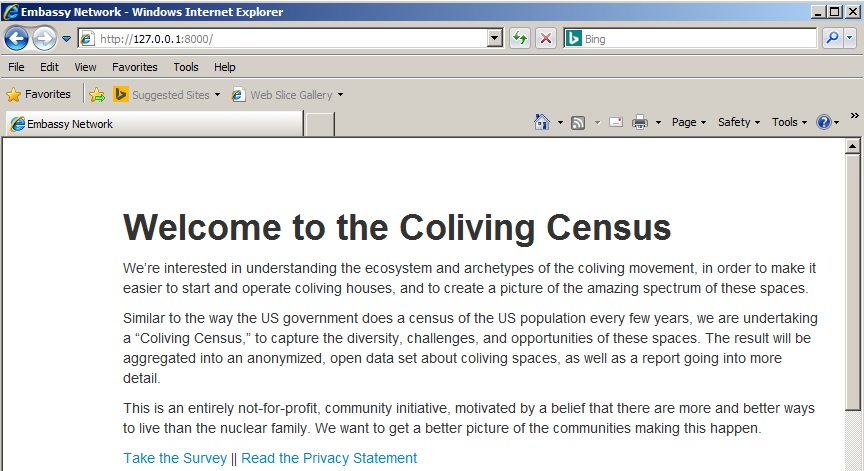
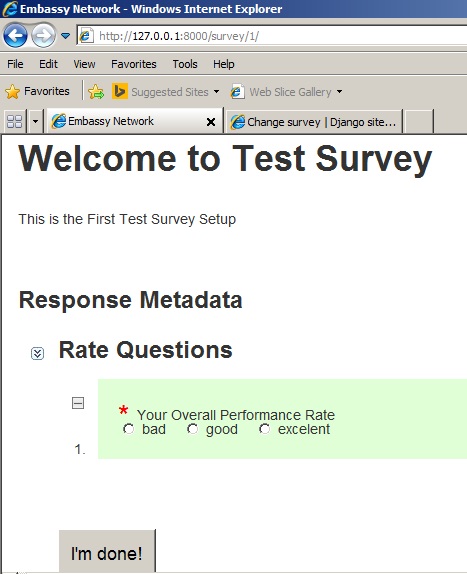
Browse the survey web site to fill-in a survey as below link http://127.0.0.1:8000 :

survey2

survey5

Bonus of a problem solving

Problem 1: The Survey web site is with link localhost:8000 and 127.0.0.1:8000 in its computer and that works fine. However, it cannot be accessed from other computer in the same network.

Solution 1: Start the Web Site Server with its own ip address, such as $ python manage.py runserver 192.168.5.105:8000; then other computers in the same network can access it with link http://192.168.5.105:8000.

Problem 2: If you have problem of running http://127.0.0.1:8000/admin, it comes out a error message “Admin Site: TemplateDoesNotExist at /admin/ …”

Solution 2: Force to re-download django with command:

pip install -r requirements.txt --ignore-installed --force-reinstall --upgrade --no-cache-dir

Temperature Sensor Setup on Raspberry Pi

Introduction

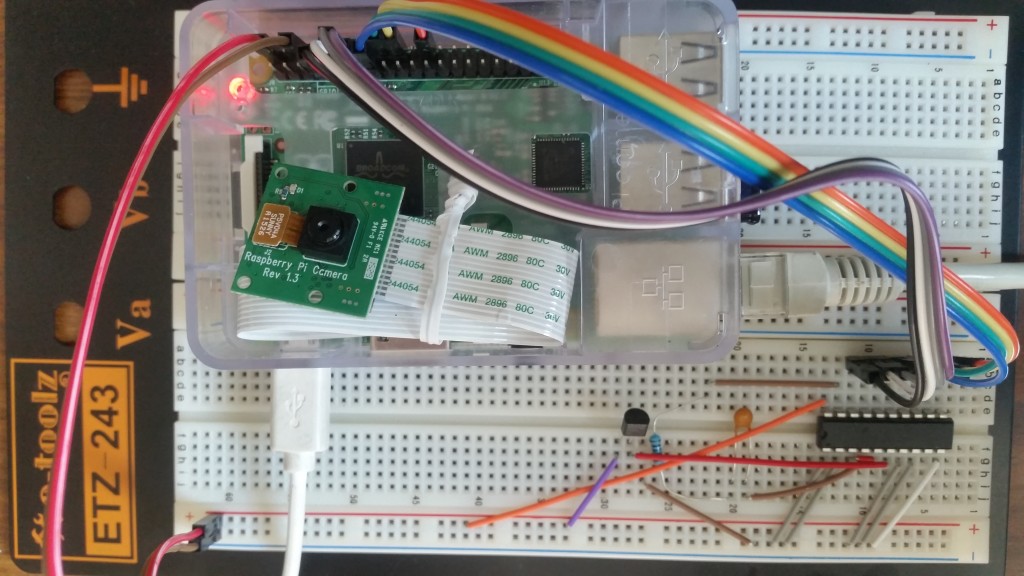
Today, I setup my raspberry pi as a temperature sensor. I mainly use a LM35 temperature sensor and an IC “ADC0804” as an analog to digital converter. I also setup a database to record down the temperature data and then display result on web browser with Chat format. The connection of the whole electronics circuit is as below diagram. temp0

Program script:

1) The coding the a python program to take temperature data is as the temp_url.py program below:

#!/usr/bin/env python
# author: Powen Ko    Program Name:  temp_url.py
import time, RPi.GPIO as GPIO
import urllib

def fetch_thing(url, params, method):
params = urllib.urlencode(params)
if method==’POST’:
f = urllib.urlopen(url, params)
else:
f = urllib.urlopen(url+’?’+params)
return (f.read(), f.code)

GPIO.setmode(GPIO.BOARD)
GPIO.setup(7, GPIO.IN)
GPIO.setup(11, GPIO.IN)
GPIO.setup(12, GPIO.IN)
GPIO.setup(13, GPIO.IN)
GPIO.setup(15, GPIO.IN)
GPIO.setup(16, GPIO.IN)
GPIO.setup(18, GPIO.IN)
GPIO.setup(22, GPIO.IN)
while True:
     a0 = GPIO.input(7)
     a1 = GPIO.input(11)
     a2 = GPIO.input(12)
     a3 = GPIO.input(13)
     a4 = GPIO.input(15)
     a5 = GPIO.input(16)
     a6 = GPIO.input(18)
     a7 = GPIO.input(22)
     total=a0+(a1*2)+(a2*4)+(a3*8)+(a4*16)+(a5*32)+(a6*64)+(a7*128)
     temp=total*5*1000/256/10;
     print a7,a6,a5,a4,a3,a2,a1,a0,”[“,total,”]”,”[C=”,temp,”]”
     content, response_code = fetch_thing(
                    ‘http://127.0.0.1/settemp.php’,
                    {‘id’: 1, ‘temp’: temp},
                    ‘GET’
                    )
     time.sleep(5)

2) Then, I save the temperature data into the database via a web php program as below:

<?php
$con=mysqli_connect(“localhost”,”root”,”infotech”,”raspberryDB”);
if (mysqli_connect_errno()) {
echo “Failed to connect to MySQL: ” . mysqli_connect_error();
}

$now= date(‘Ymdhms’);
$id = $_GET[‘id’];
$temp = $_GET[‘temp’];
mysqli_query($con,”INSERT INTO temp (datatime,temp,userid)
VALUES ($now,$temp,$id)”);

mysqli_close($con);
echo “powenko.com get it”.”, date time=”.$now.”, temp=”.$temp.”, id=”.$id;
?>

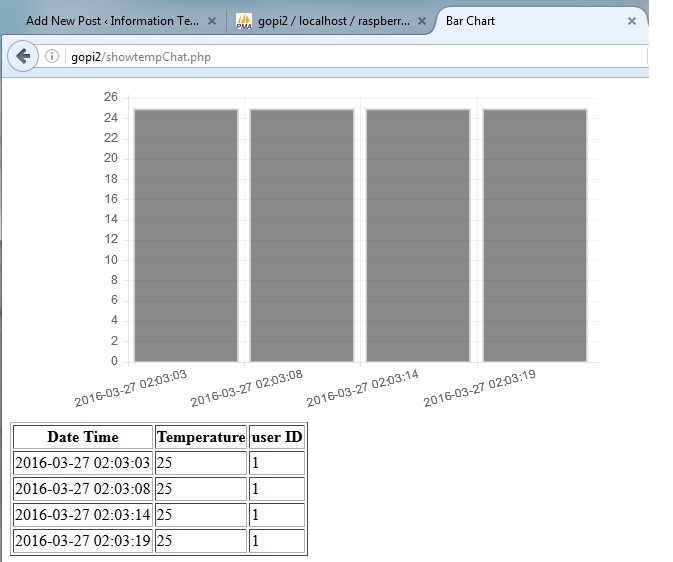
Finally, I view data by using a php web browser program as below and also screen dump result as below:

<!doctype html>
<html>
        <head>
                <title>Bar Chart</title>
                <script src=”Chart.js-master/Chart.js”></script>
        </head>
        <body>
                <div style=”width: 50%”>
                        <canvas id=”canvas” height=”450″ width=”800″></canvas>
                </div>
<?php
$con=mysqli_connect(“localhost”,”root”,”infotech”,”raspberryDB”);
if (mysqli_connect_errno()) {
  echo “Failed to connect to MySQL: ” . mysqli_connect_error();
}

$result = mysqli_query($con,”SELECT * FROM temp”);

echo “<table border=’1′>
<tr>
<th>Date Time</th>
<th>Temperature</th>
<th>user ID </>

</tr>”;

while($row = mysqli_fetch_array($result))
{
  echo “<tr>”;
  echo “<td>” . $row[‘datatime’] . “</td>”;
  echo “<td>” . $row[‘temp’] . “</td>”;
  echo “<td>” . $row[‘userid’] . “</td>”;
  echo “</tr>”;
  $Lables=$Lables.'”‘. $row[‘datatime’].'”,’;
  $temps=$temps.'”‘. $row[‘temp’].'”,’;
}

echo “</table>”;
mysqli_close($con);
?>

        <script>
var barChartData = {
                labels : [<?php echo  $Lables;  ?>],
                datasets : [
                        {
                                fillColor : “rgba(20,20,20,0.5)”,
                                strokeColor : “rgba(220,220,220,0.8)”,
                                highlightFill: “rgba(220,220,220,0.75)”,
               highlightStroke: “rgba(220,220,220,1)”,
                                data : [<?php echo  $temps;  ?>
                                ]
                       }
                ]
        }
        window.onload = function(){
                var ctx = document.getElementById(“canvas”).getContext(“2d”);
                window.myBar = new Chart(ctx).Bar(barChartData, {
                        responsive : true
                });
        }
        </script>
        </body>
</html>

temp3

Speech with Raspberry Pi

Introduction

Raspberry Pi is an excellent automation control unit, and we can use it to build a voice recognition feature in order to make it as a voice automation control unit. Yeah, is it very interesting ! In the following, I will show you the script to build voice feature, including converting speech to text, converting text to speech, auto-reply a text question.

Script to convert Speech to Text

I take the benefit of using google speech recognition ver 2 feature and arecord feature of Raspberry Pi. To remind that you should apply your google api key for usage in this script, as below:

#!/bin/bash
echo “Recording…”
arecord -D plughw:1,0 -f cd -t wav -r 16000 –duration=4 test.wav
avconv -i test.wav -y -ar 16000 -ac 1 test.flac

echo “Processing…”
wget -q -U “Mozilla/5.0” –post-file test.flac –header “Content-Type: audio/x-flac; rate=16000” -O – “https://www.google.com/speech-api/v2/recognize?client=chromium&lang=en_US&key=AIzaSyB0RJilwaAhMpftgmgRhgEzd4lZnia1MwQ” |cut -d” -f8 >stt.txt
echo “You said: “
value=`cat stt.txt`
echo “$value”

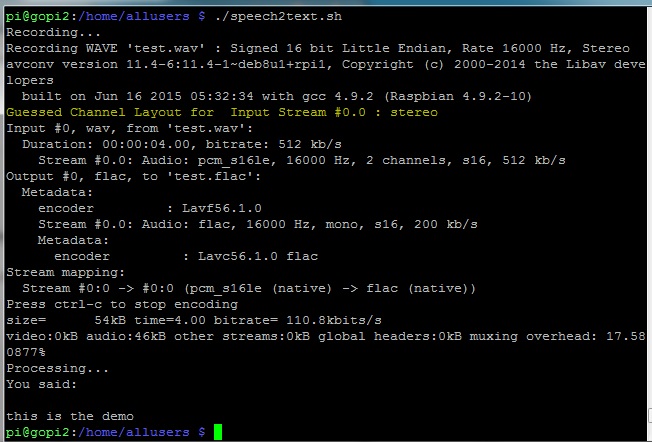
The screen dump result to run speech2text.sh program is as below:

speech2text

Script to Auto-Reply a Query

It is a python program using Wolframalpha’s API add-on tools to process a question as below script, and you should apply a app ID from http://products.wolframalpha.com/api/:

import wolframalpha
import sys

# Get a free API key here http://products.wolframalpha.com/api/
# This is a fake ID, go and get your own, instructions on my blog.
app_id=”VWQU6P-YPRRG752XH”

client = wolframalpha.Client(app_id)

query = ‘ ‘.join(sys.argv[1:])
res = client.query(query)

if len(res.pods) > 0:
    texts = “”
    pod = res.pods[1]
    if pod.text:
        texts = pod.text
    else:
        texts = “I have no answer for that”
        # to skip ascii character in case of error
    texts = texts.encode(‘ascii’, ‘ignore’)
    print(texts)
else:
    print(“Sorry, I am not sure.”)

To run the python program as script –> python3 queryprocess.py “What is your name”, then we can get a reply result as “My name is Walfram|Alpha.”, as below screen dump.

speech-reply

Convert Text to Speech

We can use Espeak utility to convert text to speech under Raspberry Pi. Its installation is very simple as below:

$ sudo apt-get install espeak

After installation, you can run the espeak program to speech, for example,

$ espeak "Hello World"

Question and Answer Program with Speech and Voice Reply

I develop a script to combine the above three program into one, so that you can use it to speech a question and wait for a voice answer. Let’s see the script of main.sh program as below:

#!/bin/bash
echo “Recording… Press Ctrl+C to Stop.”
./speech2text.sh > /dev/null 2>&1
QUESTION=$(cat stt.txt)
echo “Me: “ $QUESTION
python3 queryprocess.py $QUESTION > ans1.txt
ANSWER=$(cut -c3- ans1.txt)
ANSWER1=$(echo “$ANSWER” | sed -e ‘s/\n/ /g’)
ANSWER2=${ANSWER1::-1}
echo “Robot: “ $ANSWER2
espeak “$ANSWER2” > /dev/null 2>&1

To run this program as script –> ./main.sh, then we can get a reply result as below screen dump, and with voice reply, too.

speech-main

Reference Document:

How to Capture Weather Forecast from web using Raspberry Pi’s Python Program

Introduction

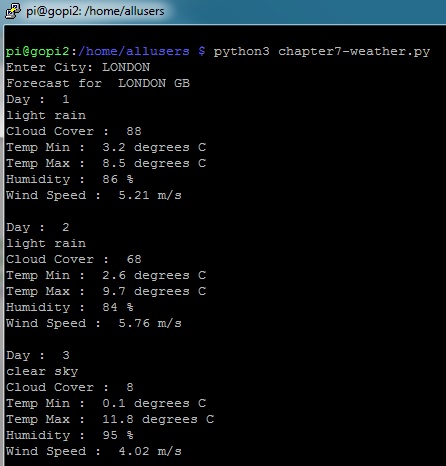
We can use python to develop a program to capture any city’s weather forecast from openweathermap.org web site under our Raspberry Pi computer. I list our program and screen capture result in the following for your reference.

Program Source Code under Python ver 3 as below:

import urllib.request,json

city = input(“Enter City: “)

def getForecast(city) :
    #url = “http://api.openweathermap.org/data/2.5/forecast/daily?cnt=7&units=meteric&mode=json&q=”
    #url = “http://api.openweathermap.org/data/2.5/forecast/city?id=524901&APPID=42443ecbdcad3d01842205e3745895cd”
    #url = “http://api.openweathermap.org/data/2.5/forecast/daily?cnt=7&units=meteric&mode=json&q=LONDON&lang=zh_cn&APPID=42443ecbdcad3d01842205e3745895cd”
    url = “http://api.openweathermap.org/data/2.5/forecast/daily?cnt=7&units=meteric&mode=json&q=”
    url = url + city + “&lang=zh_cn&APPID=42443ecbdcad3d01842205e3745895cd”
    req = urllib.request.Request(url)
    response=urllib.request.urlopen(req)
    return json.loads(response.read().decode(“UTF-8”))

forecast = getForecast(city)

print(“Forecast for “, city, forecast[‘city’][‘country’])

day_num=1
for day in forecast[‘list’]:
    print(“Day : “, day_num)
    print(day[‘weather’][0][‘description’])
    print(“Cloud Cover : “, day[‘clouds’])
    print(“Temp Min : “, round(day[‘temp’][‘min’]-273.15, 1), “degrees C”)
    print(“Temp Max : “, round(day[‘temp’][‘max’]-273.15, 1), “degrees C”)
    print(“Humidity : “, day[‘humidity’], “%”)
    print(“Wind Speed : “, day[‘speed’], “m/s”)
    print()
    day_num = day_num+1

Screen Dump Result as below:

weather-pi

Further Development:

This function can be further developed to save weather forecast data to database, and then display in a chart format on screen. I may do it if I have time in future.

Network Communication Script for Raspberry Pi

Introduction

We can use python programs to start a server side and client side network communication service and allow them to transmit message  to each other under a Raspberry Pi. For example, we start two LXTerminal Sessions under a Raspberry Pi (or two difference Pi), and then run the following script.

In Server Side, run the following script:

import socket
comms_socket = socket.socket()
comms_socket.bind((‘localhost’, 50000))
comms_socket.listen(10)
connection, address = comms_socket.accept()
while True:
    print(connection.recv(4096).decode(“UTF-8”))
    send_data = input(“Reply: “)
    connection.send(bytes(send_data, “UTF-8”))

In Client Side, run the following script:

import socket
comms_socket = socket.socket()
comms_socket.connect((‘localhost’, 50000))
while True:
    send_data = input(“message: “)
    comms_socket.send(bytes(send_data, “UTF-8”))
    print(comms_socket.recv(4096).decode(“UTF-8”))

The testing result is shown as below screen dump for your reference:

network-communicate-pi

Most Easy Way to Start a Web Server Service Using Python

Introduction

Although it is easy to start-up IIS under Window O/S or Apache under Unix O/S, we still have another choice to start a web server service using Python programming tools. You only need to install python, and then start python and run the following script line by line:

import http.server, os
#define the server document directory with unix path;
os.chdir(“UsersadministratorDocuments”)
#if it is window env with directory as c:UsersadministratorDocuments
os.chdir(“/Users/goldmanau/Documents”)
httpd = http.server.HTTPServer((‘127.0.0.1’, 8000),
http.server.SimpleHTTPRequestHandler)
httpd.serve_forever()

This script can work under either python 2.7 or 3.x version under window or Unix environment. If you put the index.html to the server document path, then, you can start a web browser and input the link as http://127.0.0.1:8000/index.html in order to display your web page. It is the most easy, simple, fast way to start a web server service.

Setup to upload & access Dropbox on Raspberry Pi

Introduction

If you want to upload file from or to DropBox through Raspberry Pi, it is easy to do so. The following will show you a a installation program and its setup steps.

Step 1. Setup DropBox account and apps from web

First of all you need a DropBox account and apps account through the following links. Hop on over to dropbox is free.

http://www.dropbox.com

You then need to visit this link https://www.dropbox.com/developers/apps, login to DropBox and create an “app” by clicking the “create app” button.

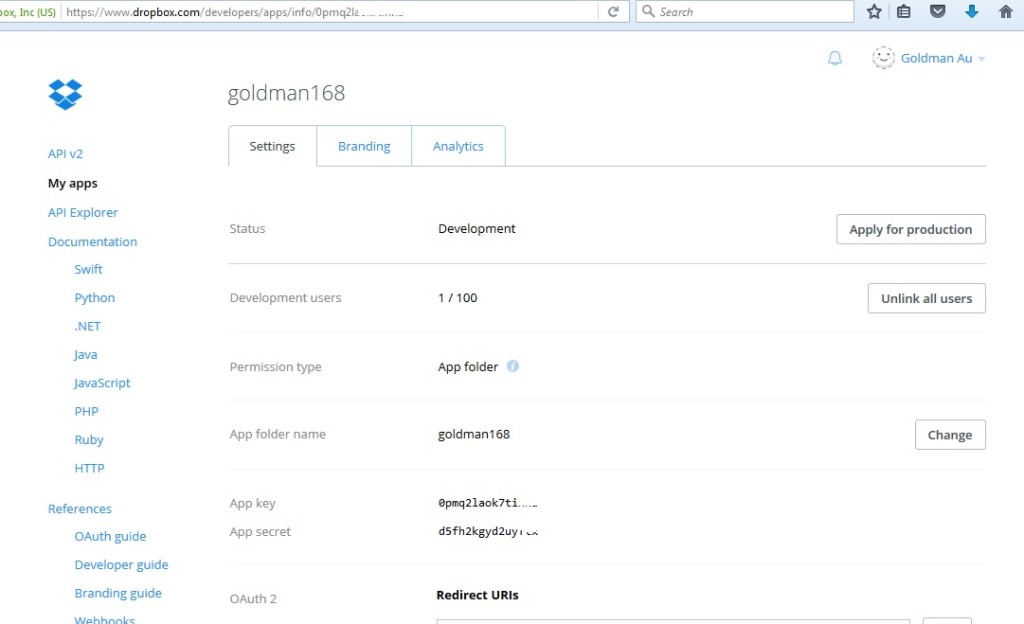
Then choose “Dropbox API app”, “Files and Datastores”, and answer the final question “Can your app be limited to its own, private folder?” – either answer is OK, depending on your needs. The result will be as below:

raspberrypi-dropbox0

Step 2. Set Up DropBox Uploader in Raspberry Pi

Get Dropbox Uploader onto your Pi

$ cd ~    (this ensures you are in /home/pi)
$ git clone https://github.com/andreafabrizi/Dropbox-Uploader.git
$ ls

(If this fails, you may need to install git with sudo apt-get install git-core)

You should be able to see a directory called Dropbox-Uploader

$ cd Dropbox-Uploader
$ ls

You should now see three files, one of which is called dropbox_uploader.sh. This is the script we’re going to use.

$ ./dropbox_uploader.sh

Run the script with ./dropbox_uploader.sh (if it fails, try chmod +x dropbox_uploader.sh)

If access right problem still occurs, run the following command:

$ sudo ./dropbox_upload.sh

Sorting out the DropBox API keys and authorization. You need to give your app a unique name, and you will be assigned some keys to go with the name. Now you need to enter your app’s DropBox API keys and secret. Once you’ve entered your keys and answered the question “app” or “full”, your Pi will request an authorisation token and you will be given a web URL you need to visit to activate it…

The following is the whole setup screen dump from my Raspberry Pi for your reference:

pi@gopi2:~ $ git clone https://github.com/andreafabrizi/Dropbox-Uploader.git
Cloning into ‘Dropbox-Uploader’…
remote: Counting objects: 718, done.
remote: Total 718 (delta 0), reused 0 (delta 0), pack-reused 718
Receiving objects: 100% (718/718), 213.12 KiB | 190.00 KiB/s, done.
Resolving deltas: 100% (369/369), done.
Checking connectivity… done.

pi@gopi2:~ $ cd Dropbox-Uploader

pi@gopi2:~/Dropbox-Uploader $ ls
CHANGELOG.md dropbox_uploader.sh dropShell.sh LICENSE README.md

pi@gopi2:~/Dropbox-Uploader $ ./dropbox_uploader.sh
This is the first time you run this script.
1) Open the following URL in your Browser, and log in using your account: https://www.dropbox.com/developers/apps
2) Click on “Create App”, then select “Dropbox API app”
3) Now go on with the configuration, choosing the app permissions and access restrictions to your DropBox folder
4) Enter the “App Name” that you prefer (e.g. MyUploader271401743117612)
Now, click on the “Create App” button.
When your new App is successfully created, please type the
App Key, App Secret and the Permission type shown in the confirmation page:
# App key: 0pmq2laok7xxxxx
# App secret: d5fh2kgyd2xxxxx
Permission type:
App folder [a]: If you choose that the app only needs access to files it creates
Full Dropbox [f]: If you choose that the app needs access to files already on Dropbox
# Permission type [a/f]: a
App key is 0pmq2laok7tinna, App secret is d5fh2kgyd2uyftx and Access level is App Folder. Looks ok? [y/n]: y
Token request… OK
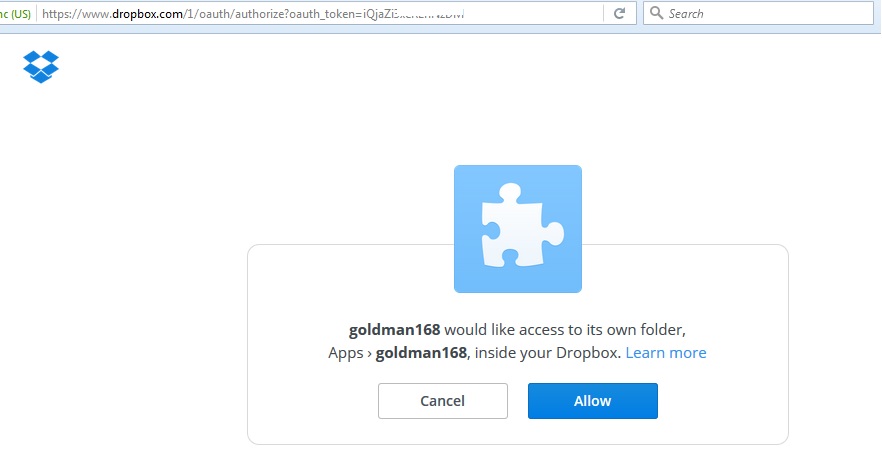
Please open the following URL in your browser, and allow Dropbox Uploader to access your DropBox folder:
https://www.dropbox.com/1/oauth/authorize?oauth_token=qH829qJuKZpxxxxx
Press enter when done…
Access Token request… OK

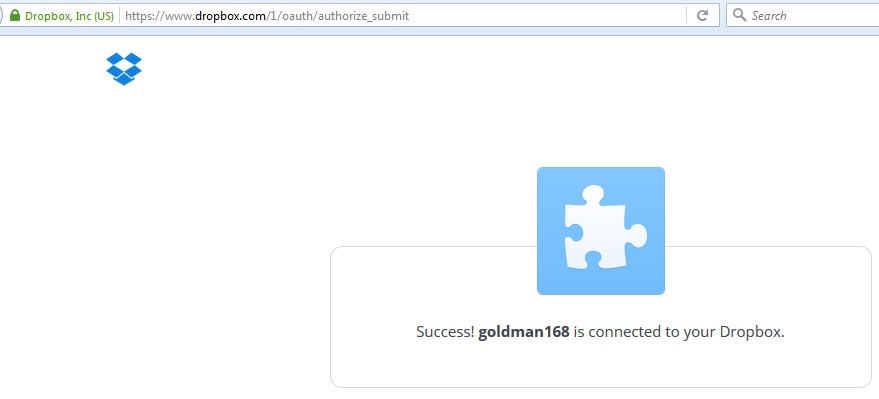
Finally, your DropBox account connected to your “app”

Besides Raspberry Pi operation, you also need to allow the access of Dropbox from Raspberry Pi as below two screens:

raspberrypi-dropbox1

raspberrypi-dropbox2

Step 3. Now you can test to upload from Raspberry Pi to DropBox

$ cd home/pi/Dropbox-Uploader
$ ./dropbox_uploader.sh upload /home/pi/upload_file_fr name_of_upload_file_to

This will upload the file you choose to your DropBox account.

…or use it in a Python script like this…

from subprocess import call  
photofile = “/home/pi/Dropbox-Uploader/dropbox_uploader.sh upload /home/pi/photo00001.jpg photo00001.jpg” 
call ([photofile], shell=True)

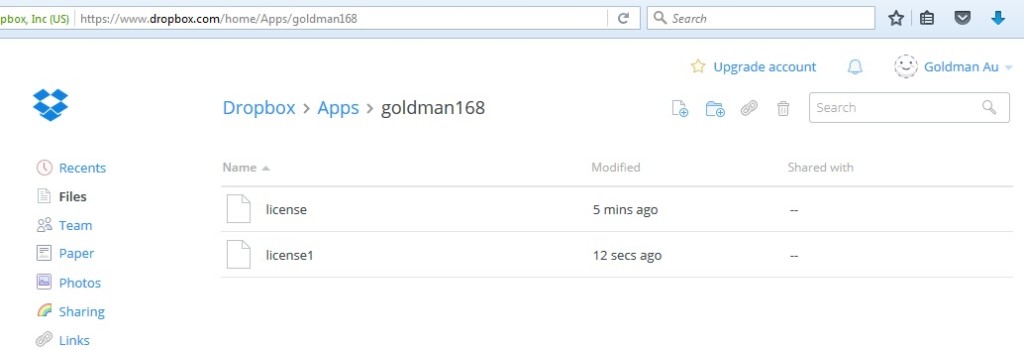
If we upload “license” & “license1” files to Dropbox, it will show the result as below:

raspberrypi-dropbox3

Finally, if you look at the DropBox Uploader documentation, there’s a lot more commands you can make use of…

  • upload
  • download
  • delete
  • move
  • list
  • share
  • mkdir


Backup of Raspberry Pi system image from SIM card

Introduction

If you want to backup your Raspberry Pi system image from SIM card, you can use the HDD Raw Copy Tool as described below.

Developer: HDDGURU.COM

License terms: Freeware

Supported OS: MS Windows XP, Vista, 7, 8, Server 2003, 2008, 2008R2

HDD Raw Copy Tool is a utility for low-level, sector-by-sector hard disk duplication and image creation.

  • Supported interfaces: S-ATA (SATA), IDE (E-IDE), SCSI, SAS, USB, FIREWIRE.
  • Big drives (LBA-48) are supported.
  • Supported HDD/SSD Manufacturers: Intel, OCZ, Samsung, Kingston, Maxtor, Hitachi, Seagate, Samsung, Toshiba, Fujitsu, IBM, Quantum, Western Digital, and almost any other not listed here.
  • The program also supports low-level duplication of FLASH cards (SD/MMC, MemoryStick, CompactFlash, SmartMedia, XD) using a card-reader.

HDD Raw Copy tool makes an exact duplicate of a SATA, IDE, SAS, SCSI or SSD hard disk drive. Will also work with any USB and FIREWIRE external drive enclosures as well as SD, MMC, MemoryStick and CompactFlash media.

The tool creates a sector-by-sector copy of all areas of the hard drive (MBR, boot records, all partitions as well as space in between). HDD Raw Copy does not care about the operating system on the drive – it could be Windows, Linux, Mac, or any other OS with any number of partitions (including hidden ones). Bad sectors are skipped by the tool.

If your media has a supported interface then it can be copied with HDD Raw Copy!

In addition, HDD Raw Copy can create an exact raw (dd) or compressed image of the entire media (including service data such as MBR, Boot records, etc). Again, all filesystems (even hidden) are supported.

Examples of possible uses

  • Data recovery: make a copy of the damaged drive to attempt recovery on the copy
  • Data recovery: copy a damaged hard drive and skip bad sectors
  • Migration: completely migrate from one hard drive to another
  • Ultimate backup: Make an exact copy of the hard drive for future use
  • Backup: create an image of a USB flash stick and copy/restore at any moment
  • Software QA engineers: restore your OS hard drives at any moment from a compressed image
  • Duplicate/Clone/Save full image of any type of media!