Questionnaire of Telecom and Multi-party Conference Requirement

In order to select an appropriate telecom and multi-party conference requirement, first thing first, we have better collect user opinion about those, so we ask users to fill-in the following questionarie as a survey.

Section 1. one-on-one phone audio call

For example:china-telecom-phone

Item Question Answer (yes/no) Remark and your comment
1.1 In PRC, do we require a phone audio call to communicate between internal phones ? I think it is essential.
1.2 In PRC, do we require a phone audio call to communicate with external China phone/mobile ? I think it is essential.
1.3 In PRC, do we require a phone audio call to communicate with external IDD phone/mobile ? I think it is essential.


Section 2. instant messaging feature

For example:wechat-pict

Item Question Answer (yes/no) Remark and your comment
2.1 In PRC, do we require instant messaging software (as similar as wechat, QQ) between our internal user communication ? Currently, “wechat” is widely used by many people in China.
2.2 In PRC, do we require instant messaging software (as similar as wechat, QQ) to transfer file between our internal user ? Currently, “wechat” is widely used by many people in China.
2.3 In PRC, do we require instant messaging software to use or to connect to external third party instant message software (e.g. wechat) ? Currently, “wechat” is widely used by many people in China.


Section 3. one-on-one phone video call

For example:video-conf-phone

Item Question Answer (yes/no) Remark and your comment
3.1 In PRC, do we require phone video call to communicate between internal phones ? Not a popular function
3.2 In PRC, do we require a phone video call to communicate with external phone/mobile or other external video communication system ? Not a popular function


Section 4. audio conf of multi-party (e.g. someone hold a dial-in meeting and allow others to call-in)

For example,voip-phone

Item Question Answer (yes/no) Remark and your comment
4.1 In PRC, do we require an audio conf system setup for usage between HK/PRC conf rooms ? I think it is essential.
4.2 In PRC, do we require an audio conf feature setup in each office phone, or who need it ? I think it is essential.
4.3 In PRC, do we require toll free service to allow external parties to call in for joining conference meeting ? Who need it ? Where will be the calling party from ? Can setup toll free service.
4.4 In PRC, do we require an audio conf software (other than using phone) to call to external third party audio conf system (e.g Skype) ? Not a popular function


Section 5. video conf of multi-party communication

For example:vc-device

Item Question Answer (yes/no) Remark and your comment
5.1 In PRC, do we require an video conf system setup for usage between sites,  or, connect to external party’s video conf system ? Can setup Video Conf system between sites, and its quality depends on site to site network performance (such as MPLS).
5.2 In PRC, do we require an video conf system setup to connect to external party’s video conf system ? Not a popular function
5.3 In PRC, do we require an video conf feature setup in each office phone, or who need it ? Not a popular function
5.4 In PRC, do we require an video conf software (other than using VC device) to call to external third party audio conf system (e.g Skype) ? Not a popular function

Comparison between Skype free and business version

Introduction

I did some research on “Skype for Business” and compared it against “Skype free version”.  To summarize, “Skype free version” is great for small group of users. “Skype free version” is free to use (good to support up to 25 users in small organization), unless you want to buy credit to make calls to landlines and mobiles. On the other hands, there are three main benefits to use ”Skype for Business” as compare to “Skype free version”:

  1. It is better integration with Office 365  (referring to appendix 1 for detail)
  2. It has security control over your company’s communications (referring to appendix 2 for detail)
  3. It can be used to hold large meetings (up to 250 people).  (referring to appendix 3 for detail)

“Skype for Business” lets clients add up to 250 people to online meetings, provides enterprise-grade security, allows to manage employee accounts, and is integrated into Office apps. Its usage is no additional cost for “Office 365 Business Premium”.

Appendix 1.  You Can Use “Skype for Business” with Office Apps

One of the big advantages of Skype for Business is that it integrates well with Office 365. Skype for Business allows you to send Instant Messages or start a voice or video call directly from a Word or PowerPoint document. You can schedule meetings from within Outlook, present documents, share your screen and even grant permission for someone else to control your desktop remotely. Skype for Business is sold with Office 365 plans for small business, such as our Office 365 Business Premium.

Appendix 2.  “Skype for Business” Has Added Security Features

Skype for Business is designed for companies, not consumers. An administrator can assign Skype permissions. For example, this version of Skype could decide that only salespeople could use it to make international calls instead of leaving the option wide open to the entire staff. The administrator can also deny access to a person who leaves the company to work somewhere else. This allows the company to maintain control over its confidential documents and communications.

Appendix 3.  “Skype for Business” is Better for Large Meetings

 If you’ve used the consumer version of Skype for business meetings, you’ve probably noticed that you can’t have more than 25 people on a conference call. That’s fine if you’re running a small meeting. But, try getting 100 people together for a company-wide webinar and it’s a different story. When you use Skype for Business, you can invite up to 250 people to a meeting. This means it’s a lot easier for you to conduct large-scale presentations or big conferences. And your participants don’t have to be on Skype for Business to participate. All they need is an internet connection and a browser.

Appendix 4. More featured on “Skype for Business”

If you have already purchased the Office 365 Business Premium plan, here are the add-on licenses to get more Skype for Business features.

To add this feature Here’s what you need to buy
Audio Conferencing
Buy 1 Audio Conferencing license for each person who is going to schedule or host a dial-in meeting. Attendees do not need licenses.
Audio Conferencing add-on
Once you buy the license, Microsoft will be your audio conferencing provider.
Toll-free numbers for dial-in access to your conferences, and the ability to dial out from a conference to add someone by calling any telephone number in the world Communications Credits
Phone System 1. Switch to a different Office 365 for business plan. If you have Office 365 ProPlus, or Skype for Business Online Plan 2 we recommend upgrading your plan to an Enterprise E5 plan to get cloud voice features. If you upgrade to an Enterprise E1 or E3 plan, you’ll see the option to buy the Phone Systemadd-on.
2. Phone System add-on
3. Calling Plans: buy a Calling Plan from Office 365.
Or, use the telephone service from your existing provider.
Calling Plans 1. Switch to a different Office 365 for business plan.
2. Phone System add-on
3. Calling Plan: you can only buy this after you buy the Phone System add-on.

Diary of IT Man – Bad Boss

Yesterday, I got a big depression due to my general manager (the biggest boss in the factory). I made a minor mistake but was blamed by him several hours. My fault was because not review an internet monthly contract after its expire. However, per the contract term, it would auto-renew after its contract period. The contract cost was cny2600/month for 10M broadband.

My boss treated this matter in serious way, seem over-reacted, and blamed me that I (as an IT manager) had to review all IT contracts timely and accurately. When your boss was in bad mood, you have better not to argue with him, and just say “sorry” and “yeah”. At last, he instructed me to do the following and treated me like a no experience staff: 1) search the up-to-date market price of internet; 2) measure our requirement on the broadband (10M, 20M or 30M); 3) ask China Telecom salesman to come on-site to negotiate about contract cost; 4) write minutes about the meeting with salesman; 5) he need to review the contract before signed.

Maybe my boss targeted me as a next layoff person, while I also prepared myself to leave the company anytime. Anyways, I will still try my best to do my job well. Hope there is no another chance that my boss finds my other fault. God bless.

Finally, this kind of bad boss made me a terrible nightmare, and he might cause me psychological problem. Because of my health, I should try my best to leave his supervisor. Good Luck to myself.

东莞市领导赴镇街督导安全生产大排查(25-29/6/2018)

因今年东莞市发生多起安全事故:

  1. 2018年4月12日11时许,高埗三联村一钢筋结构构筑物发生坍塌,造成1死1伤,4人被困。
  2. 2018年5月26日上午9时30分许,大岭山大沙村的东莞市华业鞋材有限公司发生一起有限空间气体中毒事故,造成4人死亡。
  3. 2018年5月26日晚上8时许,塘厦镇发生一起溺水事故,造成2人死亡。
  4. 2018年5月27日凌晨6时许,樟木头镇发生一起交通事故,造成2人死亡。

因此夏季安全形式严峻,东莞市领导会赴镇街督导安全生产大排查。

Setup of Ant Miner A3 Machine Mining with sia.tech pool

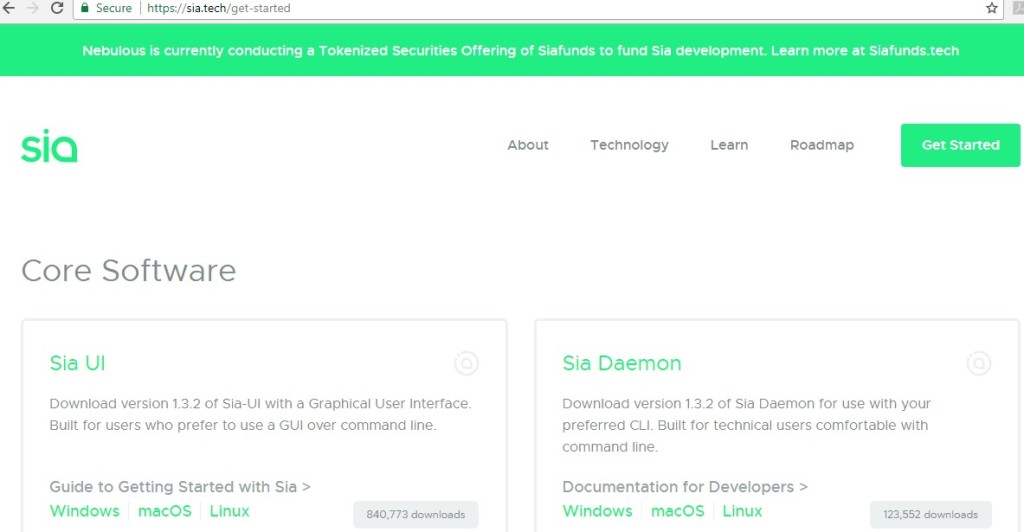
Step 1. Download sia program from https://sia.tech/get-started

sia-tech-pict1

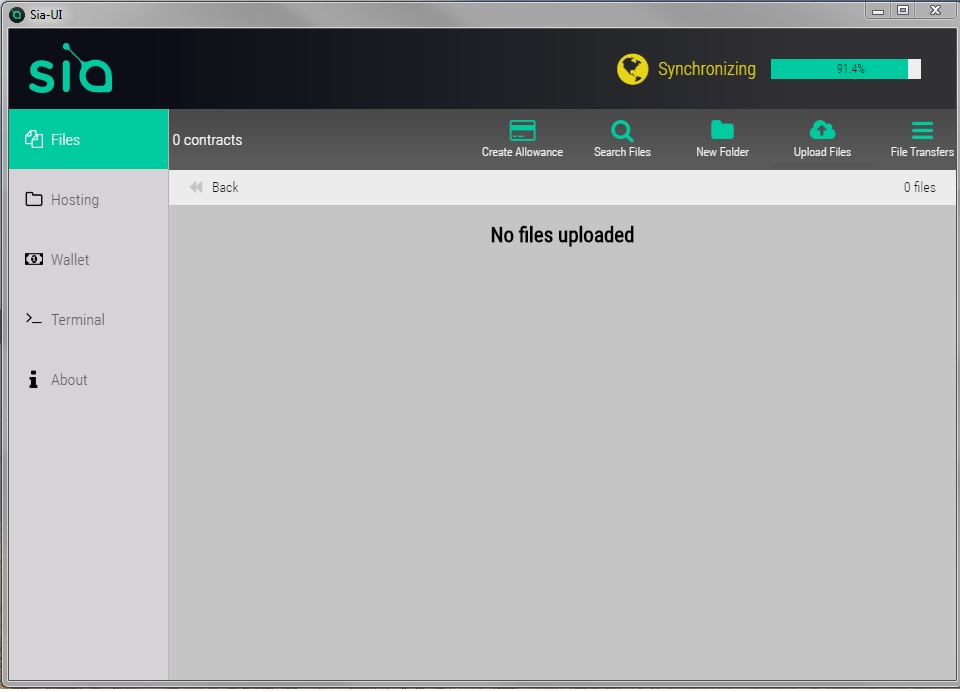
Step 2. Start the Sia-UI program, and wait for “synchronizing” done, which we may wait for one or two days, so you have better run it in a stable computer.

sia-pict1

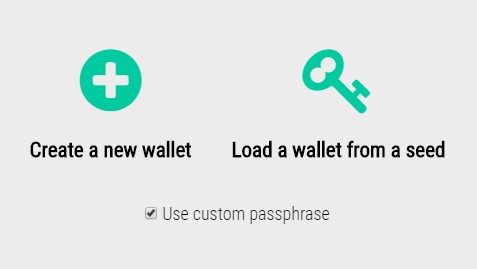
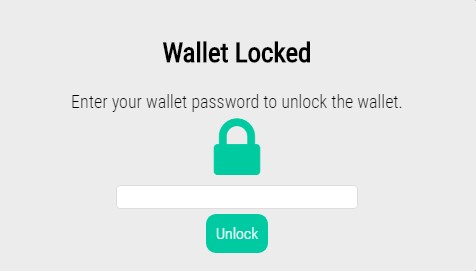
Step 3. Create a wallet, mark down the seek and passphrase, and unlock it.

Click on the Wallet tab on the left. You’ll see two options – “Create a new wallet” or “Load a wallet from a seed”. If this is your first time creating a wallet, you’ll select Create a new wallet. It is also recommended to check the box to Use custom passphrase first, and create a password for your wallet. If you don’t, your wallet password will be the same as your wallet seed, which is not ideal, especially if you plan on hosting.

sia-tech-pict3

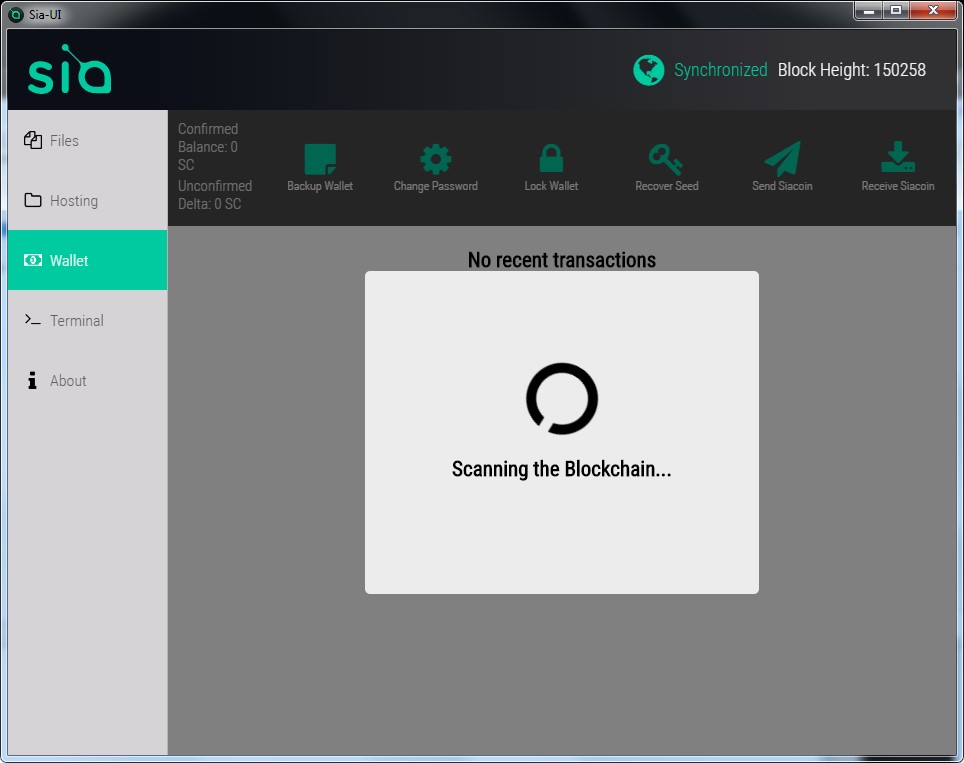
The wallet will say it’s scanning the blockchain, which may take several minutes. Wait for it to complete, or go grab a snack.

sia-tech-pict4

sia-tech-pict5

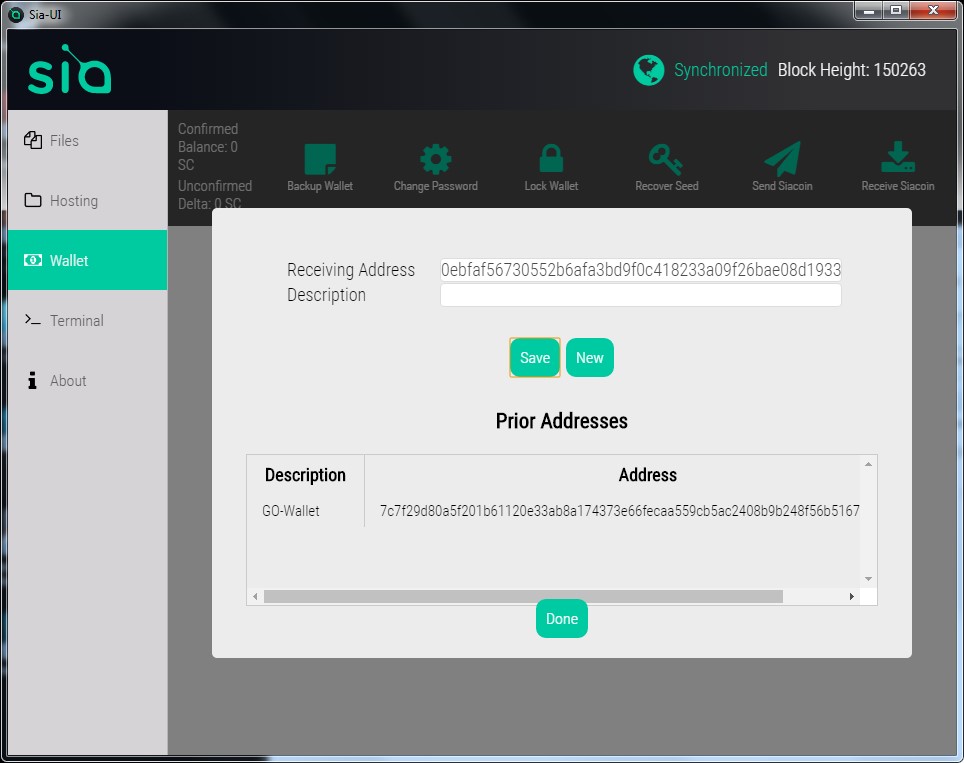
Step 4. Create a wallet address

A receiving address will be automatically generated for you in the top box, and you can give it a name in the bottom box if you want. Click Save to add it to the list of “Prior Addresses”. You can create as many addresses as you want, and they’ll all point to your wallet. Sia makes a new wallet address by default every time you click “Receive Siacoin” in order to help protect your privacy, but you can use any of your previous addresses at any time and they’ll still work.

sia-tech-pict6

Step 5. Backup your sia wallet

There is no option to backup the wallet in the sia-ui software! But you can backup the files by yourself!The files location is configured in the config.json file. The config.json is located in “Sia-UI-v1.2.0-win32-x64resourcesapp” folder. Open the file with text editor,you can see the “datadir” item.This item describe the backup files location! in the default the files location is in the C:userusernameAppDataRoamingSia-UI! Please do not go at manually backing up files from the Sia-UI folder as these are not guarenteed to work if placed back in a newer version of Sia-UI, above method is documented and always will work.

All you need to recover your wallet is to write down on a physical paper your seed, which is the same as your wallet password.
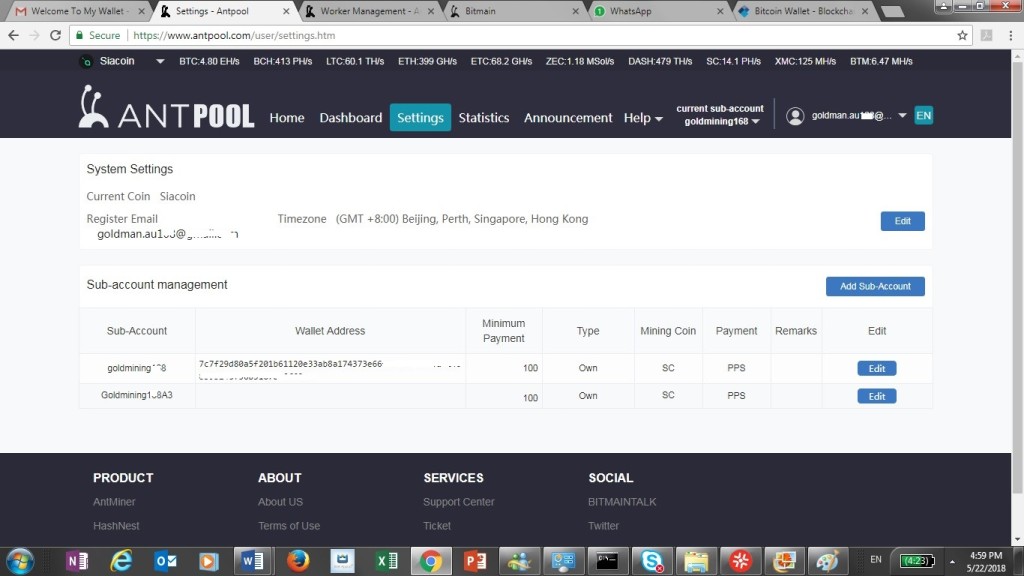
Step 6. Register account from antpool.com, and then select siacoin in the top right hand corner.

And then create account, sub-account, and worker as below:

sia-tech-pict7a

sia-tech-pict8

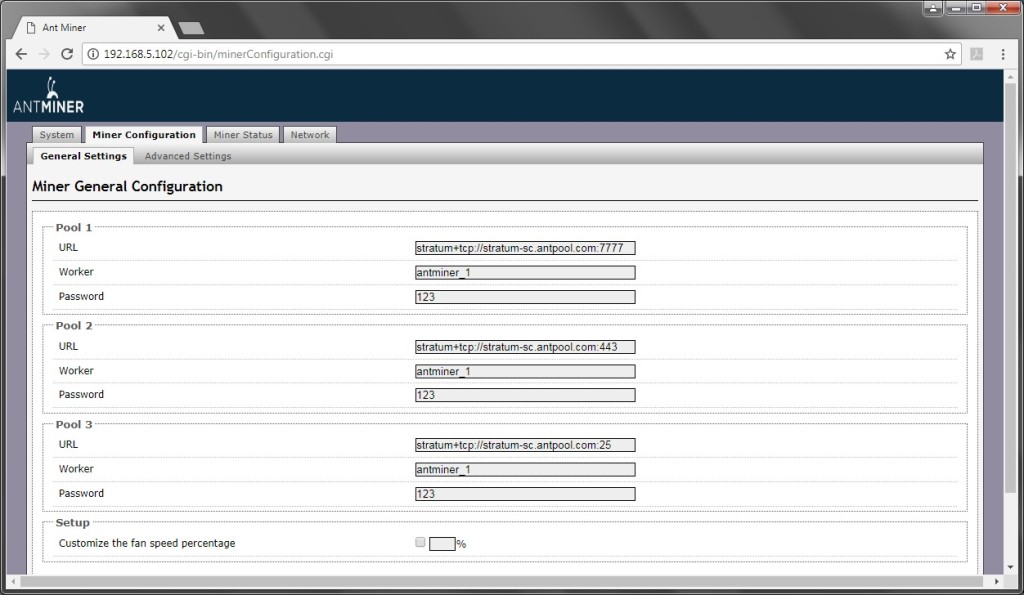
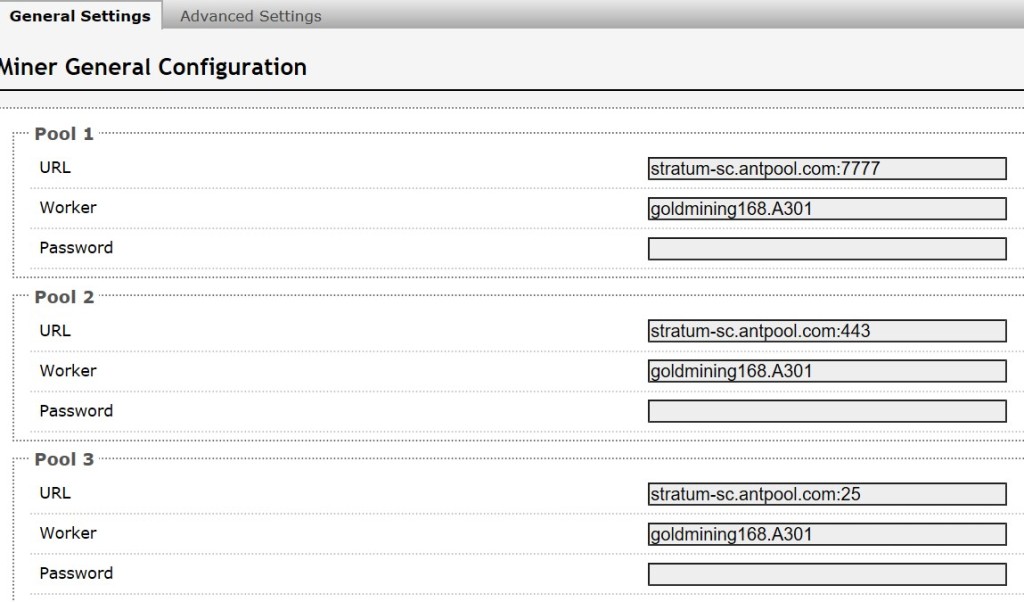
Step 7. Setup in mining machine as below:

Change from original default setting below:

sia-tech-pict9

To:

sia-tech-pict10

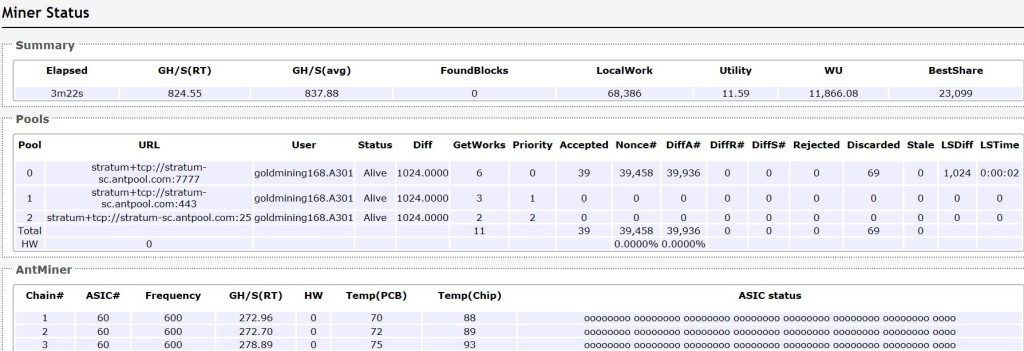
Step 8: Once you’ve started mining, you can check your stats from miner status as below example:

sia-tech-pict11

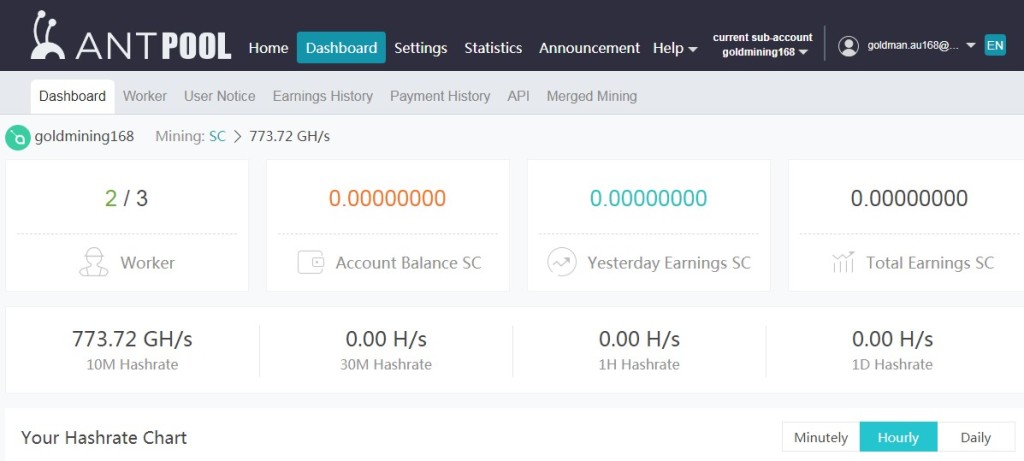
Step 9. My earning monitor screen from antpool as below:

sia-tech-pict12

Benefit of Cloud Computing

We all know that Cloud computing delivers servers, storage, database, network, software and more over the Internet. But WHY are so many business moving to the Cloud?

It’s because Cloud computing is providing the following 10 benefits to you and your company.

1. Flexibility 6. Work from anywhere
2. Disaster recovery 7. Document control
3. Automatic software updates 8. Security
4. Capital-expenditure Free 9. Competitiveness
5. Increased collaboration 10. Environmentally friendly

Most importantly, one of the key missions for adopting Cloud computing is to create the best digital experiences for our customers by providing the best and latest app to your target audiences, no matter for external and internal parties.

For more information about benefit of Cloud computing, please feel free to download our whitepaper “10 Benefits of Cloud computing By ICG Academy”.

GDPR compliant

On May 25, 2018, the GDPR (General Data Protection Regulation) will go into effect and change how organizations deal with personal data of EU citizens. Though GDPR was built to protect Europeans, it will affect organizations around the world doing business in the EU. In preparation, you have to update your Terms of Use and Privacy Policy to give client more control over their data and make it more clear how to use client data. All client, not just those in the EU, will have the same data privacy rights.

How to Fix The procedure entry point ucrtbase.terminate is missing or could not be located

Error The procedure entry point ucrtbase.terminate could not be located in the dynamic link library api-ms-win-crt-runtime-l1-1-0.dll or The program can’t start because api-ms-win-crt-runtime-l1-1-0.dll is missing from your computer.  Try reinstalling the program to fix this problem. is usually caused by corrupt or outdated Visual C++ Redist where another program has overwritten the libraries, or the program you are trying to run requires a newer version of the Visual C++. The latest one is 2017. The second most common for this issue to occur is when Windows Updates are outdated or the KB2999226 (Universal CRT) has failed. You cannot install Microsoft Visual C++ 2015 redist (runtime) unless you have Windows Update KB2999226 installed (at least on Windows 7 64-bit SP1).

Method 1: Repair Corrupt System Files

Download and run Reimage Plus to scan and restore corrupt and missing files from here, and then see if the issue is fixed if not then try the other methods listed below.

Method 2: Check for and Install Windows Updates

On Windows 10

  1. Click Start
  2. Choose Settings
  3. Choose Update and Security
  4. Choose Windows Updates
  5. Click Check for Updates
  6. If there are updates, you’ll see a message telling you that important or optional updates are available, or telling you to review important or optional updates, click the message to view the updates to install.
  7. In the list, enable the checkboxes for the updates Important or Optional, and then click Install.

On Windows 7

  1. Click Start
  2. Type Updates
  3. Choose Windows Updates
  4. Choose Check for Updates
  5. Install the Updates, and Reboot the PC.

The one we are looking for through Windows Update is the Universal CRT Update KB2999226 which can also be downloaded and installed as a stand alone package from (here).

For Windows 7 Only:

If the issue is still not resolved on Windows 7 after running the updates and install the KB2999226 manually, then follow these steps:

PRO TIP: If the issue is with your computer or a laptop/notebook you should try using the Reimage Plus Software which can scan the repositories and replace corrupt and missing files. This works in most cases, where the issue is originated due to a system corruption. You can download Reimage Plus by Clicking Here
  1. Hold the Windows Key and Press R. In the Run Dialog, type cmd and Click OK.
  2. In the command prompt window, type net stop wuauserv
  3. Then type ren c:windowsSoftwareDistributionWuRedir WuRedir1

Then run the Windows Update again, reboot multiple times and check to make sure that all the updates are installed.


The procedure entry point ucrtbase.terminate could not be located in the dynamic link library api-ms-win-crt-runtime-l1-1-0.dll

Modified on: Fri, 23 Jun, 2017 at 11:18 AM


When opening EasyWorship the following error appears “the procedure entry point ucrtbase.terminate could not be located in the dynamic link library api-ms-win-crt-runtime-l1-1-0.dll”.

This is a problem with a Windows library that is missing or corrupted. In many cases this can be fixed by installing the “Update for Universal C Runtime in Windows“.

Convert between xls and xlsx by python and compile python

1. To convert xls to xlsx:

$ pip install pyexcel pyexcel-xls pyexcel-xlsx

Run Python Script as:

import pyexcel as p

p.save_book_as(file_name='your-file-in.xls',
               dest_file_name='your-new-file-out.xlsx')

If you do not need a program, you could install one additinal package pyexcel-cli::

$ pip install pyexcel-cli
$ pyexcel transcode your-file-in.xls your-new-file-out.xlsx

The transcoding procedure above uses xlrd and openpyxl.

2. To convert between xlsx and xls vice and versa:

You need to have win32com installed on your machine. Here is the code for python 2.7 and 3.5:
import win32com.client as win32
fname = "full+path+to+xls_file"
excel = win32.gencache.EnsureDispatch('Excel.Application')
wb = excel.Workbooks.Open(fname)

wb.SaveAs(fname+"x", FileFormat = 51)    #FileFormat = 51 is for .xlsx extension
wb.Close()                               #FileFormat = 56 is for .xls extension
excel.Application.Quit()

3. Compile via py2exe

3.1. Create your setup script (setup.py)

py2exe extends Distutils with a new “command”. If you’ve installed third party Python modules then there’s a good chance you’ve seen at least one distutils command:

C:Tutorial>python setup.py install

“install” is a Distutils command that installs something (typically a Python module or package). The details Distutils needs to do that installation are contained in setup.py (and sometimes other associated files).

“py2exe” is a new Distutils command that is added when you import py2exe. To use py2exe you need to create a setup.py file to tell Distutils and py2exe what you want to do. Here’s a setup.py whose simplicity is appropriate for our sample program…

   1 from distutils.core import setup
   2 import py2exe
   3 
   4 setup(console=['hello.py'])

3.2. Run your setup script

The next step is to run your setup script. Make sure to give the py2exe command and expect to see lots and lots of output:

C:Tutorial>python setup.py py2exe

3.3. Test your executable

Now that the package has been created it is ready to test:

C:Tutorial>cd dist

C:Tutorialdist>hello.exe
Hello World

4. Compile via pyinstaller

[Anaconda3] C:Usersgoldmanau>pip install pyinstaller

[Anaconda3] C:Usersgoldmanau>pyinstaller --version
3.3.1

[Anaconda3] C:Usersgoldmanau>pyinstaller --onefile conv.py
418 INFO: PyInstaller: 3.3.1
418 INFO: Python: 3.5.1
418 INFO: Platform: Windows-7-6.1.7601-SP1
420 INFO: wrote C:Usersgoldmanauconv.spec
424 INFO: UPX is not available.
428 INFO: Extending PYTHONPATH with paths
['C:\Users\goldmanau', 'C:\Users\goldmanau']
428 INFO: checking Analysis
429 INFO: Building Analysis because out00-Analysis.toc is non existent
429 INFO: Initializing module dependency graph...
434 INFO: Initializing module graph hooks...
438 INFO: Analyzing base_library.zip ...
12259 INFO: running Analysis out00-Analysis.toc
14333 INFO: Caching module hooks...
14347 INFO: Analyzing C:Usersgoldmanauconv.py
14350 INFO: Processing pre-safe import module hook win32com
15341 INFO: Loading module hooks...
15342 INFO: Loading module hook "hook-pydoc.py"...
15343 INFO: Loading module hook "hook-pythoncom.py"...
15913 INFO: Loading module hook "hook-pywintypes.py"...
16460 INFO: Loading module hook "hook-win32com.py"...
16770 INFO: Loading module hook "hook-encodings.py"...
16970 INFO: Loading module hook "hook-xml.py"...
17803 INFO: Looking for ctypes DLLs
17879 INFO: Analyzing run-time hooks ...
17884 INFO: Including run-time hook 'pyi_rth_win32comgenpy.py'
17897 INFO: Looking for dynamic libraries
19407 INFO: Looking for eggs
19407 INFO: Using Python library c:usersgoldmanauappdatalocalcontinuumanac
onda3python35.dll
19408 INFO: Found binding redirects:
[]
19415 INFO: Warnings written to C:Usersgoldmanaubuildconvwarnconv.txt
19520 INFO: Graph cross-reference written to C:Usersgoldmanaubuildconvxref-
conv.html
19587 INFO: checking PYZ
19587 INFO: Building PYZ because out00-PYZ.toc is non existent
19588 INFO: Building PYZ (ZlibArchive) C:Usersgoldmanaubuildconvout00-PYZ.p
yz
21378 INFO: Building PYZ (ZlibArchive) C:Usersgoldmanaubuildconvout00-PYZ.p
yz completed successfully.
21402 INFO: checking PKG
21403 INFO: Building PKG because out00-PKG.toc is non existent
21404 INFO: Building PKG (CArchive) out00-PKG.pkg
21752 INFO: Updating manifest in C:UsersgoldmanauAppDataRoamingpyinstaller
bincache00_py35_64bitpython35.dll
21753 INFO: Updating resource type 24 name 2 language 1033
27241 INFO: Building PKG (CArchive) out00-PKG.pkg completed successfully.
27253 INFO: Bootloader c:usersgoldmanauappdatalocalcontinuumanaconda3lib
site-packagesPyInstallerbootloaderWindows-64bitrun.exe
27254 INFO: checking EXE
27255 INFO: Building EXE because out00-EXE.toc is non existent
27256 INFO: Building EXE from out00-EXE.toc
27258 INFO: Appending archive to EXE C:Usersgoldmanaudistconv.exe
27345 INFO: Building EXE from out00-EXE.toc completed successfully.

Compile program in    C:Usersgoldmanaudistconv.exe

Custom TinyWebDB Service

Creating a Custom TinyWebDB Service

TinyWebDB is an App Inventor component that allows you to store data persistently in a database on the web. Because the data is stored on the web instead of a particular phone, TinyWebDB can be used to facilitate communication between phones and apps (e.g., multi-player games).

By default, the TinyWebDB component stores data on a test service provided by App Inventor, http://appinvtinywebdb.appspot.com/ . This service is helpful for testing, but it is shared by all App Inventor users, and it has a limit of 1000 entries. If you use it, your data will be overwritten eventually.

For most apps you write, you’ll want to create a custom web service that isn’t shared with other App Inventor apps and programmers. You need not be a programmer to do so– just follow the instructions below and you’ll have your own service within minutes.

To create your own web service, follow these instructions:

  • Download App Engine for Python at http://code.google.com/appengine/ . After installing it, run the GoogleAppEngineLauncher by clicking its icon.
  • Download this sample code. It is a zip file containing the source code for your custom tinywebdb web service
  • This code is setup to run with App Engine using Python 2.7, so you’ll need Python 2.7 on your computer. To check your version of Python, open up your Terminal and type in python. If you don’t have the right version, you can download it from here
  • To make sure that App Engine is configured to use it, in App Engine Launcher, choose Preferences and then put in path to Python2.7 (On a Mac, this might be something like /usr/local/bin/python2.7 )
  • Unzip the downloaded zip file. It will create a folder named customtinywebdb. You can rename it if you want.
  • In the GoogleAppEngineLauncher, choose File | Add Existing Application. Browse to set the Path to the customtinywebdb folder you just unzipped. Then click the Run button. This will launch a test web service that runs on your local machine.
  • You can test the service by opening a browser and entering “localhost:8080” as the URL. (NOTE: if you’ve already created a web service, the port number (8080) may be different the second time, check the table in Google App Engine Launcher to see what Port number you should use).
  • You’ll see the web page interface to your web service. The end-goal of this service is to communicate with a mobile app created with App Inventor. But the service provides a web page interface to the service to help programmers with debugging. You can invoke the get and store operations by hand, view the existing entries, and also delete individual entries. NOTE: If you are having problems creating a web page, click the Logs on the App Engine screen to diagnose the error.

Congrats, you’ve now made a webpage for your app. But your app is not yet on the web, and thus not yet accessible to an App Inventor app. To get it there, you need to upload it to Google’s App Engine servers.

  • In the GoogleAppEngineLauncher, choose Dashboard. Enter your Google account information and you’ll be taken to an App Engine dashboard.
  • Choose Create an Application. You’ll need to specify a globally unique Application Identifier. Remember the Application identifier as you’ll need it later. Provide a name to your app and click Create Application to submit. If your Identifier was unique, you now have a new, empty app on Google’s servers.
  • Open a text editor on your local computer and open the file app.yaml within the customtinywebdb folder you unzipped. Modify the first line so that the application matches the application identifier you set at Google.
  • In GoogleAppEngineLauncher, choose Deploy and follow the steps for deploying your app.
  • Test to see if your app is running on the web. In a browser, enter myapp.appspot.com, only substitute your application identifier for myapp. The app should look the same as when you ran it on the local test server. Only now, it’s on the web and you can access it from your App Inventor for Android app.

Your App Inventor apps can store and retrieve data using your new service. Just do the following:

  • Drag in a TinyWebDB component into the Component Designer.
  • Modify the ServiceURL property from the default http://appinvtinywebdb.appspot.com/ to your web service.
  • Any StoreValue operations (blocks) will store data at your service, and any GetValue operations will retrieve from your service.

Information source: 1) http://appinventor.mit.edu/explore/content/custom-tinywebdb-service.html

2)  https://cloud.google.com/appengine/docs/standard/python/download?hl=zh-CN

Powered By Goldman Design