Setup a Survey Web Site with Python & Django

Introduction

This document shows how to setup a survey web site using python 2.7 and django 1.4. We do not need to use web server software such as IIS or Apache while python can start web server service itself. This survey web site can run under window and linux env provide that it has python. I will show its setup steps as below.

Step 1.

Download the program source code “django-survey-master.zip” from web site https://github.com/jessykate/djngo-survey and unzip it to a computer with python 2.7.

Step 2.

Under the django-survey-master directory, run the command $ pip install -r requirements.txt to install django.

Step 3.

Setup the survey database as command $ python manage.py syncdb , which you need to input a username and password.

Step 4.

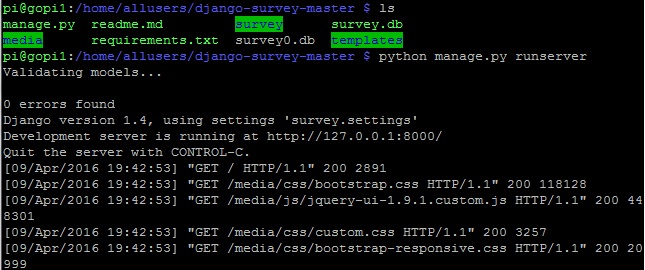
Start the survey server as command $ python manage.py runserver ,as below screen dump:

survey1

Step 5.

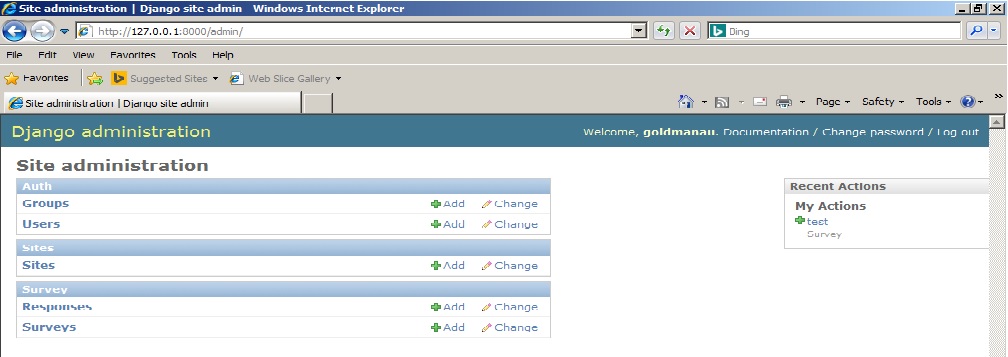
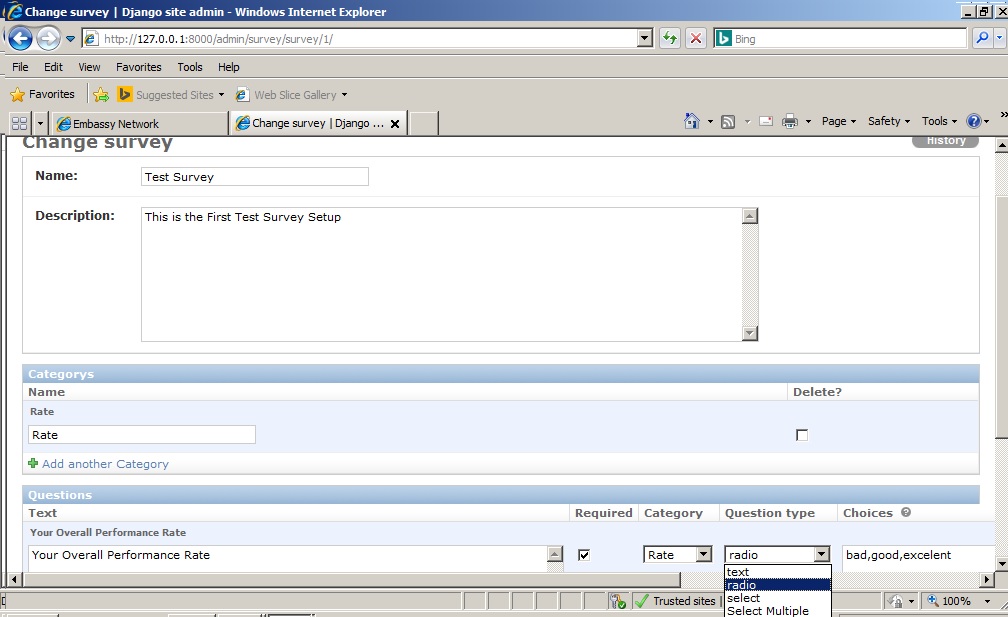
Setup a survey as below screen dump with link http://127.0.0.1:8000/admin :

survey3

survey4

Step 6.

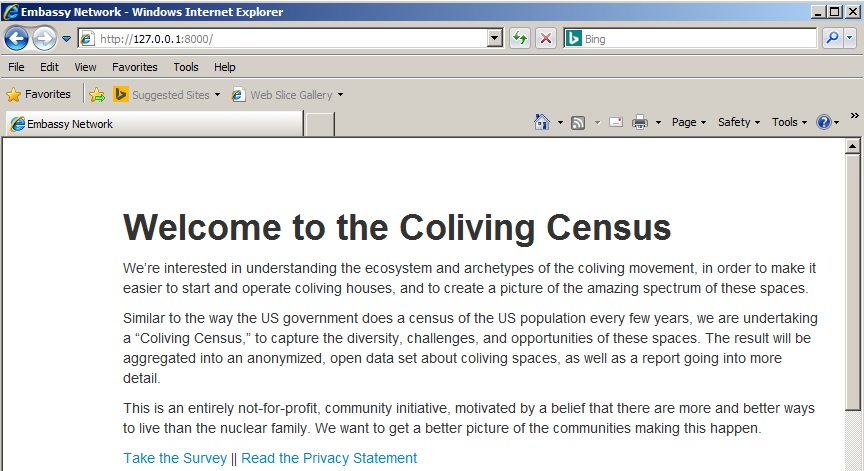
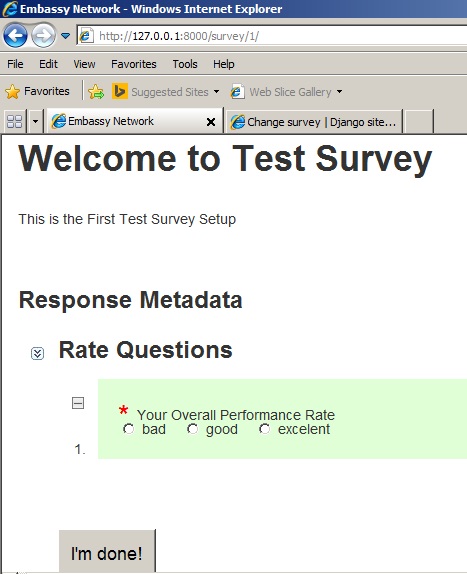
Browse the survey web site to fill-in a survey as below link http://127.0.0.1:8000 :

survey2

survey5

Bonus of a problem solving

Problem 1: The Survey web site is with link localhost:8000 and 127.0.0.1:8000 in its computer and that works fine. However, it cannot be accessed from other computer in the same network.

Solution 1: Start the Web Site Server with its own ip address, such as $ python manage.py runserver 192.168.5.105:8000; then other computers in the same network can access it with link http://192.168.5.105:8000.

Problem 2: If you have problem of running http://127.0.0.1:8000/admin, it comes out a error message “Admin Site: TemplateDoesNotExist at /admin/ …”

Solution 2: Force to re-download django with command:

pip install -r requirements.txt --ignore-installed --force-reinstall --upgrade --no-cache-dir

Comparison Video Conference Software (WebEx, TrueConf, AnyMeeting, GoToWebinar, Skype)

Introduction

I compared several web base webinars and video conference tools, anymeeting, GoToWebinar, Webex, TrueConf, Skype, with their screen dump example as below.

VC-Software

Testing

I tested WebEx between HK & PRC, which we can have meeting with video, audio, screen sharing. However, the video display is not stable as below screen dump because of low bandwidth.

WebEx1

I found another VC Tools, called TrueConf from http://trueconf.com/ . I tested its performance of cam video, voice, share picture file between HK & PRC, and I found it was better than WebEx on Cam display because it will not show a blank screen while it display a Cam picture during low bandwidth network. However, when sharing desktop, its screen was bad.

TrueConf1

TrueConf desktop sharing had latency problem as below:

TrueConf2

GoToWebinar is a webinar tools for presentation, but not a video conf tools. We can share video only from host to client, but no display from client to host.

GoToWebinar

The audio from AnyMeeting is bad, so that it is not a good choice, neither. Although the audio from WebEx is good, using the voice through WebEx consumes more bandwidth and it affects the video display.

AnyMeeting

Base on my experience in past, Skype is a good tool for audio communication, but not good from video. I always use it for audio conf, so that I did not test it this time.

I rate my testing result as below table:

 WebEx  GoToWebinar  AnyMeeting  Skype TrueConf
Audio  5  5 3  5 4
Video  3  4 4  2 3
Chat  5  5 5  5 5
Desktop/File Sharing  4  4 4  2 3
User Friendly 4 5 4  5 5
Usage Cost $99/month $99/month $78/month Free Free
Remark Sharing video only from host to client, but no display from client to host. I estimated the score of Skype base on my experience in past. I do not test it this time.

Note:  I estimate the score from range 1 to 5 where 1 for bad, and 5 for excellent.

Conclusion

WebEx is the best among other VC software but its video function sometimes has problem. Although WebEx have intermittent problem on camera video, its desktop sharing screen still can work during low network bandwidth. Hence, WebEx is the best VC solution from our testing.

IT人在工廠日記 – 假期清閒,玩圍棋消譴

近日因為AlphaGo(阿爾法)和李世石的比賽,挑起我的圍棋興致,我也趁熱鬧和電腦下幾盤圍棋,但是人始終有情緒、會疲倦、易分心…等等問題,不像電腦那樣表現穩定。我和電腦下棋,各有勝負,可是,遇到一局很特別的計分結果,原來日本計法和中國計法可以有不同的勝負結果,真難得,所以要分享給棋友們看看,如下圖示。

Go-game


Temperature Sensor Setup on Raspberry Pi

Introduction

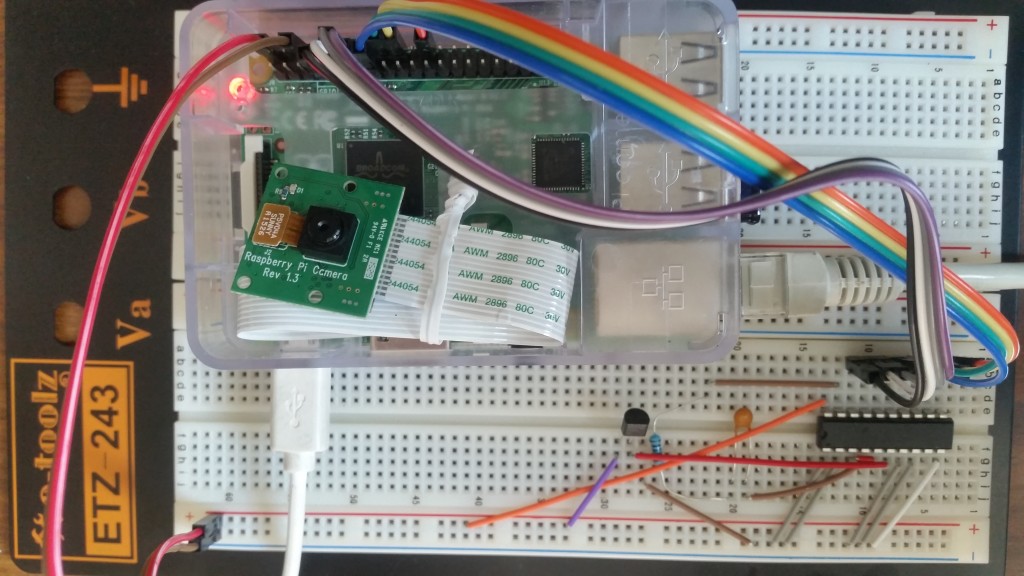
Today, I setup my raspberry pi as a temperature sensor. I mainly use a LM35 temperature sensor and an IC “ADC0804” as an analog to digital converter. I also setup a database to record down the temperature data and then display result on web browser with Chat format. The connection of the whole electronics circuit is as below diagram. temp0

Program script:

1) The coding the a python program to take temperature data is as the temp_url.py program below:

#!/usr/bin/env python
# author: Powen Ko    Program Name:  temp_url.py
import time, RPi.GPIO as GPIO
import urllib

def fetch_thing(url, params, method):
params = urllib.urlencode(params)
if method==’POST’:
f = urllib.urlopen(url, params)
else:
f = urllib.urlopen(url+’?’+params)
return (f.read(), f.code)

GPIO.setmode(GPIO.BOARD)
GPIO.setup(7, GPIO.IN)
GPIO.setup(11, GPIO.IN)
GPIO.setup(12, GPIO.IN)
GPIO.setup(13, GPIO.IN)
GPIO.setup(15, GPIO.IN)
GPIO.setup(16, GPIO.IN)
GPIO.setup(18, GPIO.IN)
GPIO.setup(22, GPIO.IN)
while True:
     a0 = GPIO.input(7)
     a1 = GPIO.input(11)
     a2 = GPIO.input(12)
     a3 = GPIO.input(13)
     a4 = GPIO.input(15)
     a5 = GPIO.input(16)
     a6 = GPIO.input(18)
     a7 = GPIO.input(22)
     total=a0+(a1*2)+(a2*4)+(a3*8)+(a4*16)+(a5*32)+(a6*64)+(a7*128)
     temp=total*5*1000/256/10;
     print a7,a6,a5,a4,a3,a2,a1,a0,”[“,total,”]”,”[C=”,temp,”]”
     content, response_code = fetch_thing(
                    ‘http://127.0.0.1/settemp.php’,
                    {‘id’: 1, ‘temp’: temp},
                    ‘GET’
                    )
     time.sleep(5)

2) Then, I save the temperature data into the database via a web php program as below:

<?php
$con=mysqli_connect(“localhost”,”root”,”infotech”,”raspberryDB”);
if (mysqli_connect_errno()) {
echo “Failed to connect to MySQL: ” . mysqli_connect_error();
}

$now= date(‘Ymdhms’);
$id = $_GET[‘id’];
$temp = $_GET[‘temp’];
mysqli_query($con,”INSERT INTO temp (datatime,temp,userid)
VALUES ($now,$temp,$id)”);

mysqli_close($con);
echo “powenko.com get it”.”, date time=”.$now.”, temp=”.$temp.”, id=”.$id;
?>

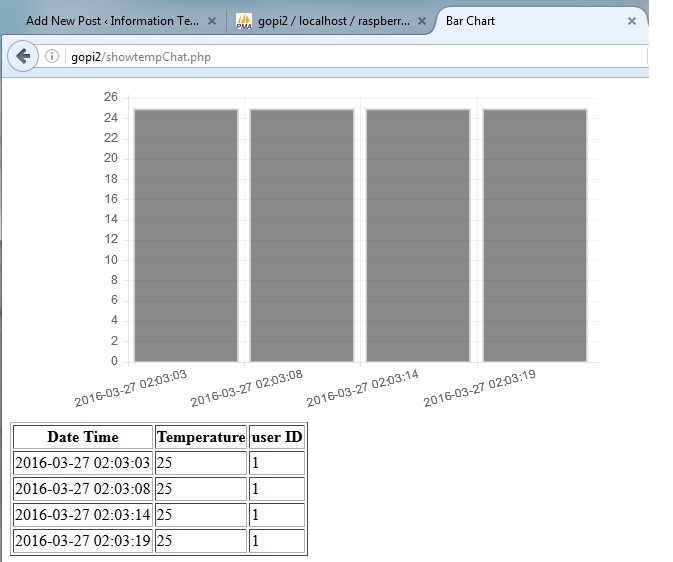
Finally, I view data by using a php web browser program as below and also screen dump result as below:

<!doctype html>
<html>
        <head>
                <title>Bar Chart</title>
                <script src=”Chart.js-master/Chart.js”></script>
        </head>
        <body>
                <div style=”width: 50%”>
                        <canvas id=”canvas” height=”450″ width=”800″></canvas>
                </div>
<?php
$con=mysqli_connect(“localhost”,”root”,”infotech”,”raspberryDB”);
if (mysqli_connect_errno()) {
  echo “Failed to connect to MySQL: ” . mysqli_connect_error();
}

$result = mysqli_query($con,”SELECT * FROM temp”);

echo “<table border=’1′>
<tr>
<th>Date Time</th>
<th>Temperature</th>
<th>user ID </>

</tr>”;

while($row = mysqli_fetch_array($result))
{
  echo “<tr>”;
  echo “<td>” . $row[‘datatime’] . “</td>”;
  echo “<td>” . $row[‘temp’] . “</td>”;
  echo “<td>” . $row[‘userid’] . “</td>”;
  echo “</tr>”;
  $Lables=$Lables.'”‘. $row[‘datatime’].'”,’;
  $temps=$temps.'”‘. $row[‘temp’].'”,’;
}

echo “</table>”;
mysqli_close($con);
?>

        <script>
var barChartData = {
                labels : [<?php echo  $Lables;  ?>],
                datasets : [
                        {
                                fillColor : “rgba(20,20,20,0.5)”,
                                strokeColor : “rgba(220,220,220,0.8)”,
                                highlightFill: “rgba(220,220,220,0.75)”,
               highlightStroke: “rgba(220,220,220,1)”,
                                data : [<?php echo  $temps;  ?>
                                ]
                       }
                ]
        }
        window.onload = function(){
                var ctx = document.getElementById(“canvas”).getContext(“2d”);
                window.myBar = new Chart(ctx).Bar(barChartData, {
                        responsive : true
                });
        }
        </script>
        </body>
</html>

temp3

IT人在工廠日記 – 生意不景,又要找新工作

我在現時這家醫療設備工廠做了差不多一年,看著它由四條生產線減至一、二條生產線,工人由七百減至三百,但是要負擔百多名職員,今年的盈虧已經可以預計了,如果未來幾個月的生意不能改善,裁員是不可避免的。我要做好準備,又要開始積極地找另一份新工作了。

Speech with Raspberry Pi

Introduction

Raspberry Pi is an excellent automation control unit, and we can use it to build a voice recognition feature in order to make it as a voice automation control unit. Yeah, is it very interesting ! In the following, I will show you the script to build voice feature, including converting speech to text, converting text to speech, auto-reply a text question.

Script to convert Speech to Text

I take the benefit of using google speech recognition ver 2 feature and arecord feature of Raspberry Pi. To remind that you should apply your google api key for usage in this script, as below:

#!/bin/bash
echo “Recording…”
arecord -D plughw:1,0 -f cd -t wav -r 16000 –duration=4 test.wav
avconv -i test.wav -y -ar 16000 -ac 1 test.flac

echo “Processing…”
wget -q -U “Mozilla/5.0” –post-file test.flac –header “Content-Type: audio/x-flac; rate=16000” -O – “https://www.google.com/speech-api/v2/recognize?client=chromium&lang=en_US&key=AIzaSyB0RJilwaAhMpftgmgRhgEzd4lZnia1MwQ” |cut -d” -f8 >stt.txt
echo “You said: “
value=`cat stt.txt`
echo “$value”

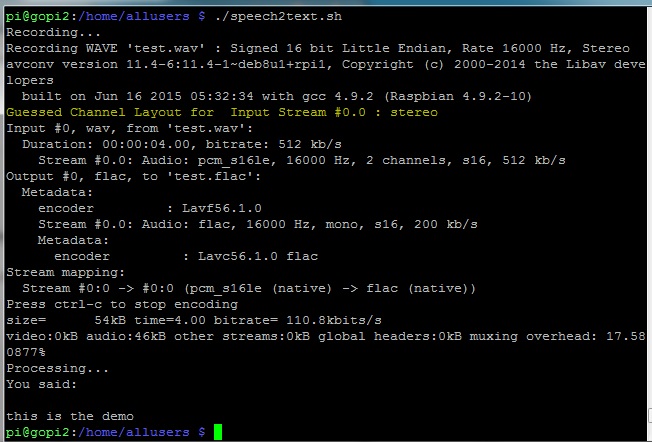
The screen dump result to run speech2text.sh program is as below:

speech2text

Script to Auto-Reply a Query

It is a python program using Wolframalpha’s API add-on tools to process a question as below script, and you should apply a app ID from http://products.wolframalpha.com/api/:

import wolframalpha
import sys

# Get a free API key here http://products.wolframalpha.com/api/
# This is a fake ID, go and get your own, instructions on my blog.
app_id=”VWQU6P-YPRRG752XH”

client = wolframalpha.Client(app_id)

query = ‘ ‘.join(sys.argv[1:])
res = client.query(query)

if len(res.pods) > 0:
    texts = “”
    pod = res.pods[1]
    if pod.text:
        texts = pod.text
    else:
        texts = “I have no answer for that”
        # to skip ascii character in case of error
    texts = texts.encode(‘ascii’, ‘ignore’)
    print(texts)
else:
    print(“Sorry, I am not sure.”)

To run the python program as script –> python3 queryprocess.py “What is your name”, then we can get a reply result as “My name is Walfram|Alpha.”, as below screen dump.

speech-reply

Convert Text to Speech

We can use Espeak utility to convert text to speech under Raspberry Pi. Its installation is very simple as below:

$ sudo apt-get install espeak

After installation, you can run the espeak program to speech, for example,

$ espeak "Hello World"

Question and Answer Program with Speech and Voice Reply

I develop a script to combine the above three program into one, so that you can use it to speech a question and wait for a voice answer. Let’s see the script of main.sh program as below:

#!/bin/bash
echo “Recording… Press Ctrl+C to Stop.”
./speech2text.sh > /dev/null 2>&1
QUESTION=$(cat stt.txt)
echo “Me: “ $QUESTION
python3 queryprocess.py $QUESTION > ans1.txt
ANSWER=$(cut -c3- ans1.txt)
ANSWER1=$(echo “$ANSWER” | sed -e ‘s/\n/ /g’)
ANSWER2=${ANSWER1::-1}
echo “Robot: “ $ANSWER2
espeak “$ANSWER2” > /dev/null 2>&1

To run this program as script –> ./main.sh, then we can get a reply result as below screen dump, and with voice reply, too.

speech-main

Reference Document:

How to Capture Weather Forecast from web using Raspberry Pi’s Python Program

Introduction

We can use python to develop a program to capture any city’s weather forecast from openweathermap.org web site under our Raspberry Pi computer. I list our program and screen capture result in the following for your reference.

Program Source Code under Python ver 3 as below:

import urllib.request,json

city = input(“Enter City: “)

def getForecast(city) :
    #url = “http://api.openweathermap.org/data/2.5/forecast/daily?cnt=7&units=meteric&mode=json&q=”
    #url = “http://api.openweathermap.org/data/2.5/forecast/city?id=524901&APPID=42443ecbdcad3d01842205e3745895cd”
    #url = “http://api.openweathermap.org/data/2.5/forecast/daily?cnt=7&units=meteric&mode=json&q=LONDON&lang=zh_cn&APPID=42443ecbdcad3d01842205e3745895cd”
    url = “http://api.openweathermap.org/data/2.5/forecast/daily?cnt=7&units=meteric&mode=json&q=”
    url = url + city + “&lang=zh_cn&APPID=42443ecbdcad3d01842205e3745895cd”
    req = urllib.request.Request(url)
    response=urllib.request.urlopen(req)
    return json.loads(response.read().decode(“UTF-8”))

forecast = getForecast(city)

print(“Forecast for “, city, forecast[‘city’][‘country’])

day_num=1
for day in forecast[‘list’]:
    print(“Day : “, day_num)
    print(day[‘weather’][0][‘description’])
    print(“Cloud Cover : “, day[‘clouds’])
    print(“Temp Min : “, round(day[‘temp’][‘min’]-273.15, 1), “degrees C”)
    print(“Temp Max : “, round(day[‘temp’][‘max’]-273.15, 1), “degrees C”)
    print(“Humidity : “, day[‘humidity’], “%”)
    print(“Wind Speed : “, day[‘speed’], “m/s”)
    print()
    day_num = day_num+1

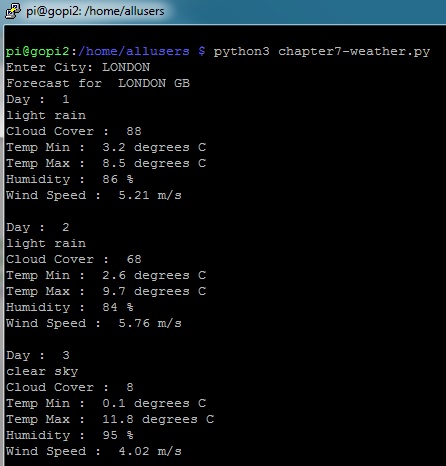
Screen Dump Result as below:

weather-pi

Further Development:

This function can be further developed to save weather forecast data to database, and then display in a chart format on screen. I may do it if I have time in future.

Network Communication Script for Raspberry Pi

Introduction

We can use python programs to start a server side and client side network communication service and allow them to transmit message  to each other under a Raspberry Pi. For example, we start two LXTerminal Sessions under a Raspberry Pi (or two difference Pi), and then run the following script.

In Server Side, run the following script:

import socket
comms_socket = socket.socket()
comms_socket.bind((‘localhost’, 50000))
comms_socket.listen(10)
connection, address = comms_socket.accept()
while True:
    print(connection.recv(4096).decode(“UTF-8”))
    send_data = input(“Reply: “)
    connection.send(bytes(send_data, “UTF-8”))

In Client Side, run the following script:

import socket
comms_socket = socket.socket()
comms_socket.connect((‘localhost’, 50000))
while True:
    send_data = input(“message: “)
    comms_socket.send(bytes(send_data, “UTF-8”))
    print(comms_socket.recv(4096).decode(“UTF-8”))

The testing result is shown as below screen dump for your reference:

network-communicate-pi

Most Easy Way to Start a Web Server Service Using Python

Introduction

Although it is easy to start-up IIS under Window O/S or Apache under Unix O/S, we still have another choice to start a web server service using Python programming tools. You only need to install python, and then start python and run the following script line by line:

import http.server, os
#define the server document directory with unix path;
os.chdir(“UsersadministratorDocuments”)
#if it is window env with directory as c:UsersadministratorDocuments
os.chdir(“/Users/goldmanau/Documents”)
httpd = http.server.HTTPServer((‘127.0.0.1’, 8000),
http.server.SimpleHTTPRequestHandler)
httpd.serve_forever()

This script can work under either python 2.7 or 3.x version under window or Unix environment. If you put the index.html to the server document path, then, you can start a web browser and input the link as http://127.0.0.1:8000/index.html in order to display your web page. It is the most easy, simple, fast way to start a web server service.

Setup to upload & access Dropbox on Raspberry Pi

Introduction

If you want to upload file from or to DropBox through Raspberry Pi, it is easy to do so. The following will show you a a installation program and its setup steps.

Step 1. Setup DropBox account and apps from web

First of all you need a DropBox account and apps account through the following links. Hop on over to dropbox is free.

http://www.dropbox.com

You then need to visit this link https://www.dropbox.com/developers/apps, login to DropBox and create an “app” by clicking the “create app” button.

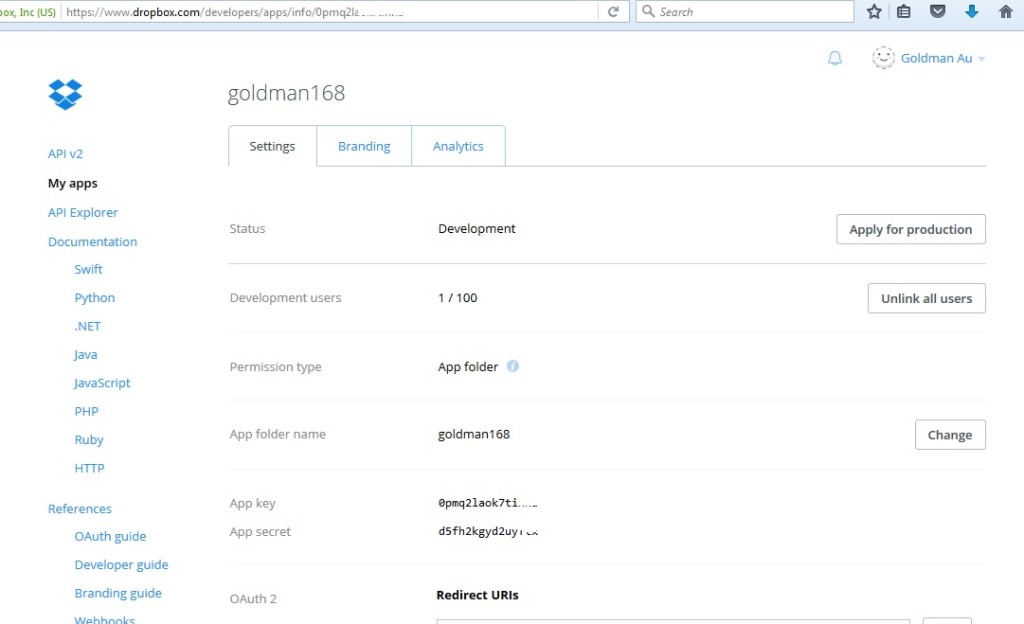
Then choose “Dropbox API app”, “Files and Datastores”, and answer the final question “Can your app be limited to its own, private folder?” – either answer is OK, depending on your needs. The result will be as below:

raspberrypi-dropbox0

Step 2. Set Up DropBox Uploader in Raspberry Pi

Get Dropbox Uploader onto your Pi

$ cd ~    (this ensures you are in /home/pi)
$ git clone https://github.com/andreafabrizi/Dropbox-Uploader.git
$ ls

(If this fails, you may need to install git with sudo apt-get install git-core)

You should be able to see a directory called Dropbox-Uploader

$ cd Dropbox-Uploader
$ ls

You should now see three files, one of which is called dropbox_uploader.sh. This is the script we’re going to use.

$ ./dropbox_uploader.sh

Run the script with ./dropbox_uploader.sh (if it fails, try chmod +x dropbox_uploader.sh)

If access right problem still occurs, run the following command:

$ sudo ./dropbox_upload.sh

Sorting out the DropBox API keys and authorization. You need to give your app a unique name, and you will be assigned some keys to go with the name. Now you need to enter your app’s DropBox API keys and secret. Once you’ve entered your keys and answered the question “app” or “full”, your Pi will request an authorisation token and you will be given a web URL you need to visit to activate it…

The following is the whole setup screen dump from my Raspberry Pi for your reference:

pi@gopi2:~ $ git clone https://github.com/andreafabrizi/Dropbox-Uploader.git
Cloning into ‘Dropbox-Uploader’…
remote: Counting objects: 718, done.
remote: Total 718 (delta 0), reused 0 (delta 0), pack-reused 718
Receiving objects: 100% (718/718), 213.12 KiB | 190.00 KiB/s, done.
Resolving deltas: 100% (369/369), done.
Checking connectivity… done.

pi@gopi2:~ $ cd Dropbox-Uploader

pi@gopi2:~/Dropbox-Uploader $ ls
CHANGELOG.md dropbox_uploader.sh dropShell.sh LICENSE README.md

pi@gopi2:~/Dropbox-Uploader $ ./dropbox_uploader.sh
This is the first time you run this script.
1) Open the following URL in your Browser, and log in using your account: https://www.dropbox.com/developers/apps
2) Click on “Create App”, then select “Dropbox API app”
3) Now go on with the configuration, choosing the app permissions and access restrictions to your DropBox folder
4) Enter the “App Name” that you prefer (e.g. MyUploader271401743117612)
Now, click on the “Create App” button.
When your new App is successfully created, please type the
App Key, App Secret and the Permission type shown in the confirmation page:
# App key: 0pmq2laok7xxxxx
# App secret: d5fh2kgyd2xxxxx
Permission type:
App folder [a]: If you choose that the app only needs access to files it creates
Full Dropbox [f]: If you choose that the app needs access to files already on Dropbox
# Permission type [a/f]: a
App key is 0pmq2laok7tinna, App secret is d5fh2kgyd2uyftx and Access level is App Folder. Looks ok? [y/n]: y
Token request… OK
Please open the following URL in your browser, and allow Dropbox Uploader to access your DropBox folder:
https://www.dropbox.com/1/oauth/authorize?oauth_token=qH829qJuKZpxxxxx
Press enter when done…
Access Token request… OK

Finally, your DropBox account connected to your “app”

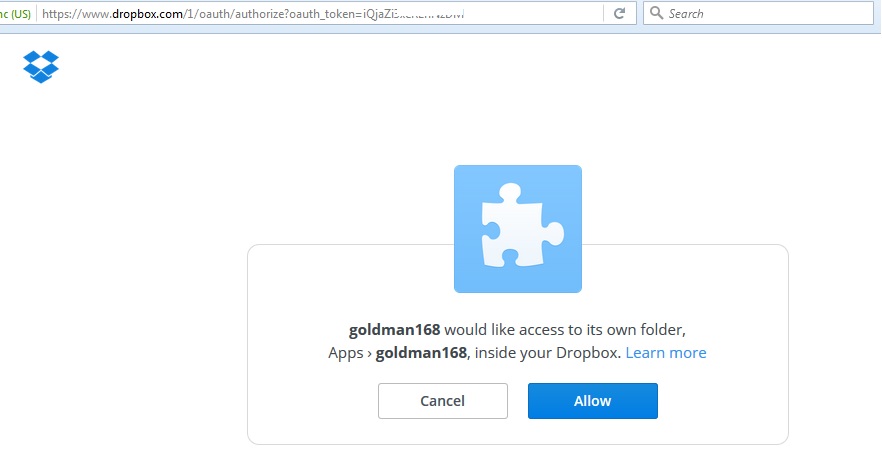
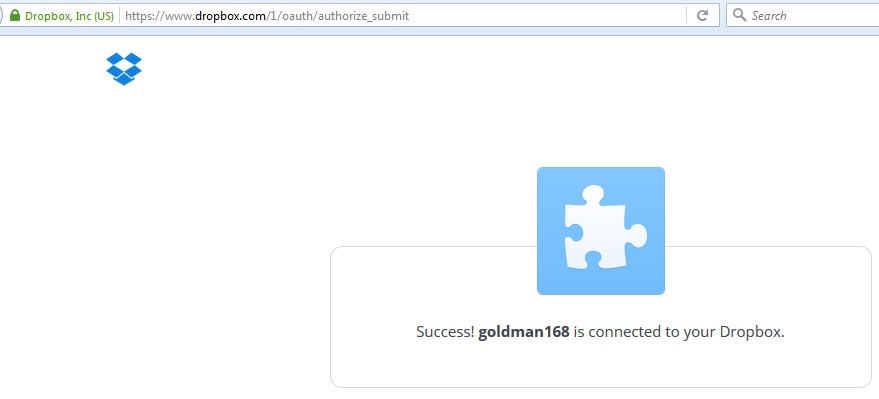
Besides Raspberry Pi operation, you also need to allow the access of Dropbox from Raspberry Pi as below two screens:

raspberrypi-dropbox1

raspberrypi-dropbox2

Step 3. Now you can test to upload from Raspberry Pi to DropBox

$ cd home/pi/Dropbox-Uploader
$ ./dropbox_uploader.sh upload /home/pi/upload_file_fr name_of_upload_file_to

This will upload the file you choose to your DropBox account.

…or use it in a Python script like this…

from subprocess import call  
photofile = “/home/pi/Dropbox-Uploader/dropbox_uploader.sh upload /home/pi/photo00001.jpg photo00001.jpg” 
call ([photofile], shell=True)

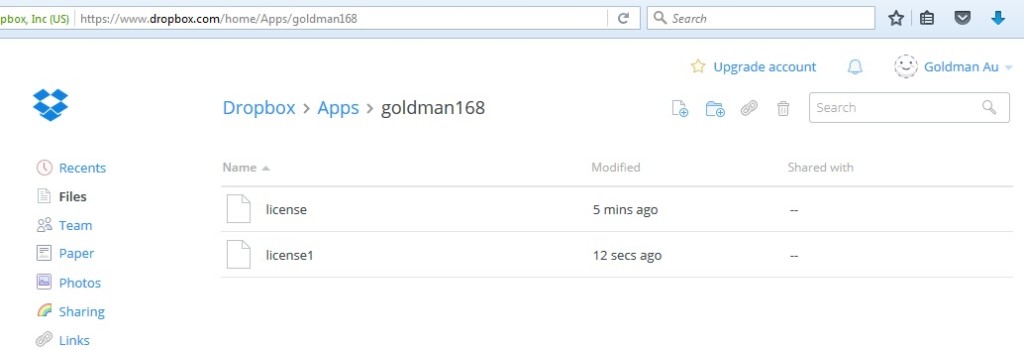
If we upload “license” & “license1” files to Dropbox, it will show the result as below:

raspberrypi-dropbox3

Finally, if you look at the DropBox Uploader documentation, there’s a lot more commands you can make use of…

  • upload
  • download
  • delete
  • move
  • list
  • share
  • mkdir