Installing pandas with Anaconda

Installing pandas and the rest of the NumPy and SciPy stack can be a little difficult for inexperienced users.

The simplest way to install not only pandas, but Python and the most popular packages that make up the SciPystack (IPython, NumPy, Matplotlib, …) is with Anaconda, a cross-platform (Linux, Mac OS X, Windows) Python distribution for data analytics and scientific computing.

After running a simple installer, the user will have access to pandas and the rest of the SciPy stack without needing to install anything else, and without needing to wait for any software to be compiled.

Installation instructions for Anaconda can be found here.

A full list of the packages available as part of the Anaconda distribution can be found here.

An additional advantage of installing with Anaconda is that you don’t require admin rights to install it, it will install in the user’s home directory, and this also makes it trivial to delete Anaconda at a later date (just delete that folder).

Windows Install

Download the Anaconda installer and double click it.

NOTE: If you encounter any issues during installation, please disable your anti-virus software.

TIP: The installer may also run in silent mode, without bringing up the graphical interface. To install Anaconda in this mode, type the following command into a command prompt, replacing the file name with the name of your downloaded install file:

Anaconda-2.4.0-Windows-x86_64.exe /S /D=C:Anaconda

The /D option specifies the install location. Quotes are not allowed here, even if there are spaces in the install location. For example, instead of /D="C:Program FilesAnaconda", use /D=C:ProgramFilesAnaconda.

Windows Uninstall

Click on “Add or remove Program” in the Control Panel, and select “Python 2.7 (Anaconda)”.

Updating from older Anaconda versions

You can easily update to the latest Anaconda version by updating conda, then Anaconda as follows:

conda update conda
conda update anaconda

Diary of IT Man – Handling of Staff Termination

Today, I need to handle the MIS work for termination of a high level staff. Very sad….

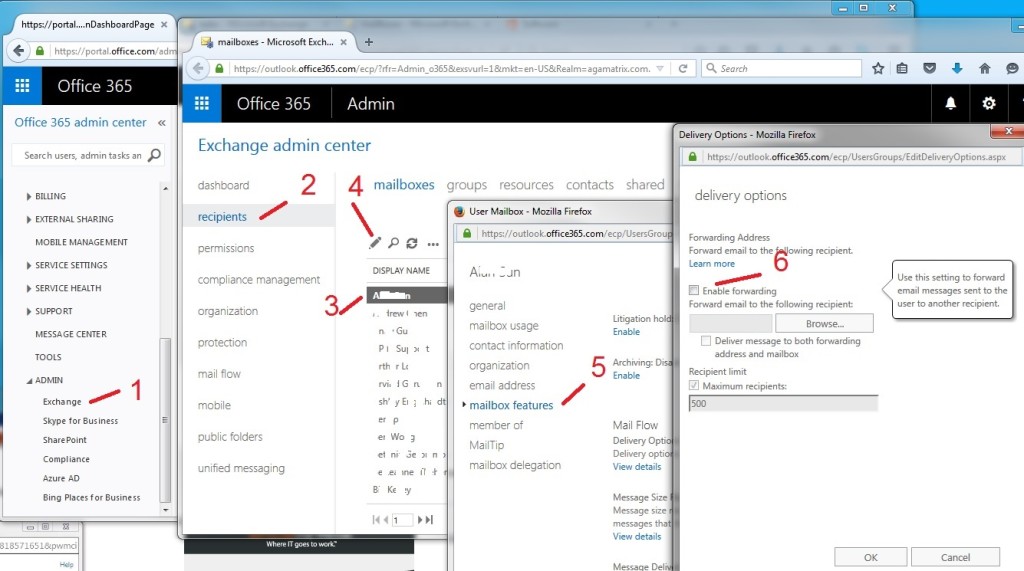
I need to setup email forwarding and password reset. Here is the step to forward 365 Email Account to another account :

1.Log into the portal as the admin, Under the Admin link, select Exchange.
2.Then select Recipients.
3.Select Mailboxes, then click the name of the user whose email you want to forward
4.Select the Edit icon (little pencil).
5.Now select Mailbox Features from the left and scroll down to the Mail Flow section, and click View details.
6.In the delivery options, Check the box next to Enable Forwarding, then select the email address to forward to using the browse button. Now you can tell it whether to continue delivering email tot he original mailbox or not. Hit save and this should start forwarding new emails immediately.

365EmailAccount-ForwardingSetup


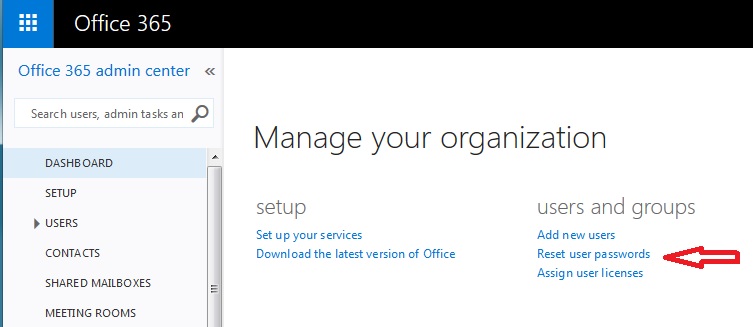
7. Reset Email Password as below:

365Email-Reset-Pwd


Install Python’s Django on Windows

This document will guide you through installing Python and Django for basic usage on Windows. This is meant as a beginner’s guide for users working on Django projects and does not reflect how Django should be installed when developing patches for Django itself.
The steps in this guide have been tested with Windows 7 and 8. In other versions, the steps would be similar.

Install Python

Django is a Python web framework, thus requiring Python to be installed on your machine.

To install Python on your machine go to https://python.org/download/, and download a Windows MSI installer for Python. Once downloaded, run the MSI installer and follow the on-screen instructions.

After installation, open the command prompt and check the Python version by executing python --version. If you encounter a problem, make sure you have set the PATH variable correctly. You might need to adjust your PATHenvironment variable to include paths to the Python executable and additional scripts. For example, if your Python is installed in C:Python34, the following paths need to be added to PATH:

C:Python34;C:Python34Scripts;

Install Setuptools

To install Python packages on your computer, Setuptools is needed. Download the latest version of Setuptools for your Python version and follow the installation instructions given there.

Install PIP

PIP is a package manager for Python that uses the Python Package Index to install Python packages. PIP will later be used to install Django from PyPI. Python 3.4 and later include pip by default [1], so you may have pip already.

Install Django

Django can be installed easily using pip.

In the command prompt, execute the following command: pip install django. This will download and install Django.

After the installation has completed, you can verify your Django installation by executing django-admin --version in the command prompt.

Changed in Django 1.7:In Django 1.7, a .exe has been introduced, so just use django-admin in place of django-admin.py in the command prompt.

See Get your database running for information on database installation with Django.

Common pitfalls

  • If django-admin only displays the help text no matter what arguments it is given, there is probably a problem with the file association in Windows. Check if there is more than one environment variable set for running Python scripts inPATH. This usually occurs when there is more than one Python version installed.

  • If you are connecting to the internet behind a proxy, there might be problem in running the commands easy_installpip and pip install django. Set the environment variables for proxy configuration in the command prompt as follows:

    set http_proxy=http://username:password@proxyserver:proxyport
    set https_proxy=https://username:password@proxyserver:proxyport

    Git Installation

    • download from http://git-scm.com/download/win

    • Run UNIX command under Window Environment.